Envato Tuts+ Tutorials |
- How to Protect the BMPCC With a Cage and Add-ons
- How to Set Up the Blackmagic Pocket Cinema Camera: Quick Start Guide
- How to Make HDR Exterior Architecture Photos With Adobe Camera Raw
- 3 Top Merchandising Video Templates for Premiere Pro: Retail and Digital Sales
- Understanding and Configuring the WordPress robots.txt File
- How to Build a Draggable JavaScript Image Gallery With GSAP
- 15 Inspiring Public Speaking Quotes (Famous, Funny, & Fear-Reducing)
- How to Present a PowerPoint Presentation on Google Meet
- 31+ Best Responsive WordPress Themes (For Sites in 2021)
- Change the WordPress Logo Size
- 43 Best Music Flyer Templates (PSDs and Using a Music Flyer Maker)
- How to Make a Newspaper Template in InDesign
| How to Protect the BMPCC With a Cage and Add-ons Posted: 30 Jul 2021 03:04 PM PDT The Blackmagic Pocket Cinema Camera is a great filmmaking tool at a reasonable price, but it's had more than its fair share of issues, leaving users frustrated and often with an expensive repair to pay for. Here we'll take a look at how you can protect your BMPCC, and although this article specifically references the 4K model, you'll find there's a lot of overlap and much of it applies to the 6K, 6K Pro and other Blackmagic cameras. We'll go through a few frequent problems that can occur with a Blackmagic Pocket Cinema Camera and how you can try and prevent those from happening. Any suggestions for kit are purely based on personal experience and are there to give you a guide, they're not an advert. How to Protect the BMPCC with a Cage and MoreProblem: Physical Damage to the Camera BodyWhether it's day to day wear and tear or something more serious like dropping the camera, it's very easy to damage the body. The Blackmagic PCC is light and the shell is delicate. It doesn't take much to scuff it, crack it, or worse. Solution: Add a Protective CageAdding a cage to your Blackmagic is a great way of protecting it because you're literally adding an extra tough buffer around your camera.    We use a SmallRig cage which has been updated to fit both the 4K and 6K body. The good thing about adding a cage to the BMPCC is that as well as protection, it can also really improve functionality.    The cage comes as one solid piece that you screw to the camera top and bottom. As with most attachments, a cage isn't something you should be taking off and putting on all the time, so cages are designed with the view of attaching things to them rather than directly to the camera, something that again will help to protect the camera from scrapes and bumps.    Some things you can attach to a cage are:
A handle is definitely something I'd recommend you get in addition to a cage. Carrying the camera even with the cage attached can be clumsy and awkward – you're more likely to drop it – so adding a handle means you've got a secure way to carry your camera. One extra useful thing about a cage is that it's still possible to use a gimbal with it, which is more protection plus no hassle of derigging and reattaching each time. Solution 2: A Padded BagTry to invest in a good padded bag for your camera, with enough compartments for extra lenses and any other kit you regularly carry around. Remember to measure your camera with any extra regular attachments – like the cage – so that you can fit it in the bag without having to dismantle anything first.    You won't always necessarily be the one carrying your kit – although if you're wise, you'll try to be – and your bag should provide enough protection, should someone plonk it down or bash it against something while moving it. Problem: The WeatherThis is an issue with all cameras, so it's not Blackmagic PCC specific; they're just not designed to be out in the rain, and that's fair enough! Sometimes it's inescapable though and you'll need to protect your gear from water damage. Solution: Waterproof Cover or a Bin LinerYou can get a specially made waterproof cover – or wetsuit – for the Blackmagic Pocket Cinema Camera. The main issue with these though is that they tend not to be flexible to how you might be using your camera. For the most part they assume you're shooting handheld and with minimal add-ons, so they're not going to easily fit around a cage, tripod or gimbal. Waterproof covers can often be a faff to put on, costing you precious time while your camera gets wet. Many filmmakers tend to keep a bin liner in the camera bag to pop over the top of the camera when it starts to rain. The benefit of a binbag is that it's large enough to go over a tripod (and cage) if you're using one, and if you still need to shoot while it's raining, you can tear a hole to poke the lens through. The simplest solutions are often the best! Problem: Inputs/Outputs Coming Loose or Falling Inside of CameraThe inputs on the Blackmagic Pocket Cinema Camera have been notoriously weak, with bits breaking off, the socket coming out when a cable is pulled, and even the fixings being pushed inside the camera. Solution: Protect Inputs/OutputsIt's frustrating to bolt stuff onto the camera just to protect what's already there, but it really is the best way to help prevent something that might be a costly fix, later.    The main problem with inputs and outputs is that you're constantly pushing and pulling cables in and out of them. The best way to avoid this is to attach an extension so that you're pulling your cables in and out of that, rather than the camera itself.    For example, we use a Smallrig HDMI & Type-C Right-Angle Adapter which plugs into the camera to give you the same sockets but at a right-angle to the originals, which also serves the function of making them more easily accessible! To save space on the body, the Blackmagic Pocket Cinema Camera has a mini XLR input for microphones, and you'll know that microphones tend not to support that anyway, so you'd need a converter from XLR mini to regular XLR. If you add a microphone mount to your cage, then you can have the cable always attached and again that will prevent the constant need to add and remove the cable. SummaryAlthough the Blackmagic Pocket Cinema Camera can be a little delicate, there are definitely some things you can do to protect it that won't break the bank.
Try These DaVinci Resolve Templates |
| How to Set Up the Blackmagic Pocket Cinema Camera: Quick Start Guide Posted: 30 Jul 2021 02:49 PM PDT The Blackmagic Pocket Cinema Camera has been revolutionary for filmmakers, providing a portable film camera that shoots great quality footage and is available at a reasonable price for the features. It's not without its problems though too, and we'll look at some of those and how to get around them in this quick-start guide.    This is the second version of the camera, and currently there are three models:
Aside from the increase in resolution with a larger sensor, the main changes seem to be Blackmagic Design ironing out some of the main kinks of the first-generation PCC, including a new tilting screen and built in neutral density filters. Although this article is about the BMPCC 4K, there's a lot of overlap and much of the advice will be the same, including for earlier cameras. When it comes to adding a cage, make sure you double-check your camera's body size to be sure it'll fit. 1. Internal SettingsRecording CodecsIf you're unsure about what codecs are or what that means in terms of what you should use, then check out What is a Video Codec for a run-through of how they work. Generally though, a safe bet for filmmakers is to use ProRes 422 or ProRes 422 4K. Although there are a lot of options, this setting is a good balance between quality and file size. If your ultimate output will be in HD then you might prefer to record in HD, forgoing the option of 4K to keep your file sizes down. Conversely, shooting in 4K with an intended HD output will give you other options, like cropping or reframing interview subjects for variety without needing a second camera.    Look-up Tables (LUTs)You can apply a LUT in camera so that your otherwise flat raw profile looks better to view on your monitor. The best way to do this for most people is to preview the LUT in your in-camera view, without applying the look to the footage directly. This way you can later apply the same LUTs in your post-production software, while keeping all the original raw data in the recordings. There is the option to apply the LUT to the footage while recording, effectively flattening it and baking in the look, but it's probably best not to do this unless you are on a very tight production timeline. Focus AssistFocus assist is another useful tool to adjust when you're getting started. It has different intensities and also lets you change the colour. The screen is quite small and hard to see in bright sunlight, so the focus assist can be really useful in making sure you nail your focus, particularly if you're shooting people when soft facial features would be really noticeable. An extra benefit to focus assist is it actually lets you see if your footage is becoming noisy, as it starts to highlight the grain as focus points. Again, really useful when it's difficult to see your screen clearly. 2. StorageThe Blackmagic Pocket Cinema Camera will take a CF card, SD card and an external hard drive. It's important to check which storage cards or devices are compatible with your camera, though. For example, when it comes to the BMPCC 4K it will only take a CF2 card (CF doesn't work at all) and will record onto a Samsung T5 external SSD but not the newer T7.    You might also need to purchase a separate data cable for your SSD, depending on what it comes with. Again, the Samsung T5 comes with a cable that doesn't have a fast enough data transfer speed, so that needed upgrading. We've also had a data cable fail, so if you're buying one remember to buy a spare. 3. BatteryThe BMPCC comes with a battery, but like most film cameras today it's woefully inadequate for any long-term shooting, it lasts about 20 minutes continuously and that's if you're only shooting HD, at 4K you can expect it to die even sooner.    An external battery is definitely something to invest in sooner rather than later and if you shoot hand-held. A battery changes the grip, too, and you'll find that this extra bit bolted onto the camera also helps it feel more secure in your hands. 4. MicrophoneThe camera has onboard mics with two sources for stereo recording. While the internal microphones aren't bad, you'll probably want to add a mic at some point. To save space, the BMPCC has a mini XLR input (as well as a 3.5mm jack) and microphones tend not to support that, so as well as a mic, you'll need a convertor from mini XLR to regular XLR. Add a microphone mount and then you can keep the cable attached all the time.    5. Protecting the Blackmagic Pocket Cinema CameraThe BMPCC feels – and in many ways, is – a delicate thing and there have been problems aplenty with it. So much so that we're going to dedicate another tutorial to how you can protect your PCC and avoid some of the pitfalls others have had happen, like broken inputs and general damage and cracking to the body.    I recommend that you get a cage for your body, it'll help protect it from knocks and wear and tear, but it's also a useful platform to bolt other things onto, like the microphone mount I mentioned earlier, but we'll go into all of that in a lot more depth in the next tutorial. 6. LensesThe Blackmagic Pocket Cinema Camera doesn't come with a lens as standard, so remember to factor that into your costs as it'll bump it up a fair bit. If you're moving across to Blackmagic from another camera then you might want to invest in a decent lens mount so that you can port your old lenses across to your new camera. If you're starting from scratch then get yourself a good allrounder to start with, something like a 14-140mm that's going to cover a lot of your bases. Although the BM doesn't have image stablisation, many lenses do and when you attach one of those you'll be able to switch that option on in your Setup menu. 7. Notable FeaturesDual Native ISOThis is a very cool feature that takes a little bit to get your head around because it's so different to what we're used to when shooting either photo or video. Usually, your sensor will have a circuit for each photosite/pixel in the sensor. With dual native ISO there are two. As you increase the ISO, the level of noise or grain you introduce to the image increases, that is until you hit the point when that second circuit kicks in. Suddenly you have much more light and far less noise at much higher ISOs, which feels very counter-intuitive. In real terms, you can get the same result from 25,000+ ISO as you can from 3200 on a regular camera without dual native, which is just incredible. TouchscreenThe touchscreen is great for adjusting settings while recording. Some options are locked out, but lots are available for 'one touch' settings, like exposure, white balance, audio input etc. Also you can swipe the screen to hide the settings and take advantage of the full view. One of the problems with the screen is it's quite small and the earlier models don't tilt, making it quite impossible to see what you're shooting if you're above eye height or on a bright day. It's worth adding an external monitor if you can or, at the very least, buying a sunshade for the screen.    DaVinci ResolveIf you're buying your BMPCC new then you'll get a copy of DaVinci Resolve which is an excellent all-in-one editing suite, and it's particularly noted for its colour correction tools. There are also a ton of LUTs and templates available to make use of too, so it's certainly worth getting to grips with. ConclusionThe Blackmagic Pocket Cinema Camera series has made high-quality filmmaking portable and affordable. As with everything, there's a trade-off, and the BMPCC undoubtedly has its issues. Some of these have been solved in later models, and some… well some are still causing the forums to be lit up in fury or frustration on a regular basis. I think that the benefits of the BMPCC far outweigh the negatives, but there are some really important things to remember:
DaVinci Resolve Tutorials and Templates |
| How to Make HDR Exterior Architecture Photos With Adobe Camera Raw Posted: 30 Jul 2021 02:03 PM PDT Although the thought of high dynamic range photography can make some people cringe, it can be really useful. Real estate companies, for example, like to use HDR to make everything look clearer, brighter and more detailed, but often you might want to use HDR in architecture photos for practical reasons. In this tutorial you'll learn how to make an HDR photo of a building using Adobe Camera Raw Before You StartIf you're new to HDR photography, you can read How to Make HDR Photographs With Automatic Exposure Bracketing to help you with shooting multiple images in preparation for merging them to one HDR photo. How to Merge and Edit High Dynamic Range Photos in Adobe Camera Raw will take you through how to merge your photos in Adobe Camera RAW. I'll touch on this briefly in this tutorial but for a more in-depth look at your options and best practice it's worth reading the article first. How to Make a High-Dynamic Range Architecture Photo With Adobe Camera RawYou can't control the weather when you're shooting externally, and you can't always choose your time of day either. This means you might have one side of the building in bright sunshine, or completely in shade, or a frustrating mix of both. Using HDR can help you balance photographs, not only individually once merged, but when compared as part of a set – if you're photographing the same building front and back for example. Open and Merge Your Images in Adobe Camera RawLet's get started.    This is how I'd expose the image if I was only taking one shot. The exposure is slightly to the right, or over-exposed, so that the shadows are recoverable. You can still see from the histogram that the light areas are too bright, beyond recovery in fact. This is often a problem when photographing a building in its entirety. By shooting three images with a stop or two below and above the centre image, I can increase the dynamic range available to me by having the 'best' parts of the exposures of all three. Select all the images in your film-strip, right-click and choose Merge to HDR.    You'll see a preview of the image. Selecting Deghost (either low, medium, or high) will make the process longer but is better for handheld images or for photos where something in the photo (like the tree in mine, for example) might have moved. Deghost will take into account any differences in the image from movement and merge them cleanly, without any odd halos or glow from the overlap. Because of this, you might lose some edges due to cropping.    You can see from the merged image and the histogram now that things are much more balanced. You might notice the image is very saturated. That's partly an effect of HDR but also it's to be expected from the weather and time of year it was taken. Apply Profile Correction and StraightenLet's clean things up a little now.    The merge process will apply the Basic adjustments that it thinks balances the image, but it won't apply profile corrections or straighten your image, both things that might be required, particularly if you've photographed with a wide lens and may have some barrelling. Depending on your style of photography, you might also want to straighten the vertical lines in your image at this point. Under Geometry > Manual Transformations, adjust the Vertical slider until the lines vertical lines run parralel. Colour CorrectionRather than starting with reducing the Vibrance or Saturation in the Basic panel, I like to start with Colour Mixer.    You can sometimes take the harshness from some colours by shifting their Hue. For example I find that the luminous greens of grass can be offset with some yellow/orange, while bright blue skies can move away from aqua towards purple. You can also dip the Luminance of those colours slightly but try not to go too far with it or your photo will start to look strange and flat    Local AdjustmentsYou can learn how to use the Local Adjustments tool and what each targeted adjustment does in our article How to Use Brushes and Filters in Adobe Camera Raw (Make Selective Adjustments). Hopefully your HDR technique will have balanced the exposure of your image but you can still draw attention to architectural interest like brickwork and windows by using local adjustments.    Use your paintbrush to make targeted changes like making windows brighter and adding more clarity and texture to bricks. Put Your Stamp On ItFinally, add the touches that make your work distinct and crop to suit or if needed. If you're presenting to a client then basic edits and a natural look might be as far as you go, but if you're experimenting with HDR for yourself then try a slightly different edit ready for a fine art print, or to use in a written piece or blog.    I always think the thing to remember about HDR is that it gives you more flexibility but (unless you're deliberately going for an unrealistic look) requires subtly and generally a pulling back of saturation and contrast. HDR is really useful for low-light and night time photography too, though you might find you'll need a tripod for those so that you don't end up with too much movement and subsequent ghosting. The great thing about HDR in ACR is that the file saves separately from your original multi-image shot, and like all ACR images it saves with sidecar data, so you can revert to your original at any point, meaning you can experiment a bit and give something different a try! Learn How To Do More With Adobe Camera Raw
 |
| 3 Top Merchandising Video Templates for Premiere Pro: Retail and Digital Sales Posted: 30 Jul 2021 07:58 AM PDT Try some of our top templates for Premiere Pro to help you market and sell your merchandise by creating eye-catching and engaging video!    Top Video Templates to Sell MerchandiseCheck out our favourite templates for Merchandise for Premiere Pro, available from Envato Market and Envato Elements. Product Sale & Discount PromoFeatured Merchandising Video Template From Envato ElementsTry this brightly coloured template to help you move your products with a well-timed promotion. Featuring animated shapes and lines, it's bound to catch your customers' attention. Space for a product picture is front and centre, and there's plenty of room for product information and pricing. Urban Instagram PromoA fashionable and fast-paced Premiere Pro template with an urban style. This would work particularly well for merchandise like apparel but could easily be customised to suit other merchandise too. Posters SalesEnvato Market OptionA pack of 16 'posters' to show off your merchandise and build sales. Whether you want to promote a specific product, or you're having a special event, this Premiere Pro (2019+) template set will have something for you. Try More Video AssetsThe following resources are all from Envato Elements and included in a monthly subscription so why not give them a try! Woman using smartphone to buy merchandise – Stock FootageStock footage of a woman buying merchandise, with greenscreen. 65 Merchandising Line Icons – IconsA set of cute, merchandising-themed icons including window and in-store displays. Daily Notes—FontA brand new handwritten font that's clear to read and feels friendly and personal.    More Video Resources From EnvatoLearn Photo and Video Post-Production with Envato Tuts+Premiere Pro FAQs
Free Video Courses: Follow Envato Tuts+ on YouTubeAdobe Premiere Pro has lots of great features. Learn more in oour free course, Ultimate Premeire Pro FAQ. More Resources From EnvatoEnvato has lots of resources to try. PlaceIt lets you make high quality motion graphics in your browser, no software needed. Envato Studio connects you with creative talent for your projects. Reshot has free photos, icons, and graphics. Twenty20 has a diverse library of stock photography and thoughtfully curated collections. More Top Resources for Premiere Pro |
| Understanding and Configuring the WordPress robots.txt File Posted: 30 Jul 2021 07:42 AM PDT One of my previous tutorials covered the basics of understanding and configuring the .htaccess file in WordPress. The robots.txt file is a special file just like the .htaccess file. However, it serves a very different purpose. As you might have guessed from the name, the robot.txt file is meant for bots. For example, bots from search engines like Google and Bing. This tutorial will help you understand the basics of the robots.txt file and how to configure it for WordPress. Lets get started. Purpose of the robots.txt FileAs I mentioned earlier, the robots.txt file is meant for scraping bots. These are mainly search engines but can include other bots as well. You might already know that search engines find all the pages and content on your website by crawling it—moving from one page to another through links either on the page itself or in the sitemap. This allows them to collect data from your website. However, there could be some pages on a website that you don't want the bots to crawl. The robots.txt file gives you the option to specify which page they are allowed to visit and which pages they shouldn't crawl. Please note that the instructions you provide in the robots.txt file are not binding. This means that, although reputable bots like the Google search crawler will respect the limitations in robots.txt, some bots will probably ignore whatever you put in there and crawl your website anyway. Others might even use it to find links that you specifically don't want crawled and then crawl them. Basically, it is not advisable to rely on this file to prevent malicious bots from scraping your website. It is more like a guide that good bots follow. Where Should I Put My robots.txt File?The robots.txt file is supposed to be in the root directory of your website. This is different than .htaccess files which can be placed in different directories. The robots.txt file only works if it is in the root directory and is exactly named robots.txt. You can create this file manually and place it inside your web root directory if it doesn't already exist. Understanding the Contents of the robots.txt FileThe robots.txt file will tell different bots what they should and should not crawl on your website. It uses a bunch of commands to do that. Three such commands that you will use very often are The The The You are only allowed to provide one directory or webpage for each User-Agent: * Disallow: /uploads/ Disallow: /includes/ Allow: /uploads/images/ Disallow: /login.php In the above example, we told the bots that they shouldn't crawl the contents of the uploads directory. However, we use the Any bot will assume that it is allowed to crawl all pages that you have not explicitly disallowed. This means that there is no need for you to allow crawling of directories one at a time. You should also keep in mind that the values you provide are case-sensitive. The bots will treat The robots.txt file can also contain link to one or more sitemaps on your website. This makes it easier for bots to find all the posts and webpages on your website that you want them to crawl. Configuring the robots.txt File in WordPressIt is important to be careful when you are creating a robots.txt file to go along with your WordPress website. This is because small mistakes or oversights can prevent crawling of content on your website by search engines. All the work that you put into SEO will be in vain if the search engines can't even crawl it. A good rule of thumb is to disallow as little as possible. One approach is to just put the following in your robots.txt file. This basically tells all the bots that they are free to crawl all content on the website. User-agent: * Another option is to use the following version which tells them to avoid crawling the wp-admin directory but still crawls all the other content on the website. We also provide a link to the sitemap of the website in this example but that is entirely optional. User-agent: * Disallow: /wp-admin/ Allow: /wp-admin/admin-ajax.php Sitemap: https://your-website.com/sitemap.xml It is important to not be too aggressive with the When You Shouldn't Be Using robots.txtAs I have mentioned before, the robots.txt file is not used to enforce any rules. The rules you specify in the file are only to be used for providing guidance to good and obedient bots. This basically means that you should not be using this file in order to restrict access to some content on your website. There are two common situations that you might face if you used robots.txt file for this purpose. Even though malicious bots won't follow the guidelines provided in robots.txt, they could still use it in order to figure out exactly what you don't want them to crawl. This could possibly inflict more damage if you were using this file as a security measure. This file isn't helpful in preventing your webpages from appearing in search results either. The webpage you are trying to hide will still show up in search results but its description would simply say No information is available for this page. This can happen when you block Google from reading a certain page with the robots.txt file, but that page is still being linked to from somewhere else. If you want to block a page from appearing in search results, Google recommends using the There's an easy way to do this if you are using WordPress. Just go to Settings > Reading in the WordPress admin dashboard and then uncheck the Search engine visibility option.    Removing a webpage from search results requires you to take some other actions like removing the page itself from the website, password protecting it, or using the Similar to the robots.txt file, only well-behaved and trustworthy bots will respect the Final ThoughtsOur aim with this post was to introduce you to the basics of robots.txt file so that you can get an idea of what this file does. After that, we discussed the optimum configuration of robots.txt with respect to WordPress. We also saw how to set the In the end, I would like to repeat just one more time that you should not be using robots.txt to block access to sensitive content on the website. This will usually have the opposite effect with malicious bots!  |
| How to Build a Draggable JavaScript Image Gallery With GSAP Posted: 30 Jul 2021 06:46 AM PDT In a previous tutorial, we learned how to build a responsive image gallery with slick.js. Today, let's build something similar: a responsive image gallery with a draggable featured image/main slide. To make the target element draggable, we'll take advantage of GSAP's Draggable plugin. Sounds like a good exercise? What We're BuildingHere's the gallery that we're going to create: 1. Include the Required PluginsAs already discussed, to make the featured images draggable elements, we're going to use GSAP and specifically its Draggable plugin. Optionally, we'll also include InertiaPlugin (formerly ThrowPropsPlugin), a second GSAP plugin that will apply a momentum-based movement after the mouse/touch is released. It's worth noting that this is a premium plugin, and you have to sign up for a GSAP membership before deciding to use it. In our case, we're going to use a trial version that only works locally and on domains like codepen.io (see the browser console of the demo for more details). With all these in mind, we'll include three external JavaScript files. The first two are mandatory, while the third one is optional.   2. Define the HTML MarkupWe'll define a wrapper element that will contain two lists: the list of thumbnail images and the list of featured images. Both lists will include the same Unsplash images. These will have equal dimensions and be big enough to implement the draggable effect. By default, the first main slide will appear. But we can configure that behavior by attaching the In addition, all featured images will retain their original dimensions (1920 x 1280px). Here's the required structure for our demo page: <div class="gallery-wrapper"> <ul class="thumb-list"> <li class="is-active"> <img width="1920" height="1280" src="sports-car1.jpg" alt=""> </li> <li> <img width="1920" height="1280" src="sports-car2.jpg" alt=""> </li> <li> <img width="1920" height="1280" src="sports-car3.jpg" alt=""> </li> <li> <img width="1920" height="1280" src="sports-car4.jpg" alt=""> </li> </ul> <ul class="featured-list"> <li class="is-active"> <div class="featured-img" style="background-image: url(sports-car1.jpg); width: 1920px; height: 1280px;"></div> </li> <li> <div class="featured-img" style="background-image: url(sports-car2.jpg); width: 1920px; height: 1280px;"></div> </li> <li> <div class="featured-img" style="background-image: url(sports-car3.jpg); width: 1920px; height: 1280px;"></div> </li> <li> <div class="featured-img" style="background-image: url(sports-car4.jpg); width: 1920px; height: 1280px;"></div> </li> </ul> </div> 3. Specify the Main StylesWith the markup ready, we'll continue with the main styles of our gallery. For simplicity, I'll skip the introductory/reset ones. Also, I won't optimize or merge the common CSS styles, so it will be easier for you to understand what is going on. Be sure to see all of them by clicking the CSS tab of the demo. Set Gallery LayoutThe gallery will have a maximum width of 950px. On large screens (>750px), we'll have two columns. The thumbnails will appear on the left side, while the featured images will be on the right, like this:    Notice that the thumbnails will cover a quarter of the gallery width, while the featured images will cover three quarters. On small screens (≤750px), the thumbnails will sit underneath the featured image, like this:    Notice that each thumbnail will cover one quarter of the parent's width. Here are the associated styles: .gallery-wrapper { max-width: 950px; padding: 0 15px; margin: 0 auto; display: grid; grid-template-columns: 1fr 3fr; grid-gap: 15px; } .gallery-wrapper .thumb-list { display: grid; grid-gap: 15px; } @media (max-width: 750px) { .gallery-wrapper { grid-template-columns: 1fr; } .gallery-wrapper .thumb-list { grid-template-columns: repeat(4, 1fr); order: 1; } } Featured Slides VisibilityBy default, all featured slides will be hidden, apart from the active slide. Plus, only one featured slide (the active one) will appear at a time. Here are the associated styles: .gallery-wrapper .featured-list li { opacity: 0; transition: opacity 0.25s; } .gallery-wrapper .featured-list li.is-active { opacity: 1; } Position Featured ImagesOn large screens, both gallery columns will have the same height as they are grid items. The featured images though will be absolutely positioned elements and centered within their container. To view all their parts we have to drag over them. On small screens, as the columns are stacked and the featured images are still absolutely positioned, we should specify a fixed height for the right column. Here are the associated styles: .gallery-wrapper .featured-list { position: relative; overflow: hidden; } .gallery-wrapper .featured-list .featured-img { background-size: cover; background-repeat: no-repeat; background-position: center; z-index: 1 !important; position: absolute; top: 50%; left: 50%; transform: translate(-50%, -50%); } @media (max-width: 750px) { .gallery-wrapper .featured-list { height: 340px; } } Indicate Active and Hovered StatesEach time we hover over a thumbnail, its On the other hand, the active thumbnail will receive a red border color.  Here are the associated styles: /*CUSTOM VARIABLES HERE*/ .gallery-wrapper .thumb-list li { position: relative; cursor: pointer; border: 4px solid var(--black); } .gallery-wrapper .thumb-list li:not(.is-active):hover::before { content: ""; position: absolute; top: 0; left: 0; right: 0; bottom: 0; background: var(--hovered-thumb); } .gallery-wrapper .thumb-list li.is-active { border-color: var(--red); } 4. Add the JavaScriptLet's now give life to our gallery! Change SlidesEach time we click on a thumbnail, we'll perform the following actions:
   Here's the required code: const thumbList = document.querySelector(".thumb-list"); const thumbItems = thumbList.querySelectorAll("li"); const featuredList = document.querySelector(".featured-list"); const isActiveClass = "is-active"; thumbItems.forEach(function (el) { el.addEventListener("click", function () { thumbList.querySelector("li.is-active").classList.remove(isActiveClass); featuredList.querySelector("li.is-active").classList.remove(isActiveClass); let index = Array.from(thumbItems).indexOf(el); el.classList.add(isActiveClass); featuredList .querySelector(`li:nth-child(${++index})`) .classList.add(isActiveClass); }); }); Add Keyboard SupportLet's now enhance the user experience by providing support for keyboard navigation. More specifically:
Here's the required code: ... document.addEventListener("keyup", (e) => { if (e.keyCode === 38 || e.keyCode === 40) { const activeThumb = thumbList.querySelector("li.is-active"); // up arrow if (e.keyCode === 38) { if (activeThumb.previousElementSibling) { activeThumb.previousElementSibling.click(); } else { thumbList.lastElementChild.click(); } } else { // down arrow if (activeThumb.nextElementSibling) { activeThumb.nextElementSibling.click(); } else { thumbList.firstElementChild.click(); } } } }); Make Feature Images DraggableAt this last step, we'll make the featured images draggable elements. To do this, we'll use the
Here's the corresponding code: const featuredList = document.querySelector(".featured-list"); const featuredImgs = featuredList.querySelectorAll(".featured-img"); Draggable.create(featuredImgs, { bounds: featuredList, inertia: true }); Of course, here, we covered just the basic part of the plugin's functionality. You can go even deeper by reading the docs and implementing complex stuff. ConclusionAnother exercise has come to an end, folks! Thanks for following along. Hopefully, you enjoyed what we built today, and it gave you solid knowledge of how to combine some custom code with the power of popular plugins like GSAP. Here's a reminder of what we built: Last but not least, remember that GSAP isn't the only way to create a draggable effect. You're more than welcome to try another option and share it with us. In addition, if you want to practice with this demo, I have a challenge for you: create a custom lightbox that will open each time you click on the corresponding button. See the call-to-action button below:    Should you accept the challenge, you might use the modal we built some time ago as a starting point. In an upcoming tutorial, I'll provide a possible solution. Stay tuned! As always, thanks a lot for reading!  |
| 15 Inspiring Public Speaking Quotes (Famous, Funny, & Fear-Reducing) Posted: 30 Jul 2021 06:35 AM PDT One thing we've learned in this series about public speaking is that it's normal to have a fear of public speaking. Hopefully, you've also learned that it's possible to improve your public speaking skills through mastering the right techniques and through practice.    If you're one of those who's struggling to become a better speaker, though, it can be easy to become discouraged. You may feel that you're the only one who's got to work on their speaking skills or the only one who suffers from a fear of public speaking. You may feel unmotivated about your upcoming speech and you may be tempted to quit. The truth, though, is that you're not alone. There are many others who have learned to improve their public speaking skill. When you struggle with something, sometimes it helps to know that you're not alone. In this article, I share public speaking quotes from such famous people as Jerry Seinfield and others. My hope is that when you read some of these inspirational quotes about public speaking you'll be encouraged. Download Free Presentation eBookDownload Free Presentation eBook: The Complete Guide to Making Great Presentations. It'll help you master the presentation process, from: initial idea, through to writing, design, and delivering with impact.    Read on for some motivational quotes for public speaking. Top Quotes About Public SpeakingHere are some of the best quotes about public speaking that I've found. In this list you'll find funny quotes on public speaking, fear of public speaking quotes, and famous quotes on public speaking. To make it easier to follow, I've divided the list into sections—starting with the fear of public speaking quotes. Fear of Public Speaking QuotesFear of public speaking is one of the most common phobias that people face. Some studies estimate that as many as 75% of us have this common fear. If you struggle with fear of public speaking (sometimes known as stage fright), hopefully you'll find these quotes about public speaking from those who've faced a fear of public speaking to be helpful. 1. Emma RobertsEmma Roberts is a popular actress who has appeared in numerous movies and televisions shows. Roberts has appeared on Teen Vogue's best dressed list and even served as a brand ambassador for the Neutrogena skin care line. With those accomplishments you wouldn't expect Roberts to have stage fright, but in February of 2010 Roberts was quoted in the Los Angeles Times as saying, "...doing a music video is so embarrassing. I don't think I'll be doing [another] album unless I write it for someone else. I have stage fright. I can't ever do theater because I would pee my pants ... It's way too nerve-racking. There's a comfort in being able to mess up when you're on a movie set." 2. Mahatma Gandhi.jpg) .jpg) .jpg) One of the greatest influencers and leaders of the 20th century, Gandhi led the Indian independent movement from British rule. Gandhi's efforts ultimately led to an independent India and inspired thousands around the world. Yet, Gandhi struggled with shyness. In Gandhi's autobiography, there's an entire chapter on shyness. The chapter includes this motivational quote, which can be applied for public speaking, "My shyness has been in reality my shield and buckler. It has allowed me to grow. It has helped me in my discernment of truth." 3. Prince HarryEven being a royal doesn't make you immune from fear of public speaking. Princy Harry, the younger son of Charles and Diana (Prince and Princess of Wales), has admitted to struggling with fear or public speaking. Multiple news outlets, such as The Times, have documented Harry's stage fright. Here's the fear of public speaking quote from the Prince: " My secret is -- believe it or not -- I get incredibly nervous before public speaking, no matter how big the crowd or the audience and, um, despite the fact that I laugh and joke all the time I get incredibly nervous, if not anxious, actually, before going into rooms full of people when I'm wearing a suit... And now that I've confessed that, I'll probably be even more worried that people are looking at me." 4. Annie LennoxLennox is perhaps most famous as the lead singer of the British music group, the Eurythmics. As a singer, Lennox received numerous awards, including the Billboard Century Award. In addition to being a talented musician, Lennox has raised money for HIV/AIDS awareness—resulting in an appointment from Queen Elizabeth II as an Officer of the Order of the British Empire. But Lennox also had to overcome the fear of public speaking: "Fear paralyses you - fear of flying, fear of the future, fear of leaving a rubbish marriage, fear of public speaking, or whatever it is." (Source: BrainyQuotes) Funny Quotes on Public SpeakingIt's often been said that the ability to laugh at oneself is a good thing. Now, a 2011 study on laughter seems to support that premise. The researchers found that participants who laughed at themselves were more cheerful and had a better mood. If you can recognize yourself in some of these funny quotes on public speaking, it may cheer you up. 5. Jerry SeinfieldSeinfield 's a comedian and television personality who starred in a popular TV comedy series. Seinfield has also been a guest a number of other television shows. When it comes to public speaking quotes, Seinfield reportedly said this (from the New York Post), "According to most studies, people's number one fear is public speaking. Number two is death. Death is number two. Does that sound right? This means to the average person, if you go to a funeral, you're better off in the casket than doing the eulogy." 6. Dale CarnegieA writer and lecturer, Carnegie is best known for the popular advice book, How to Win Friends and Influence People. Perhaps one of the most famous self-help authors of 20th century, Carnegie went on to found a series of professional development courses that are still used today. Regarding public speaking, Carnegie reportedly said, "There are always three speeches, for every one you actually gave. The one you practiced, the one you gave, and the one you wish you gave." (Source: BrainyQuotes) 7. George JesselA famed British jurist of the 1900s, Sir George Jessel is most known for commercial law and equity. This historic judge was a part of numerous cases. Although accustomed to speaking in a court of law, Jessel reportedly had this to say about public speaking, "The human brain starts working the moment you are born and never stops... until you stand up to speak in public." (Source: BrainyQuote) 8. Dorothy Sarnoff.jpg) .jpg) .jpg) Sarnoff started out as an opera singer and star on Broadway. Later, Sarnoff founded a company called Speech Cosmetics--a company dedicated to improving its client's public speaking skills. The following funny public speaking quote has been credited to Sarnoff, "Make sure that you have finished speaking before your audience has finished listening! " (Source: Lead Yourself Today by John E. Markley) 9. Adam DuritzAnother popular musician, Duritz is a vocalist for the rock band Counting Crows. Duritz is also an accomplished writer, co-writing a song for the Shrek 2 movie. Plus, Duritz owns several record labels. Here's a funny public speaking quote that's attributed to Duritz, "People ask me if I have stage fright. I say, '... no, I'm completely comfortable there. I have rest-of-the-day fright.'" (Source: AZ Quotes) Famous Quotes on Public SpeakingIn this section, I've shared some motivational and inspirational quotes about public speaking from well-known historical and contemporary leaders. 10. Lady Bird JohnsonJohnson was the First Lady of the United States from 1963 to 1969. In addition, Johnson advocated for The Highway Beautification Act that limits the use of outdoor advertising along highways and promotes scenic roadside development. Johnson was also a business owner. Early in life, Johnson bought the KTBC radio station in Austin, TX. The following motivational public speaking quote is attributed to Johnson, "The way you overcome shyness is to become so wrapped up in something that you forget to be afraid." (Source: Quotes.net) 11. Ralph Waldo EmersonThis poet and philosopher influenced American thought in the 19th century and beyond. Emerson is mostly known for essays and other writings today, but what many don't know is that Emerson was a popular lecturer in the mid to late 1800s. This inspiring quote expresses Emerson's view that speech is important, "Speech is power: speech is to persuade, to convert, to compel." (Source: The Later Lectures of Ralph Waldo Emerson: 1843 - 1871) 12. Seth GodinGodin is known for blogging and for entrepreneurial ventures. Godin also wrote several best-selling books such as Purple Cow and Tribes. Godin also gives frequent public speeches. This motivational quote on public speaking comes from Seth Godin's Blog, "You are not being judged, the value of what you are bringing to the audience is being judged." 13. Richard BransonThe founder of the Virgin Group (which includes the Virgin Records music label and other companies), Branson has been an entrepreneur since the 1970s. In fact, in 1999 Buckingham Palace knighted Branson for "services to entrepreneurship." This Branson motivational quote about public speaking is from Inc., "Picture yourself in a living room having a chat with your friends. You would be relaxed and comfortable talking to them, the same applies when public speaking." 14. Franklin D. Roosevelt.jpg) .jpg) .jpg) Roosevelt was a U.S. president for thirteen years, with a presidency spanning both the Great Depression and World War II. Roosevelt is known for the New Deal legislation, which implemented public work projects and other financial reform. Roosevelt is also known for leadership during World War II. The following public speaking quote is credited to Roosevelt, "Be sincere; be brief; be seated." (Source: GoodReads) 15. Hillary ClintonHillary Clinton is perhaps most famous for being a former First Lady of the United States or for advocating healthcare reform. However, Clinton was also Secretary of State from 2009 to 2013. Clinton ran for presidential office in 2008 and 2016. About public speaking, Clinton reportedly said, "If you're not comfortable with public speaking - and nobody starts out comfortable; you have to learn how to be comfortable - practice. I cannot overstate the importance of practicing. Get some close friends or family members to help evaluate you, or somebody at work that you trust." (Source: AZQuotes) Take Away: Use These Motivational Quotes for Public Speaking to Become a Better SpeakerIf you get nothing else from this article, remember that public speaking is a skill that can improved. You can improve. You can become a better public speaker! To inspire you, I've gathered some of the best motivational quotes for public speaking that I could find, including quotes about public speaking from famous people who've struggled with it. And just for fun, I've also shared some funny quotes on public speaking. As you read these, I hope you found them useful. Start Making Great Presentations TodayTake the tips you learned in this article further with our new eBook: The Complete Guide to Making Great Presentations. Grab it now for FREE, along with a subscription to the Tuts+ Business Newsletter.    Learn how to write your presentation, design it like a pro, and prepare it to present powerfully. This 30-page eBook with helpful PDF checklist will walk you through the complete presentation process. Editorial Note: This content was originally published in 2018. We're sharing it again because our editors have determined that this information is still accurate and relevant.  |
| How to Present a PowerPoint Presentation on Google Meet Posted: 30 Jul 2021 05:55 AM PDT Are you getting ready for an online presentation on Google Meet? Stay tuned to learn how to share a PowerPoint in Google Meet.    Presenting in Google Meet is convenient option if you can't meet with people in person to give your presentation. Use it to have real-time meetings or without video. Before setting up your presentation in Google Meet, you'll need to create a presentation. In this tutorial you'll learn how to present in Google Meet. You'll also see some premium PowerPoint templates. Plus, there's a question-and-answer section and a design trends section to make sure that you've got the best presentation for Google Meet. How to Present a PowerPoint Presentation on Google MeetOnce you complete your PowerPoint presentation, you can then present it in Google Meet. Let's look into how to present on Google Meet. For this tutorial, we'll use the Niche PowerPoint template.    Before your presentation, you'll want to customize the template. Learn how to do that in this tutorial: Once you've customized your template, here's how to present a PowerPoint on Google Meet: 1. Open the PPT fileTo begin, locate the PowerPoint file on your PC that you want to share on Google Meet and open it. 2. Log Into Your Google AccountYou won't be able to use Google Meet unless you're logged into your Google account. So, the next step is to make sure that your Google account is logged in. 3. Create a Meeting   Open a browser and go to https://meet.google.com/. Click on the blue New Meeting button in left of the screen.    When you click on this button, a menu will drop down where you've got the choice to
Click on Start an Instant meeting to start a meeting. A popup displays asking for access to your camera and microphone.    Click Allow to give Meet access to your camera and microphone. 4. Start Your MeetingNow that you've started a meeting. In the left upper corner, a popup window gives you a link that you can use to add others to your Google Meet session. Click the icon in the left of the gray bar to copy the link and email to the people you want to invite to your meeting. Or add others to the meeting by using the blue button.    If you don't want people don't see you, click the Camera button on the bottom of the screen. 5. Give Your Presentation   On the bottom of the screen, click on the Present now button. When you click on this button, a menu will pop up. In this menu, you've got three options:
Choose the best option for you. I recommend clicking on the A window option to share the window where you've got your presentation open. When you choose this option, a window pops up that gives you an option to choose from your open windows.    Once you've selected the window where your presentation is, click on the Share button on the bottom of the window. 6. Start Your PresentationOn your open presentation, click Slideshow from the menu bar. Then click From Beginning. Click through the slides at your own pace. If your microphone is turned on, you can talk about each slide. You're now sharing your PowerPoint presentation in Google Meet.    7. End the Meeting   To end your Google Meet presentation, click on the Stop Presenting button in the top right corner. When you click on this button, you'll stop sharing your window, but you'll still be in Google Meet. To leave the meeting, click on the Leave Call button. Find the Best PowerPoint Template for Presenting in Google Meets (Envato Elements vs GraphicRiver)1. Key Benefits of Envato ElementsFinding a good template that looks good enough to present can be hard. You want a template that looks professional and not sloppy. The best solution is to use a professional premium template from Envato Elements. Professionals make all the templates on Envato Elements to have the best design. Plus, Envato Elements is a subscription service. Once you subscribe, become a member, and pay a low monthly fee, you'll get unlimited downloads. The unlimited downloads include:
   Using a template saves you time because you're starting with a good base. With a template, just add your information then make any customizations you want. So, you don't need to worry about designing your own presentation. 2. Key Benefits of GraphicRiverGraphicRiver is a digital marketplace where you buy templates and other digital assets for one time use. GraphicRiver is perfect if you aren't sure about paying for a subscription. It's got thousands of premium templates and other digital assets that you can buy one at a time.    What's the Right Choice for You?If you've got a job where you'll need PowerPoint templates or other digital assets often, then Envato Elements is the right option for you. With an Envato Elements subscription, you'll save more money than buying each template separately.    If you don't need templates or other digital assets often, then GraphicRiver is the best option. Professionals make both options to have the trendy but professional designs. So, either option is a good choice. 5 Top Premium PowerPoint TemplatesHere are some of the best PowerPoint templates that you can use to present in Google Meet: 1. Hirata Business PowerPoint Template   Hirata Business PowerPoint Template is a great template for presenting in Google Meet. This template comes with a total of 39 slides. Easily add an image to your template by using the picture placeholder. 2. Probiz Business PowerPoint   This template that can be used in Google Meet has a minimalistic style. Here are some highlights of this template:
3. Morphe   Morphe is a minimal multipurpose PowerPoint presentation template that can be used for presenting in Google Meet. This template comes with a total of 35 slides, including gallery and portfolio slides. The slides come in a 16:9 aspect ratio. 4. Rising Multipurpose PowerPoint Template   Rising is a multipurpose PowerPoint template that can be used in Google Meet to present. Here are some key features of this template:
Everything in the Rising premium PowerPoint template is entirely editable. 5. Buter   Buter is a multipurpose template that can be used presenting in Google Meet. This template comes with over 150 total slides and five premade color schemes. Buter also comes with illustrations and infographics. Easily add images to this template by using the picture placeholders. Find More TemplatesAre you still looking for the right template for your Google Meet present? Here are some articles with even more premium PowerPoint templates:
How to Customize Your PowerPoint Template (FAQ Section)PowerPoint has a lot of features. If you've got questions about PowerPoint, it's perfectly normal. Here's a helpful tutorial guide to help you learn more. Plus, here are five common questions and answers: 1. How Do I Get My Audience More Engaged With My Presentation?There are many ways that you can engage your audience. One way to engage your audience is to create an interactive quiz. Interactive quizzes are a good way to make sure that your audience pays attention while presenting to them. Here's how to create an interactive quiz in PowerPoint: 2. If I'm Presenting Data, How Do I Know What Chart to Use?Knowing which chart to use in your presentation is important. Using the wrong chart can confuse the audience. Study the following tutorial for more information on how to create charts in Microsoft PowerPoint: 3. Is There a Quick Way I Can Edit My Template Layout?Yes. Slides have a slide layout. When you're customizing your template, a slide's layout can make the slide look professional or unprofessional. Here's more information on how to edit your slide layout: 4. What's a Great Way to End My PowerPoint Presentation?There are several different types of presentations that you can do. They're persuasive, informative, decision-driven, and introductory. Each type of presentation has a different ending that you can do. To learn more, read this article: 5. How to I Create More Interesting Slides?You don't want your presentation to be boring because the audience will lose interest. There are some things you can do to make your slide more interesting, for example, decluttering your slides. For even more tips, read this article: 5 Design Trends for Making Presentations to Present in Google MeetWhen making your presentation, you want the presentation to be effective. Having an attractive design is a way to make your presentation more effective. Here are design five trends to be aware of: 1. Gradient Color   Solid colors can be boring. So, if you're looking for a way to make your Google Meet presentation more visually appealing, use gradient color. Gradient color is where a color gradually transitions into another color. You can have gradient color with similar colors or contrasting colors. 2. Keep It SimpleSimple Google Meet presentation slides make the audience focus on what you want them too. This trend allows you to add the most important information to the side and leave the non-important information off. This look means less design, text, and images. 3. Pastels   Previous trends using neon colors were in. But now those are out, and pastels are in. Pastels add a nice touch of color to your presentation slide without distracting your audience from your main point. Pastel colors are not only less distracting but add an element of fun and whimsy to your slide design. 4. VisualsVisuals such as images and video have the power to evoke emotion from your audience. When choosing which visuals to use in your Google Meet presentation, choose high-quality visuals. They'll have the biggest impact on the audience. Along with high-quality visuals, choosing visuals that are relevant to your topic is important too. 5. Nature-Inspired   Taking inspiration from nature is a recent trend that's popular in presentation design. Nature inspiration can mean having leaves and flowers on your slide or having a color scheme of natural colors. This trend goes well with whatever topic your Google Meet presentation may be about. Start Your PowerPoint in Google Meet Today!Now that you've read about how to present on Google Meet, use that knowledge to give a PowerPoint presentation for your next Google Meet call. If you want a good base for your Google Meet Present and to save time, a premium template from Envato Elements is for you. But, if you don't have many projects where you'll need premium templates or digital assets, then GraphicRiver is also a great option. Good luck on your presentation in Google Meet!  |
| 31+ Best Responsive WordPress Themes (For Sites in 2021) Posted: 30 Jul 2021 05:51 AM PDT When it comes to creating a website for your business, an attractive design will only get you so far. With people increasingly using their tablets and smartphones to research and shop online, your website needs not only to be responsive, but flawlessly responsive. In 2021, the number of smartphone users worldwide is forecast to reach an incredible 3.8 billion. According to socPub 57% of users say they wouldn't recommend a business with a poorly-designed mobile site. When you take the stats above into consideration, it's easy to understand that an unresponsive (or poorly responsive) website will lead to a significant loss of revenue. Nowadays Google favors mobile-friendly websites, ranking them more highly than websites which aren't responsive. Luckily, creating a responsive site is easy with WordPress, especially when you use the latest responsive WordPress themes. We have the leading WordPress theme marketplace (ThemeForest) with thousands of responsive WP designs to choose from, all of which you can purchase for individual use.    Best Responsive WordPress Themes From ThemeForestHere are the best WordPress themes to make your site with in 2021. Browse through this curated list of best responsive themes for WordPress from our theme marketplace ThemeForest.    As well as some of the behemoths of ThemeForest–themes with hundreds of thousands of sales–you'll also find some of the latest responsive WordPress themes that can be used for all kinds of industries and websites. All the best WordPress themes on this list include attractive and modern designs, premium features, as well as plenty of customization options. 1. Authentic - Lifestyle Blog & Magazine WordPress ThemeDo you want to make a blog from a WordPress responsive theme? Then Authentic is one of the best WordPress themes for you. It has 50 demos to get your creativity going as well as custom blocks for page building. See how your posts are performing with Google Analytics synchronization, and allow readers to share your entire posts or snippets.    2. Karma - Elementor Business WordPress Responsive ThemesKarma is a versatile example of premium responsive WordPress themes. As an extremely capable multipurpose responsive WordPress theme (there's a mouthful) you might imagine there are plenty of demos for you to take a look at. This screenshot is from the home page. There are fifty other homepage layouts to drool over. There's no doubt you can make some of the best WordPress websites with Karma.    3. Savoy - Minimalist AJAX WooCommerce Theme   Savoy gives you super reliable responsiveness. Also available as a plain HTML version, this theme has a flexible and modern design for online shops. The minimal Savoy WordPress responsive theme features one-click install and excellent support. If you need a customizable design experience with a toned-down feel, try out Savoy. 4. Flatsome | Multi-Purpose Responsive WooCommerce Theme by UX-themesThe perfect theme for a company website, Flatsome is ideally suited to anyone from a freelancer to an e-commerce business. Complete with all of the tools required to create a super-fast, responsive website, Flatsome delivers an amazing user experience. An ultra-responsive page builder allows even non-coders the ability to create anything with unlimited options in the live theme option panel builder. The makers of Flatsome concentrate only on this theme and continue to support the latest versions of WordPress and WooCommerce.    5. The Retailer - eCommerce WordPress Theme for WooCommerceSince 2013, The Retailer has been the must-have WordPress e-commerce theme for WooCommerce. Established with a user-base of more than 15,000 people, this theme has been a weekly top seller. Proven to be a reliable WordPress responsive theme for any e-commerce project, The Retailer is supplied with $90-worth of plugins. It also ships with the popular WPBakery page builder and is compatible with both Elementor and Visual Composer.    6. UrbanGo - Directory and Listing ThemeUrbanGo is an ideal theme for listings websites with one-click import and no special coding skills required to get up and running. This WordPress theme is fully responsive meaning that it looks stunning regardless of what sort of device it's viewed upon. Shipping with free plugins, WPBakery and Slider Revolution, the UrbanGo WordPress theme contains an enormous collection of stunning elements and practical options with an intuitive website setup. If you need premium responsive WordPress themes, try out UrbanGo.    7. Konte - Minimal & Modern WooCommerce WordPress ThemeKonte can make some of the best WordPress websites. It's a unique and modern WordPress e-commerce theme built with Bootstrap and powered by the ever-popular WPBakery Page Builder. Konte has been specifically designed as a beautiful WooCommerce compatible storefront. Konte features a mini cart, custom widgets, unlimited colour schemes, a slider with smooth transition effects, a menu with multiple column styles and advanced widgets making this theme infinitely customisable.    8. Squaretype - Modern Blog WordPress ThemeSquaretype is a content-based blog and magazine WordPress theme that's fully responsive to display wonderfully, beautiful websites with a choice of multiple designs within the one theme. Squaretype enables you to build your own shop and easily integrate it with WooCommerce, the most popular WordPress e-commerce plugin, and help you configure the catalog of a shop.    9. Digiqole - News Magazine WordPress ThemeDigiqole is a responsive WordPress theme for anyone wanting to set up a magazine or news website. Its neat grid layouts offer perfect collapsed versions for smaller screens, and its clear typography and generous whitespace make it very easy to read/digest. And how's this for a rich and colorful demo?! A few clicks around Digiqole will show you why it's one of the best premium responsive WordPress themes around.    Built on Bootstrap 4 and equipped with the Elementor Builder, Digiqole is the perfect WordPress theme to help you create page layouts with confidence. Take a look at these guides to learn more about Elementor and how it can help you create WordPress websites:
10. Crocal - Responsive Multi-Purpose WordPress Theme   Crocal is new to ThemeForest's collection of responsive WordPress themes, but hit the trending charts immediately and enjoyed hundreds of sales in its first few days. It demos 14 different types of website, over 300 different page layouts, and over 50 custom elements, highlighting its versatility and flexibility. It also supports Gutenberg, WordPress' new visual block editor. 11. Adios - Portfolio Elementor WordPress Theme   The Adios portfolio WordPress theme is entirely responsive. It's tested to display well on all popular tablets, smartphones, and desktop computers. This template makes the best WordPress websites for artists, agencies and creatives. It comes with a full-set of design features, such as an elegant customizer, page builder, beautiful typography, and more. Design your portfolio to stand out in 2021! 12. Avada - Responsive Multipurpose WordPress Theme (for 2021)   Avada is one of the most popular responsive WordPress themes on ThemeForest (with well over 500,000 sales to date!) and with good reason: it boasts a hugely impressive number of premade demos and tons of customization options. It also integrates seamlessly with some of the most popular plugins such as WooCommerce, bbPress, Contact Form 7, and others. You can easily import any of the demos with a single click, and use the options panels to control fonts, colors, layout, and so much more. Version 6.0 includes an intuitive front-end, visual editing experience (thanks to Fusion Builder) among a vast array of new features and improvements. 13. Jupiter - Elementor Multi-Purpose Theme   If you're looking for a fast-loading WP theme, look no further than Jupiter. It has been optimized to load fast and comes with more 160 page templates, as well as more than 490 different styles that you can mix and match to create the best WordPress websites. Each page can have a unique header and you can easily customize layouts with Visual Composer. 14. Flatsome - Versatile Responsive WooCommerce Theme   Consider the Flatsome theme if you want a modern design and complete control over how your products display. This latest WordPress site template comes with a page builder that allows you to create a unique layout for your product pages as well as customize every aspect of the visual styles. On top of that, it comes with a huge library of different elements and it's been optimized for SEO. 15. uDesign - User-Friendly Responsive WordPress Theme   The uDesign theme is a powerful and user-friendly WordPress theme that can be used by complete beginners as well as advanced developers. Main features include:
As far as the best premium responsive WordPress themes go, they don't get much better than uDesign. 16. Total - Multipurpose Responsive WordPress Theme Design   The Total WordPress responsive theme is a great choice no matter which industry your business is in. With tons of customization features, a beautiful design, and a variety of premade demos in different niches, this responsive WordPress theme is touted as the total solution for creating a powerful website. Because of this, our customers continue to praise its functionality: "Total is by far the most powerful WordPress theme we've ever used. To be so powerful and offer so many features, it's also extremely well coded and very fast. And the support is stellar. I highly recommend Total." 17. The7 - Customizable WP Theme With Responsive Design   The7 theme integrates perfectly with Visual Composer and the Ultimate Addons plugin. On top of this, the theme options panel features more than 750 options, allowing you to create a unique website that stands out from your competitors. It's also fully compatible with most popular WordPress plugins like WooCommerce, WPML, Yoast SEO, All in One WP Migration, W3 Total Cache, and many others. And if those features aren't enough to convince you that the theme is indeed a powerhouse, The7 is SEO-ready and mobile friendly as certified by Google. 18. BeTheme - Intuitive Responsive WordPress Template   If you're looking for a WordPress template that's easy to work with and has a responsive design, consider the BeTheme. It comes with quite a few premade demos, all of which can be imported with a single click. The theme is also easy to customize with the theme options panel and you can even control how each element on the page displays on mobile devices. Take advantage of the theme's shortcodes to add elements like accordions, tabs, and more and don't forget to add a parallax or a video background to make your website stand out. BeTheme will let you build the best WordPress websites that visitors will love. 19. Enfold - Creative Responsive Theme for WordPress   The Enfold responsive WordPress template is another best-seller that allows you to not only create a stunning website that's optimized for mobile but also to see all the changes you make in real time. The best premium responsive WordPress themes are full of features. Thankfully, Enfold is one of the best. Other main features include:
20. X The Theme - Unique Responsive WP Theme   X Theme stands out with its four unique stacks, each of which comes with their own set of demos. It comes with Cornerstone page builder so you can create your own layouts with a simple drag-and-drop. It also integrates with several popular WordPress plugins such as Layer Slider, ACF Pro, Google Analytics, Envira Gallery, and others. Customers praise the features of the X Theme: "It's friggin awesome! You can do anything with it - I use it on all of my client sites." 21. Bridge - Beautiful Website WordPress Theme   The Bridge is a beautiful, retina-ready WP theme suitable for business sites, portfolios, restaurant sites, music websites, and more. It's easy to use and you can speed up the site setup process with a one-click install of any of the demos and styles. This WordPress template features a responsive design, a powerful theme admin panel, flexible headers, video backgrounds, and more. 22. Oshine - Portfolio and Agency Responsive WP Theme   The Oshine WordPress template is a great choice for portfolio and agency websites that want a modern and stylish design. It features several portfolio layouts, numerous demos, and a unique builder that lets you see the changes in real time. It's also optimized to load fast and looks great on mobile devices, making Oshine one of the best themes for WordPress websites. 23. Striking - Latest Feature-Rich WordPress Theme Design   The Striking theme is a great choice for large WordPress websites and online stores that need a flexible theme with plenty of options. It can be used for a multisite installation and can be translated into any language thanks to the integration with WPML. It also comes with custom styling for WooCommerce, a built-in mega menu, and more. 24. Kingsize Fullscreen Photography Responsive Theme   If you're a photographer, look no further than Kingsize. This theme features beautiful full-screen sliders and galleries so you can showcase your photos. You can also sell prints thanks to WooCommerce integration. Other features include:
25. The Gem WordPress Theme   The Gem WordPress theme is versatile and responsive with a modern and creative design. It's suitable for a variety of niches for 2021. On top of a responsive design, it loads very fast and has been optimized for SEO. The Gem theme also comes with a plethora of customization options and demos ready to be imported with a single click. Check out what our customers say about The Gem WordPress theme: "Very well designed theme, lots of extra effort from the developers have made this one of the two best themes I have ever worked with" 26. Porto | Multipurpose & WooCommerce Theme   The Porto theme can be used for a business site as well as a full-fledged online store. This WordPress template has several demo layouts for each category and integrates with other popular plugins such as Visual Composer, Revolution Slider, and others. You can have complete control over the colors, fonts, and layout of every page and use custom widgets to display extra information about your business or store. 27. Salient - Responsive Multi-Purpose Theme   The Salient theme is a great choice for corporate site owners that want to get their WordPress site up and running quickly. Numerous demos can be easily imported and modified with a simple drag-and-drop interface. You can also customize every aspect of your site and add attractive icons for extra visual appeal in 2021. Premium responsive WordPress themes like Salient are hard to come by. 28. Shopkeeper - eCommerce WordPress Theme for WooCommerce   If you need a new theme for your online store and love minimal design, consider the Shopkeeper theme. Your products are the main focus of attention thanks to plenty of whitespace and beautiful product images. What makes this WordPress eCommerce theme stand out is the ability to add videos to individual product pages. Other notable features include:
29. Houzez - Responsive WordPress Real Estate Theme   The Houzez theme is a professional WordPress theme designed for real estate agents and companies. It was built with conversion in mind so you can schedule more viewings and earn better commissions. You can easily engage visitors and potential clients in 2021 with custom layouts built with Visual Composer modules, header options, different listings, and property templates. Even our customers agree this theme has everything you need as a real-estate agent: "The theme is very robust, it covers every need you could have in the real estate market. Even better, the team consistently answers support questions on their ticksy account, and will help you get the most out of it." 30. SEOWP - Marketing Responsive WordPress Template   The SEOWP theme is perfect for marketing and SEO agencies that need a modern and elegant WordPress website. This responsive theme loads fast and is easy to customize. It also comes with various useful plugins such as Easy Social Sharing, Google Position Tracker, MailChimp Optins, and more. 31. Rosemary - A Responsive WordPress Blog Theme   Rosemary is another great WordPress responsive theme for a blog. The design is minimal and very stylish, and it looks stunning on desktop and mobile devices. There are five different blog layouts included as well as multiple post formats. You can also take advantage of Contact Form 7, so your avid readers can stay updated with new content. 32. Ave - Responsive Multi-Purpose WordPress Theme   Rounding out our list of premium responsive WordPress themes is the wonderful Ave. The quality of Ave shows that the three years of design and development were well worth it. Get this theme set up in one minute, and experiment with layouts with the visual editor. Buying Ave also gives you access to useful plugins, like:
Give Ave a try if you want a WordPress responsive theme to start your website. Find Free Premium Responsive WordPress Themes From ThemeForestThe premium responsive WordPress themes featured above are some of the best options to get your site up and running. But what if their prices don't fit your budget? You may want to go the free WordPress theme route, but then you'll give up some quality. To get the best of both worlds, check out ThemeForest. Every month, a selection of premium WordPress themes are free to download and use. That's right. You get professional design quality at no cost at all.    Do you want to see what free premium WordPress themes are available this month? Head to any of the links in this section to find out! 5 Tips for Choosing the Best Responsive WordPress Theme for Your SiteResponsive design is one of the most important features in a WordPress theme, however, there are a few other things to keep in mind when shopping for a theme for 2021. 1. Choose a Fast-Loading WP ThemeWhen it comes to loading times, a website that takes more than 3 seconds to load is likely to be abandoned by customers. Because of this, look through the theme features and see if it's already optimized to load fast, like Jupiter. This will help you improve conversions and keep visitors on your site longer. 2. Opt for a Quick to Customize DesignAlthough all of the themes feature an attractive design, it's important to customize your site to match your brand. Customizing your theme will make you stand out from the competition and build brand recognition. 3. Make Sure It Fits With Your IndustryWordPress certainly doesn't lack in themes for any industry and there are multipurpose themes as well that can be tailored to business sites as well as portfolio or e-commerce sites. However, take a look at the theme demos to ensure it comes with a layout and features that are specific to your industry. Without it, you'll have a harder time getting your site to look the way you want. A theme like X The Theme does a great job of adapting to any niche.    4. Work With an Easy to Use ThemeIf you're a complete beginner, look for themes that are easy to use. They can easily be recognized with descriptions that say intuitive or user-friendly. An easy to use theme will save you time needed to set it up and allow you to get your site up and running quickly, like in the case of BeTheme.    5. Consider How Well It is SupportedFinally, opt for a theme that comes with author support. This ensures your theme will be continually updated and maintained but it also guarantees you can reach out to the author with questions if you run into any issues. Get Started With Your Responsive WordPress Website for 2021Making sure your website is responsive is a great step toward increasing your search engine ranking and improving your conversions. Browse through our selection of the best responsive WordPress themes on ThemeForest. Then get started building your responsive WordPress website right now. What website design trends do you think will hold strong or take off in 2021? Make sure you're planning ahead for your next site design. Learn How to Use WordPressAre you new to using WordPress? Learn how to use WordPress in our complete guide. This guide will take you through the full process, from the basics of creating posts and pages right through to installing and customizing your first WordPress theme and setting up plugins for security and performance. Or why not watch our extensive Beginner's Guide to Using WordPress? This recently updated course (available for free on the Tuts+ YouTube channel) covers every aspect of getting setup and using WordPress, including how to work with the WordPress Gutenberg editor. Check out the introduction:  |
| Change the WordPress Logo Size Posted: 30 Jul 2021 05:15 AM PDT Logos are a big part of any brand's identity. Seeing the logo of a company you like helps you instantly create a connection and trust with the product. The same thing goes with the logo on your website. Every website that you visit will have their logo on almost all the pages and posts they publish. One of our previous quick tips covered how we can change the logo on a WordPress website. Our goal in this one is to change the logo size. Before We Get StartedLogos provide people an easy way to add brand identity to your website. Therefore, almost all themes have the option to change a logo using the customizer from the WordPress admin dashboard. However, the same is not true for changing the logo size. This basically means that you might need to do a little more work to get it done. There are a lot of ways to change the logo size in a WordPress website but we will limit ourselves to just two methods which are beginner friendly and don't require you to do a lot of tinkering with the website code. Lets start with the easy one! Changing the WordPress Logo Size with Built-in SettingsSome premium theme developers will provide you an out-of-box solution for changing the size of logo on your WordPress website. We will learn how to do that with an education theme called Eduma available on ThemeForest. The first step is to visit Appearance > Customize from the WordPress admin dashboard after you have logged in to the backend. Now we look around a bit to see available menu options and figure out which of them could have the logo settings we need. The General menu seems like a good candidate so we click on it.    Click on Logo in the next list of menu items that appear on screen. Then, you should see some options to change the logo as well as its size. This particular theme allows us to configure a number of things like providing different images for the regular and sticky version of the logo. You should see something like Logo Width or Logo Height if you scroll down a bit in your settings as well. In our case, we set the value of Logo Width to 60%. Any changes you make will reflect right away on the website preview so you can undo any changes you don't like. Changing WordPress Logo Size with Custom CSSThis method of changing the WordPress logo size requires a little bit more work but it also gives you more control. Ideally, you should consider using it only if your theme doesn't have any option to directly change the logo size within the customizer settings. We will use the WordPress Twenty Twenty-One theme as an example here but the same steps will work for every theme that you have. The first step here is to find out which CSS selector is used by the theme to target the logo on your website. To do so, just visit any page on your website and then right click on the logo. Click on Inspect in the context menu.    This should open up the developer tools in the browser and you should see code something like the image below. Find the CSS selector which specifies the width and height of the logo. It's important to find the selector where none of these properties are crossed out—when the properties are crossed out, that means they are overridden by another selector further up the list. The highlighted selector will work perfectly in our case.    Try playing around with these values to figure out the right logo size for your website. Two things that you should keep in mind here. One, it is a good idea to avoid setting both Two, just setting a    Now comes the part where we make changes to the logo size. Go to the theme customizer in the WordPress admin dashboard by navigating to Appearance > Customize.    You should see a menu item called Additional CSS. Click on it.    Now paste the selector and CSS properties that you changed earlier into this box and hit the Publish button.    This should update the size of the logo on the website. Final ThoughtsWe learned two different methods of changing the logo size in WordPress in this tutorial. The first method is easier to use and should be preferred if your theme supports the functionality. There is a good chance that the theme developers included some built-in checks to make sure any extreme changes to logo size don't affect the layout. The second method is a little more complicated but it is almost always guaranteed work as long as you choose the selectors carefully. Make sure you test the final layout on different devices to confirm that there are no unexpected shifts in positions of different elements. The premium themes from ThemeForest come with free support for six months. Take a look at over 11,000 themes listed on ThemeForest to choose the one that best meets your needs. If you need help picking a theme, check out our curated lists of the best themes on ThemeForest!  |
| 43 Best Music Flyer Templates (PSDs and Using a Music Flyer Maker) Posted: 30 Jul 2021 02:00 AM PDT If you're a musician or promoter and looking for great music flyer templates to create a flyer or poster to promote an event, then you're in the right place.    Today, we'll show you 43 of the best music flyer templates available at Envato Elements and Placeit. So sit back and enjoy. Best Music Flyer Templates on Envato Elements (Unlimited Downloads)   Envato Elements is a terrific source when you need the very best music flyer templates for important projects. What makes Elements so outstanding is that it offers you thousands of gorgeous templates by the most talented designers in the field, and you can download as many as you want, as often as you want, for one flat monthly fee. One low monthly fee = unlimited access to the best fonts available on the internet today. What's more, that monthly fee also allows you to access thousands of premium digital assets like logos, mockups, photos, business card templates, and much more. Let's take a look at a few of the outstanding music flyer templates available at Elements. 21 Music Flyer Template From Envato Elements If you have a working knowledge of Adobe Illustrator, Photoshop, or InDesign, then these templates from Envato Elements are perfect for you. You won't have to wonder how to create band flyers from scratch because these templates do all the hardest work for you. Indie Music Flyer Design Template (AI, EPS, PSD)  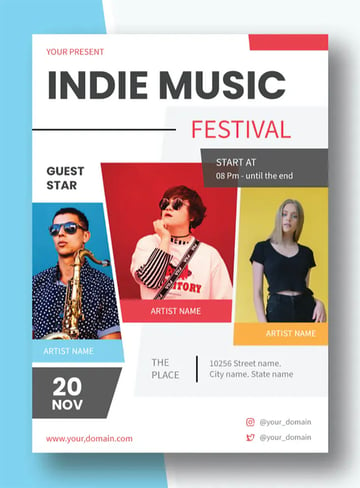 It doesn't get cooler than this awesome music flyer design template. The A4 template is offered in well-organised, layered files, and customisation is easy using the smart object function to replace images in a click. Music Flyer for Virtual Concerts and More (PSD)   Virtual concerts have become quite a thing in this age of Covid-19, so if you are planning one and want to promote it online, this music concert flyer is the perfect choice. It comes in A4 with a bleed area, and all text, colours, and images are customisable. Photoshop Music Poster Templates (PSD)   This is a terrific template for solo artists who want to invite fans to their next performance. The flyer music PSD file is well organised and very simple to customise, but there is a help file included if you need it. Music Festival Flyer Template (INDD, IDML)   This is one of the only InDesign templates featured here, and it's a great one. With its cool, modern and clean music flyer design, this is the perfect flyer for musicians of every stripe. Of course, you need a working knowledge of InDesign to customise it, but it's a well-organised and layered file designed to make your work easy. Widtemp Music Flyer Design (AI, EPS, PDF)   Looking for a flyer with a unique feel? Then check out this terrific music flyer design. The A4 template is perfect for all types of musical events from concerts to festivals to solo performances. Cool Music Event Flyer Template (PSD)   Get your solo performance off to a good start with this highly versatile music promo flyer. Modern and simple, with a unique layout and great typography, this template is fully editable using Photoshop. Jazz Music | Flyer (PSD, AI)   This Jazz Music Concert Flyer Template is fully editable in both Photoshop and Illustrator. Replace the placeholder images with your own images in a single click, and then add your text and change the colour of the template to suit your needs. Live Music Flyer (PSD, AI, EPS)   A terrific live music flyer that is completely versatile and suitable for other music events. The A4 template flyer for music is fully customisable in multiple programs, so choose your favourite software and get to work today. Urban Music Promo Flyer Template (AI, EPS, PSD)   This cool Urban Music Promo Flyer Template is eye-catching and can also be used for other types of concerts or performances. The A4 sized file can be edited in Photoshop or Illustrator. Indie Band Promo Music Flyer (AI, PSD)   Indie band promoters should check out this stunning music promo flyer template. Use Photoshop or Illustrator to swap the placeholder image with your own, add your text and chosen colour scheme, and your flyer is ready to send out. Minimal Music Flyer Template (PSD)   How awesome is this music flyer design? Can't you see your image and information on it? This modern and stylish template is fully editable in Photoshop. Give it a try. Madona Music Flyer Maker (AI, EPS)   The best music events are those long summer festivals, aren't they? Capture the beauty of summer with this flyer music PSD template. The sunny colours are perfect, but of course you can change them in Photoshop if you want. Illustrator & Photoshop Music Poster Templates (AI, PSD)   If you're planning an electronic dance music (EDM) event, then this beautiful, abstract flyer is the perfect template for you. There's plenty of room for you to add all the relevant details, without detracting from the bold, eye-catching design. Photoshop Music Poster Templates (AI, PSD)   This is quite a busy design, but it's so well laid out that the key information is still easy to pick out. That's the beauty of a professional design like the one you get in this flyer music PSD template. All you have to do is add your own text and images to make an outstanding music concert flyer. Acoustic Musical Flyer Design (AI, PSD)   When you're looking at these templates, pay special attention to the design and layout. After all, you'll be changing the images and text anyway. This one, for example, is billed as an acoustic music flyer design, but you could adapt it to any genre you choose. Music Flyer Maker Template (AI, EPS, PSD)   The days when pasting a flyer up on a wall was the only way to promote your event are gone. These days, bands routinely use social media to reach larger audiences. So it makes sense that this template includes not only an A4 flyer, but also templates for an Instagram post and story. It's all here, ready for you to customise in Photoshop or Illustrator. Music Flyer Design (AI, EPS, PSD)   This stylish, contemporary musical flyer design is ideal for promoting pretty much any kind of event. It comes in A4 size, with CMYK colours and bleeds so that it's ready for printing. The fully layered template file is easy to customise in Photoshop or Illustrator. Music Festival Flyer (AI, PSD)   Photoshop music poster templates don't come much better than this. The sleek layout and tasteful colour scheme make this one perfect for a jazz festival, as pictured here, but you could also use it to promote other events. It comes with three ready-made colour schemes, and of course you can dive in and change things up as much as you want. Minimal Music Flyer Template (PSD)Many of the music flyer designs we've looked at today use images and colour across the whole page, but this one makes generous use of white space. See how it helps the design to breathe and makes the details really pop? The cool image, elegant text and bright colours help too. Hand Lettering Music Flyer (PSD)   If you want your flyers to look hand-written, but without spending hours creating that lettering by hand, then this is the template for you. It has the look and feel of a painstakingly hand-lettered flyer, but all you have to do is jump into Photoshop and type your own text into the placeholders. That leaves more time for you to rehearse and plan the perfect gig! Summer Musical Flyer Design (AI, EPS, PSD)   Summer is here, and so are summer concerts. Promote yours with this wonderful summery music event flyer template. The well-organised and layered file is editable in Photoshop or Illustrator. 23 Best Music Flyer Templates From PlaceitIf you don't have Photoshop skills or need an easier way to create a music flyer template, then Placeit is for you. Placeit provides an affordable online music flyer maker that you can use to create your flyers directly in your browser. Let me show you what I mean. 1. Go to Placeit.net > Type Music Flyer in the Search Bar   2. Click on the Flyer Template You Like to Open the Music Flyer Maker   3. Add Your Text > Change Fonts > Change Font Colours   4. Select Background Graphics and Colours for Your Flyer   5. Download Your Customised Music Flyer   With Placeit, you can buy just one item for a small fee, or if you regularly need templates, mockups, logos, and various designs, you can sign up for a low monthly or yearly plan. This gives you access to unlimited downloads of any and all the digital assets available at Placeit. Music Promo Flyer Maker for a Techno Festival   Planning a big musical event? Then a musical flyer design like this one is exactly what you need to help you promote it. The music flyer maker allows you to add all the details you need, so that in a matter of minutes your flyer is ready to download. Musical Flyer Design Template for an Electronic Festival   DJs promoting an electronic music festival have a ready-made template here. But, of course, you could also switch the image and text and promote any kind of event. Music Poster Design Template to Promote a New Album   Want to announce a new album in an aesthetically pleasing way? How about Music Flyer Template to Promote a New Album? The music flyer maker provides you with tons of creative control so that you can change just about every aspect of the template to suit your needs. Flyer Design Template for a Trendy Music Event   Looking to promote your next DJing event on or offline? You'll need well-designed flyers with just the right amount of information. The great thing about Placeit's music promo flyers is that they are professionally laid out, so you have the perfect foundation for adding your own details. Live Music Flyer Design   This live music flyer design is super easy to customise. All you need to do is add your own photo, change the text and text colour, add the background colour that suits your taste, and voila! Your flyer is ready to download and share. Music Poster Design Template   This sweet music event flyer template is just what you need to create both flyers and posters for your next event. Simply choose a wonderful illustration from the selection on offer, edit the text fields, and customise the colours to create your very own promo materials. Music Festival Online Flyer Maker   If you're going for something more classical, then try this musical flyer design, featuring a trumpet and sheet music. The grainy background adds to the traditional vibe. Music Poster Design Template for a Virtual Music Festival   In the Covid-19 pandemic, lots of events had to go "virtual", and music festivals are no exception. This template is perfect for a virtual music festival, although there's no reason you can't adapt it for a real-life event too. Flyer Maker for a Music Ticket Sale   The best concert flyers are simple and eye-catching, so that they clearly communicate the key information of when, where, and how to book. This is a great example. Music Poster Design Template With a Stencil Style for a Band's World Tour   Ready for your big world tour? Then try this template, and see how to create band flyers the easy way. Just update the information and download your flyer. You can even change "World Tour" to something more local if you're not at the Wembley Stadium stage yet. Violin Online Flyer Maker   Here's a great classical music concert flyer for you to customise and download. Try different colours, different instruments, change the text, move it around... it's all so easy with Placeit's music flyer maker! Music Poster Design Template for Music Tour Featuring a Retro Print Style   Tap into the design style of iconic music festivals from the 1960s and 70s with this wonderful retro template. It'll have your audience flocking to hear you. Music Promo Flyer Template for Music Festivals Featuring Abstract Geometric Graphics   The actual sound of music is tough to represent visually, so that's why abstract graphics are such a popular and effective choice for music flyer designs. Music Poster Design Template to Promote a Music Tour   The great thing about a band promo poster template like this one is that it's so flexible, and it could make a great flyer too. The design and layout options are all there for you, so you can customise the details and create whatever end result you want! Musical Flyer Design for an Online Music Festival   More abstract graphics for you, but this time with a simple, clean, black and white style. If you want a pared-back style, this template is ideal. You'll save on printing costs too! Custom Music Flyer Maker for Open Air Festivals   If you're travelling to a gig, please put your equipment somewhere safer than this! But as a whimsical, nostalgia-infused promo for your event, this works perfectly. Jazz Band Promo Poster Template   Jazz concerts and festivals are always popular, so why not use this classy illustrated template to make your own promo flyer? Music Concert Flyer for Concerts and Music Festivals   This live music flyer works well because of the contrast between the text and the background image. So keep that in mind as you're customising—make sure the text stands out! Live Music Flyer for Musicians Featuring Modern Abstract Graphics   Remember that monochromatic flyer design we looked at earlier? This is a similar layout, but in beautiful, bright colours! See how much variation you can get from the same basic template? Try it out and see what you can create. Band Promo Poster Template to Promote a Music Battle   There's nothing to generate a buzz like a music battle! Promote your next event using this cool music flyer design. Music Concert Flyer Maker for a Rock Concert   With this template, you can either keep the bold colours and plain text of this example, or you can add musical instrument illustrations from the selection provided. Band Promo Poster Template With an Illustration of a Rooster for a Local Festival   Looking for something a bit different? This strange illustration of a rooster and roses will make your music flyer stand out from the crowd. And there are plenty of other illustrations to choose from too, so you can experiment to get the look you want. Musical Flyer Design Template Featuring Wavy Lines   Like all the best concert flyers, this one features an innovative layout and eye-catching graphics. This example doesn't include the all-important event details, but of course you can add that using the text placeholders provided. Choose Your Music Flyer Template TodayBoth Placeit and Envato Elements are excellent resources for premium music flyer and poster templates. If you also regularly need mockups, icons, and other design resources, Elements offers unlimited downloads for one low monthly fee. Alternatively, if you just want to buy a single music flyer, Placeit is the resource for you, but you can also sign up for a monthly or yearly membership which also offers unlimited downloads of templates, mockups, logos, and various designs. Head over to either site to download your favourite template today. And finally, if you want even more information on flyer templates, check out these really helpful articles below:
 |
| How to Make a Newspaper Template in InDesign Posted: 30 Jul 2021 12:00 AM PDT    In this Adobe InDesign newspaper tutorial, you'll learn how to make a newspaper template in InDesign, designing the front page for a tabloid newspaper template. The result will be a versatile Adobe InDesign newspaper layout you can use for future projects, allowing you to easily incorporate your own text and images into the newspaper template. Looking for more newsletter templates or InDesign newspaper templates? You can find a wide range of newspaper styles and newsletter design templates, from traditional broadsheets to modern email newsletters, on Envato Elements.   
What You'll Learn in This TutorialThis tutorial is a great introduction to using InDesign for newspaper layout design, as well as a useful starting point for beginners to print design. We'll look at:
Follow along with us over on our Envato Tuts+ YouTube channel: Creating newspaper layouts is one of the most traditional forms of graphic design and typographic layout, but the columned style has endured because of its simple visual impact. Knowing how to create a newspaper template is a useful skill that is excellent preparation for creating other editorial designs in InDesign, such as magazines, flyers, or brochures. Ready to start creating your newspaper template? Read on to find out how to make a newspaper template in InDesign.  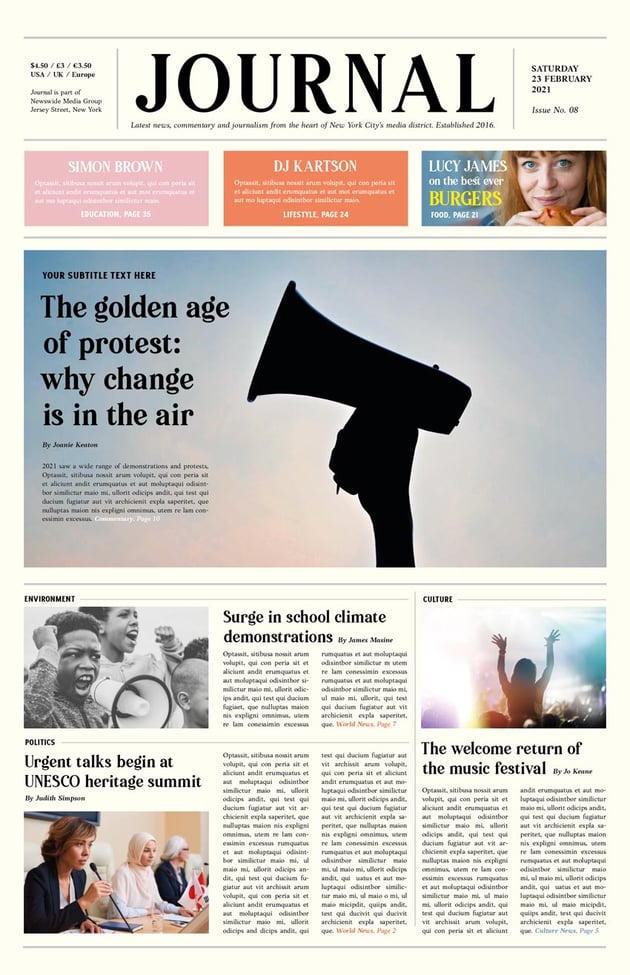 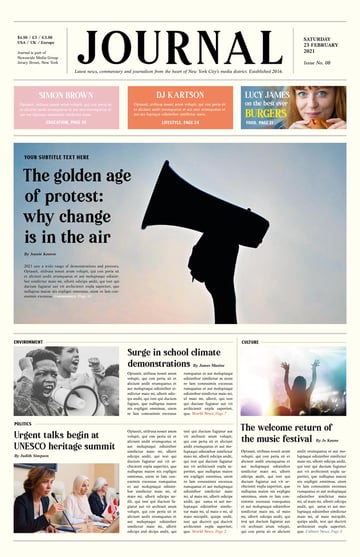 What You'll Need to Create Your Adobe InDesign NewspaperAs well as access to the InDesign app, you'll also need some fonts and images to use in your newspaper design. The fonts we will be using are:
You may want to use your own images in your newspaper template, but if you'd like to use the images shown in the design here, the links to these are listed below.
Download the fonts and images, and make sure the fonts are installed before you begin. 1. How to Set Up the Newspaper Template in InDesignStep 1Open InDesign and go to File > New > Document. Choose Print from the options at the top of the New Document window, before selecting the Tabloid preset below (this will set a Width of 11 in and a Height of 17 in). Deselect Facing Pages, as we'll just be creating a single front cover page in this tutorial. Increase the number of Columns to 3, with a Gutter of 0.25 in.    Set the Left, Bottom, and Right Margins to 0.4375 in and the Top Margin to a more generous 2.435 in. As we're creating this newspaper template for print, we'll need to add a bleed. Set the Bleed width to 0.25 in, before clicking Create.       Step 2Go to View > Grids & Guides > Show Document Grid.    The document grid is a useful tool for newspaper design, helping you to line up text baselines as you work. You can switch the visibility of the grid on and off by hitting W on your keyboard.    Step 3Go to the Layers panel (Window > Layers) and rename Layer 1 as Background. Choose New Layer from the panel's drop-down menu, and rename this as Images. Repeat to create a third and final layer, Type.    Lock the Type and Images layers, keeping the Background layer unlocked and active.    Step 4Go to the Swatches panel (Window > Color > Swatches) and choose New Color Swatch from the panel's dropdown menu. Set the Type to Process, Mode to CMYK, and the levels to C=0 M=0 Y=100 K=0. Repeat to create five more new CMYK swatches:
   Step 5Working on the Background layer, select the Rectangle Tool (M) and drag across the whole page, taking the shape up to the bleed edge. Set the Fill Color to C=0 M=0 Y=7 K=0.    2. How to Structure Your Newspaper Template With LinesDividing up a newspaper layout into columns and rows, as well as allocating space for a masthead, is important for organising the design and allowing the text-heavy content to feel ordered and balanced. Step 1Lock the Background layer and unlock the top layer, Type. Switch to the Line Tool (\) and, holding Shift, click and drag across the top of the page, about 0.65 in down from the page edge, creating a single horizontal line that extends across all three columns.    Set the Stroke Color to C=90 M=78 Y=62 K=97, giving the swatch a Tint of 20%. From the Stroke panel (Window > Stroke), set the Weight of the stroke to 2 pt and the Type to Thick - Thick.    Step 2Edit > Copy and Edit > Paste the line, positioning it over the top margin line.    Paste again, positioning this line over the bottom margin line.    Paste another line, moving this one just below the top margin line, Y position 4.125 in. You can view the Y position from the top Controls panel. Paste a final time, moving this line down to Y position 10.15 in.    Step 3Use the Line Tool (\) to create a shorter vertical line, placing this between the two horizontal lines at the top of the page, at the center-point of the first left-hand column. From the Stroke panel, set the Weight to 1.5 pt and Type to Thick - Thick. As before, set the Stroke Color to C=90 M=78 Y=62 K=97, giving the swatch a Tint of 20%.    Copy and Paste the line, placing this on the right, across the center-point of the third column.
Step 4Paste the line and lengthen it, positioning it across the center of the gutter between the central and right-hand column, on the bottom section of the layout.    3. How to Create a Masthead for Your Newspaper TemplateStep 1Still working on the Text layer, use the Type Tool (T) to create a large text frame across the top-central section of the page. Type in the name of your newspaper and from either the top Controls panel or the Character and Paragraph panels (Window > Type & Tables > Character) adjust the Font to Pioggia.    You can add a subtitle below in Anko Italic, with around a 10 pt Font Size.    Step 2Use the Type Tool (T) to create text frames in the spaces on either side of the masthead. This is a good place to include the price, location, date, and issue number. Set the text in Anko.    Step 3Use the Line Tool (\) to create a horizontal line towards the top of the lower left section of the page, leaving a short space at the far left side for a text subheading. From the Stroke panel, set the Weight to 1 pt, Type to Thick - Thick, and from the Swatches panel, as before, set the Stroke Color to C=90 M=78 Y=62 K=97, giving the swatch a Tint of 20%.    Create a small text frame to the left side of the line, typing in a subheading for the section the article will fall under, e.g. "Environment". Set the Font to Elmoder Regular, Size 12 pt, and a C=90 M=78 Y=62 K=97 Font Color.    Select both the subheading and the line next to it and Edit > Copy, Edit > Paste, moving this below, to around Y position 12.9 in. Change the section title accordingly.    Paste again, moving this copy across to the top of the right-hand bottom section. Shorten the line so that it fits neatly within the column. Top tip: Switch off the visibility of the Background layer as you work by clicking the eye icon next to the layer's name. This will allow you to see the document grid, which can be helpful for lining up titles and typesetting.    4. How to Map Out Images on Your Newspaper TemplateStep 1Lock the Type layer and unlock the Images layer below. Use the Rectangle Frame Tool (F) to 'map' out where the images on the page will go. In this design, I've used three frames at the same size (using Copy and Paste), positioning them in each section, as pictured below.    Create a much larger image frame for the headline article, using this to fill the space above the smaller article sections.    Step 2Create three image frames with equal dimensions below the masthead, spanning the width of each column. Use the colors in your Swatches panel to give them a pink, orange, and blue Fill.    Step 3Insert images into your prepared frames by selecting each frame and going to File > Place.       You can place an image into one of the colored image frames and preserve the background color by directly selecting the image inside the frame and going to Object > Effects > Gradient Feather. Apply a Linear gradient to bring through some of the color behind.       5. How to Typeset Text on Your Newspaper DesignStep 1Before inserting article text into your template, you will need to split the design into more columns. A quick way to do this is to use guides. Pull out a guide from the left-hand ruler (View > Show Rulers) and place this along the existing line between the first two columns. Pull out two more guides for either side of the column line, creating a gutter, and three guides in total.    Drag your mouse over the guides to select all three, and Edit > Copy them. Edit > Paste, dragging the copied lines over to the halfway point of the first column.    Paste repeatedly to create more copies of the guides trio, dividing up the three columns into six vertical sections.    Step 2Working on the Type layer, use the Type Tool (T) to create a text frame for an article title, at the top of the first smaller article section. Type in the title, and set the Font to Pioggia, Size 25 pt.    Add another text frame for the author name, setting the Font to Anko Bold Italic, Size 9 pt.    Create a text frame for the article text, fitting this below the title and within the width set by the guides. Set the Font to Anko Regular, Size 8.5 pt. You can enter your own text or, for now, insert placeholder text (Type > Fill with Placeholder Text). Click on the small square at the bottom-right of the text frame to pick up the text and thread this into a newly created text frame, in the next mini-column along.    Direct readers to the section inside the newspaper by highlighting the page number at the end of the text in a different color.    Step 3Now that you've formatted the typesetting for one article, you can use this as a template for the other articles. Copy and Paste the text frames you've created, moving these onto the other sections below and to the right. Adjust the height of the body text frames as required.       Step 4Create a larger text frame for the headline above, setting the text for this in Pioggia, Size 46 pt. A subtitle above this can be set in Elmoder Bold, Size 12 pt.    Insert a text frame below with the first part of the article, setting the Font to Anko, Size 8.5 pt.    Step 5The colored spaces below the masthead are a good place for article and interview teasers. Set the headings to Pioggia, All Caps, the body text to Anko, and the section/page number to Elmoder.    Highlight some of the key words in a brighter color, to draw the eye.    6. How to Export Your Newspaper TemplateOnce you've finished working on your newspaper layout, you will need to export your design as a PDF for printing or sharing online. For print: Go to File > Export, and choose Adobe PDF (Print) from the Format menu. Name the file and click Save. In the Export PDF window that opens, choose Press Quality from the preset menu at the top.    Then click on Marks and Bleeds in the window's left-hand menu. Check both All Printer's Marks and Use Document Bleed Settings, before clicking Export.    For online: Go to File > Export, and choose Adobe PDF (Interactive) from the Format menu. Name the file and click Save. In the window that follows, adjust the options to your preference and click Export. Conclusion: Your Finished Newspaper TemplateYour newspaper template is finished—great job! You can save this document as an InDesign file so that you can return to it again. By simply dropping in different images and text, you'll have a completely new front page for your next issue.    In this tutorial, you've expanded your skillset by learning how to make a newspaper template in InDesign. Along the way, you've picked up plenty of useful skills for creating print documents and tabloid newspaper templates in Adobe InDesign. Creating grids and guides and mapping out the placement of images are all handy skills for creating newsletter design templates too. Looking for more newspaper templates and newsletter templates? These easy-to-edit InDesign newspaper templates from Envato Elements are great if you're short on time: A3 Business Newspaper Template (INDD)   Why not try a simple and elegant newspaper template that can be adapted as a company newsletter or business magazine? Perfect for presenting corporate, financial, or business news and articles. Professional Tabloid Newspaper Template (INDD)   If you're looking for a comprehensive and professional newspaper template, look no further. This 16-page newspaper template has standard tabloid dimensions and a range of color themes to choose from, to help introduce color in a subtle way into your design. Classic A3 Newspaper Template (INDD)   A 20-page newspaper template available in three colorways, this InDesign newspaper template has been designed with e-readers and tablets in mind. Elegant Lifestyle Newspaper Template (INDD)   This newspaper template has a refined and elegant style that would suit lifestyle, beauty, and fashion news. Sans serif typography gives the titling a modern feel. Traditional Pink Newspaper Template (INDD)   Inspired by the famous pink paper of the FT, this rosy-hued newspaper template combines traditional newspaper styling with contemporary minimalism. Plenty of white space makes this newspaper design feel particularly elegant. Discover more print design and InDesign tutorials to keep building your skillset:  |


.jpg)
.jpg)


| You are subscribed to email updates from Envato Tuts+ Tutorials. To stop receiving these emails, you may unsubscribe now. | Email delivery powered by Google |
| Google, 1600 Amphitheatre Parkway, Mountain View, CA 94043, United States | |


0 Comments