Envato Tuts+ Tutorials |
- Catching and Responding to Keyboard Events in JavaScript
- 10 Best Responsive HTML5 Sliders for Images and Text (Plus 3 Free Options)
- 8 Best WordPress Facebook Widgets (And 5 Free Plugins)
- 10 Best PHP Instagram Scripts and Bots in 2021
- What Is eCommerce?
- Top 20 WordPress Wedding Themes (+ Tips to Build Your Wedding Website)
- 25 Business Stationery Templates With Professional Corporate Designs 2021
- 30 Best Free Keynote Presentation Templates Designs (Download for 2021) + Video
- 31 Best Brochure Mockups (Using an Online Mockup Generator)
- How to Design a Product Catalogue
- From Photoshop to After Effects: How to Animate Custom Characters (Part 2)
- From Photoshop to After Effects: How to Customize Rigged Characters for Animation (Part 1)
| Catching and Responding to Keyboard Events in JavaScript Posted: 08 Jul 2021 06:43 PM PDT In this article, we'll discuss how you can catch and respond to different keyboard events in JavaScript. I'll show you a couple real-world examples to make it easy to understand. JavaScript is one of the core technologies of the web. The majority of websites use it, and all modern web browsers support it without the need for plugins. In this series, we're discussing different tips and tricks that would help you in your day-to-day JavaScript development. As a JavaScript developer, sometimes you need to implement features that require you to deal with keyboard events and perform actions based on them. Luckily, JavaScript provides a built-in Keyboard Events in JavaScriptIn JavaScript, the When you press any key on the keyboard, a series of events take place in the following order.
When you press down any key on the keyboard, the key down event is triggered. And if a key is pressed for a long time, the key down event is repeatedly triggered. The keypress event is mostly triggered when you press down any printable character, and it's fired after the key down event. In fact, the keypress event is used to relay a character resulting from the key down event. Mostly, the keypress event is not raised by non-character keys. Although some browsers support this event, it's not recommended to rely on this event, as it's going to be removed from the web standards. Finally, the key up event is raised when a key is released. Basically, a combination of key down and key up events provide you a code which indicates the key which was pressed. Each keyboard event provides two important properties: So that was a brief overview of keyboard events in JavaScript. Starting with the next section, we'll discuss these events along with real-world examples to understand how they work. The |
| 10 Best Responsive HTML5 Sliders for Images and Text (Plus 3 Free Options) Posted: 08 Jul 2021 06:04 PM PDT In this post, I'll show you some of the best free and premium HTML5 image sliders. We'll see automatic image sliders, responsive sliders with text, banner sliders, and more. All built with HTML5 and CSS.    Why Use a Responsive HTML5 Slider?HTML5 enables users to have a better and more consistent web experience across several devices. Now that smart devices are the number one way that people access the web, your site needs to be responsive. That is, it needs to work on varying screen sizes and resolutions—from a smartphone right up to a full-size computer. The best HTML5 sliders will look great and work great on all these devices. If you have image-rich content or want to present key text in an interesting way on your website, then you just can't go wrong by using an HTML5 slider. Find The Best HTML Sliders on CodeCanyonThere are many HTML5 based content sliders available on CodeCanyon. You can start using them on your website right away. Once you purchase a plugin, you will be eligible for free lifetime updates and six months of free support.    The large variety of scripts, widgets, and plugins available in the market should meet almost all your needs. You can use them to create sliders for your most popular posts, your best products, or customer testimonials. They are easy to use and look great on all devices. 10 Best HTML5 Sliders on CodeCanyon for 2021Because there are so many sliders out there to choose from, I've pulled together a list of the best slider responsive HTML5 templates for image and text available at CodeCanyon. 1. Royal Slider–Touch-Enabled HTML Slider Image Gallery   Royal Slider is the top-selling and best HTML slider you find on CodeCanyon. This HTML slider is an image gallery and content slider plugin with animated captions, responsive layout and touch support for mobile devices. This image slider in HTML has a 4.75 stars rating. User ecotouristitaly said:
2. Bootstrap 4 Carousel—Bootstrap Slider HTML Code   This Bootstrap-based HTML slider code is another great option. Bootstrap 4 Carousel is a set with image slideshows, a thumbnail slider and multiple items with advanced options. The Bootstrap 4 Carousel slider HTML code comes with 70+ pre-built examples and layouts. The image slider in HTML is compatible with all devices and web browsers, as well as 100% responsive. 3. Ultimate 3D Carousel HTML5 Photo Slider   If you've ever seen or used an actual slide carousel, you'll appreciate the design and aesthetics of the Ultimate 3D Carousel. This carousel slider allows you to display multimedia content with a unique 3D layout that mimics the carousels of film photography days. There are a number of effects you can apply to your carousel style if you choose, and if you prefer a more traditional slide effect, you can also opt for that instead of the carousel style. The carousel supports images, MP4 videos, MP3 audio, Google Maps, and more. It runs on all major browsers and uses a responsive layout with auto-scale function so that it works well on all mobile devices. 4. Simple 3D Coverflow HTML5 Photo Slider   Simple 3D Coverflow is a fully 3D multimedia slider plugin. You can use the plugin to display multimedia content on the website in an original and catchy layout that uses 3D perspective. You can include all kinds of content in a single slide. This includes images, videos from YouTube and Vimeo, etc. This HTML and CSS slider features:
The plugin comes with the Revolution lightbox, which can display all kinds of content like images, videos, iFrames, Google maps, etc. Make sure you go and see the live preview of this fantastic plugin. 5. Creative BS-4 Carousel HTML Slider   This slider is ideal for anyone who is already using Bootstrap 4 on their website. The framework already provides a lot of features and capabilities. It makes sense to take advantage of this fact and create a multi-functional slider. This is a fully responsive HTML5 slider and has great cross-browser compatibility. You will be getting 33 different carousels with their own animations. This plugin can create carousels for everything from products to testimonials and portfolios to video carousels. The live preview of the plugin covers all these use cases, so do check it out. 6. Vertical Ultimate 3D Carousel HTML Slider   This ultimate vertical 3D carousel offers a unique solution when it comes to sliders and carousels. Instead of presenting the carousel content horizontally, the slides are laid out vertically. This makes it a better option for mobile devices because they have more space available vertically. The responsive HTML5 text and image slider is incredibly user friendly. It has implemented drag-and-swipe-based navigation for desktop and mobile devices. It also lets you navigate through all the slides using a mouse wheel or with the left and right keyboard keys. It offers a bunch of parameters to control the alignment and separation of different slides in both horizontal and vertical directions. There are three different skins, each of which can be used with three unique layouts to create a slider. You can see how all the skins and parameters look and work in this live preview. 7. Simple Image HTML Slider Carousel   This simple image slider carousel actually comes with a lot of awesome layouts that you can use to showcase all your images. It's "simple" because it's easy to integrate into your own website. It comes with quite a few important features. The responsive slider with text layout has multiple display types to fit with all kinds of website designs. You can add lazy loading to the slider so that it only loads images when the user is about to scroll to the slider in the visible area. You can create the image playlist using either HTML markup or JSON data. There are a lot of other features such as navigation based on swipe gestures and keyboard arrow keys. You can read about all of them on the product description page. 8. Ultimate Media Gallery   The Ultimate Media Gallery is unique among the sliders in this list because it can display not just images but also video and audio files from a number of external content sources, including YouTube, Vimeo, Google Drive media, Podcast, and SoundCloud. This highly customizable gallery is fully responsive and mobile friendly. It takes full advantage of Font Awesome Library icons, and all demo examples are included in the download package for quick and easy setup. 9. Shopping Banners With Photo Slider HTML5 Code   These HTML5 banner sliders are meant to be used for creating HTML5 banner ad templates for AdWords, DoubleClick Studio, AdRoll and other ad platforms. This is the perfect plugin for people who want to create interactive ad banners to sell different products. This best slider HTML CSS is created with and fully editable in Google Web Designer. You can also change the colors and background with just a few clicks. You can create ad banners in seven popular sizes. See them all in action in the live preview of the plugin. The detailed documentation included with the plugin will provide a step-by-step guide to editing the template and creating your own interactive banner ads with sliders. 10. VS Team—Team Showcase HTML5 Photo Slider   Are you looking for a creative image slider in HTML? This HTML5 photo slider allows you to display your team members in your website. The automatic image slider in HTML and CSS features 4 layouts (Simple, Slider, Grid, Advanced) with unique 10 different styles. The Bootstrap slider HTML code comes with a fully responsive layout that will fit any device. Three Free HTML5 Sliders for Images and TextSome of the best HTML sliders are found on CodeCanyon. However, if you just want something simple, you can try out some of the free options first. Here are some of the most popular free HTML5 sliders for images and text. 1. bxSlider 4 Free HTML SliderThis is a fully loaded, responsive slider built with jQuery. The slides can contain images, video, or other HTML content. You can get all the bxSlider 4 files from its GitHub page. 2. Swiper Free HTML SliderSwiper is a free and modern responsive HTML5 slider which is designed as a mobile-based touch slider. It is usable on desktops as well. However, it does not implement keyboard- and mouse-based navigation. 3. Slick Free HTML SliderSlick calls itself "the last carousel you'll ever need." It relies on jQuery and works in browsers as old as IE8. There are plenty of attributes to precisely control how the carousel behaves. Tips for Using HTML Sliders on Your WebsiteHere are a few tips to keep in mind to help you get the most value out of any slider carousels that you use on your website. 1. Use Sliders to Showcase Important Products and ServicesSliders and carousels will take up a large portion of the user's screen when they visit your website. This makes them ideal for pitching your best product or service. Also, make sure that you avoid clutter. Each slide in the carousel should focus on just one aspect of the product and do it well. 2. Include Call to Action ButtonsIt is also important to include a direct call to action button somewhere on the carousel itself. If a visitor likes one of your products, they should not have to go somewhere else to make the purchase. Explore More HTML5 Scripts and TemplatesThese HTML5 photo sliders are by no means the only ones available at CodeCanyon You can find HTML5 widgets, scripts, and templates of every kind!
Editorial Note: This post has been updated with contributions from Maria Villanueva. Maria is a staff writer with Envato Tuts+.  |
| 8 Best WordPress Facebook Widgets (And 5 Free Plugins) Posted: 08 Jul 2021 04:39 PM PDT In order to run a successful business, you need to promote and advertise your company wherever your audience's attention is. Adding premium Facebook widget WordPress plugins to your website will help you connect with your customers. 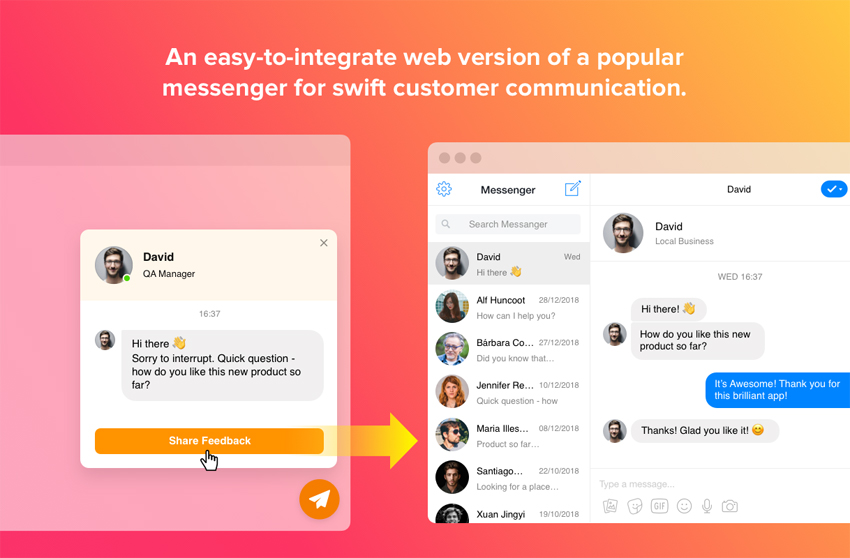   Facebook allows you to promote your business through text, images, and videos, all of which are necessary to promote your business successfully. At CodeCanyon, you will be able to choose from all the premium Facebook widgets available, and they will allow you to display all of these elements on your website. Don't miss out on this opportunity to improve your business through premium Facebook widgets for WordPress! The Best WordPress Facebook Widgets on CodeCanyonDiscover CodeCanyon's extensive library of the best WordPress widgets and plugins ever created. With a cheap one-time payment, you can purchase these high-quality plugins and widgets and grow your business through Facebook. Here are a few of the best Facebook widget WordPress plugins available on CodeCanyon for 2021.    These feature-rich WordPress Facebook plugins will assist you in connecting with your target audience on one of the most popular social media platforms on the planet. With the premium widgets offered on CodeCanyon, you will be able to:
Add a high-quality Facebook widget plugin to your website today! Top 8 WordPress Facebook Widgets (From CodeCanyon for 2021)1. Facebook Pixel WordPress PluginDo you use the Facebook Pixel analytics tool in your business profile? Then you need this Facebook Pixel WordPress plugin. The Facebook Pixel and Meta Manager for WordPress takes the hassle and complexity out of implementing essential Facebook Pixel tracking codes and OG meta tags. This Facebook Pixel WordPress plugin allows you to easily manage your Facebook Pixel for conversion rates and successful digital marketing. 2. Facebook Reviews WordPress Plugin   Are you looking for the best Facebook plugin for WordPress? The Facebook Reviews plugin for WordPress is one of them. The Facebook Reviews WordPress plugin allows you to integrate reviews from your Facebook page into your website to increase trust in your brand among visitors. Customization options include four layout variants, three review templates, a flexible header, and more. 3. WordPress Facebook Chat   WordPress Facebook chat plugins are very useful. This Facebook WordPress plugin lets you set up a Facebook page chat box on your website. Visitors will be able to chat with you via your Facebook inbox. This is an easy way to offer support, keep contact with your customers, turn visitors into your customers, and chat with them anytime to increase sales and build trust. 4. Facebook Feed—WordPress Facebook Plugin   The Facebook Feed WordPress plugin is essentially four Facebook plugins in one. With it, you can display your Facebook Posts Feed, Image Gallery, Video Gallery, and Events Calendar. Features include:
Facebook feed WordPress plugin is a great way to get your Facebook content on your website. 5. Social Stream WordPress Facebook Plugin   Social Stream for WordPress with Carousel is a viable option whether you're interested in only displaying Facebook content or content from multiple social media networks at one time. With Social Stream, you can funnel all your social media streams to your WordPress-powered website in style. There are several display options included with this social media carousel:
If you're interested in mixing in other social media streams along with your Facebook feed, Social Stream for WordPress with Carousel may be exactly what you're looking for. 6. Facebook Events Calendar For WordPress   Display your Facebook events using a widget or shortcode with the Facebook Events Calendar. This full-featured Facebook widget not only looks great, but has some great features as well. Features include:
The Facebook Events Calendar is easy to use and one of the best ways to display your Facebook Page public events on your website. No need to maintain two calendars any more! 7. Facebook Chat—Facebook Messenger for WordPress   Facebook Chat is the fastest way for your clients to reach you and get their questions answered. This customizable Facebook chat widget gives you a direct line of communication with your customers and potential customers 24/7. The chat widget can be customized to be shown on specific pages or to specific users. Keep a line of communication open with your website visitors with this powerful chat widget. 8. WooCommerce Facebook Chatbot   Do you have a WooCommerce online store? This Facebook plugin for WordPress is a great option for you. This WordPress Facebook plugin creates a specific chatbot on your WooCommerce Store. The Facebook Chatbot can chat with your customers, respond to particular questions, and provide suggestions. The visitors will receive information and can buy products 24/7 on your WooCommerce store with this WordPress Facebook chat plugin. 5 Free WordPress Facebook Plugins To Try In 2021By purchasing a premium Facebook WordPress plugin, you will receive the most advanced set of features and functionality. The number of features that these plugins will have and the overall user experience will be much higher with a premium plugin. If your budget does not allow you to afford these premium Facebook WordPress plugins, there are plenty of free alternatives for you to check out. Here is a list of five free WordPress Facebook plugins. 1. Facebook for WooCommerce Free PluginThis free WordPress Facebook plugin connects your WooCommerce website to Facebook. With this Facebook plugin for WordPress, you can install the Facebook pixel, upload your online store catalog, and create a shop on your Facebook page, enabling you to easily run ads. 2. The Official Facebook Chat Free PluginThis free WordPress Facebook chat enables customers to message you while browsing your website. Chats started on your website can be continued in the customers' Messenger app, so you never lose connections with your customers. 3. Easy Social Post Feed   This beginner-friendly plugin will allow you to display not only a custom Facebook feed, but also a custom Instagram feed. With the custom Facebook feed, you can add posts, links, photos, videos, and events. This plugin is an all-in-one solution for your Facebook needs! 4. Smash Balloon Social Post FeedDisplay completely customizable, responsive, and search-engine-friendly Facebook feeds on your website with this plugin. You can include multiple Facebook feeds from any public Facebook page and customize their appearance to fit the theme of your website. 5. WP2Social Auto Publish   WP2Social Auto Publish is one handy plugin. You can publish posts automatically from your blog to Facebook. The plugin supports filtering posts based on custom post types as well as categories. How to Add a Facebook Chat to Your Website Using WordPress Facebook Chat WidgetNow that we have gone over the best Facebook widget for WordPress available, I'm going to show you just how easy it is to implement them into your website. The Facebook Chat widget is an incredibly powerful tool that can be used to keep in contact with your website audience around the clock. In this short tutorial, I'm going to show you how you can connect your business's Facebook page to the chat widget and display the chat in the bottom right-hand corner of your website. Once you've installed the Facebook Chat widget, head on over to WP Dashboard > Facebook Chat. This will open up the chat widget creator. Click the Create Widget button and type "Facebook Chat" in the text field for the name of the widget. Next, we will connect our Facebook page to the chat so we can receive messages from the chat. Click on the Connect to Facebook button and you will be asked to log in to your Facebook account. From there, you can select the page that you want to be linked with the chat widget. Click the Connect button, and your page will now be connected to the chat.    Finally, we would like to make a few changes to the text and styling of the chat widget that's on the website. We will choose the Chat Bubble menu item and choose the mail icon. Next, we will select the Welcome Message menu item and change the text to say, "Thanks for stopping on by! Feel free to send me a message!" Now that we have connected our Facebook page and edited the styling and text of the chat, it is time to add it to our website. Click the Save and Exit button at the bottom of the chat editor. This will take you to an overview of all of your chat widgets and display the shortcodes for each widget. Copy the shortcode of the Facebook Chat widget and paste it to the visual editor of the post or page that you would like the chat to be displayed on. That's it! You have now successfully added a Facebook chat to your WordPress website.    Install a WordPress Facebook Plugin Now!It's just a matter of comparing prices, options, and reading a few user reviews before finding the right Facebook widget. Facebook is a powerful social media platform that should not be overlooked. Integrating it into your website can make a big difference. If you are looking to gain more exposure for your business, then add a premium Facebook widget WordPress from CodeCanyon to your WordPress website. The plugins available will allow you to add Facebook messengers, feeds, images, videos, and like buttons to your website and customize them to fit the theme of your website. If the plugins listed in this article did not seem to suit your needs, you can always browse CodeCanyon for more high-quality Facebook widgets and plugins. Also, don't miss out on the thousands of other high-quality WordPress plugins on CodeCanyon that can help you grow your business. Have a look through this massive collection of plugins, and you'll find helpful plugins in all different types of categories from marketing to eCommerce to social media. CodeCanyon has the tools necessary to help your business succeed, so act now! Other Ways to Connect WordPress and FacebookIf you want to learn more about connecting WordPress and Facebook, or want to discover more Facebook plugins for WordPress, check out our other posts here on Envato Tuts+.
Editorial Note: This post has been updated with contributions from Maria Villanueva. Maria is a staff writer with Envato Tuts+.  |
| 10 Best PHP Instagram Scripts and Bots in 2021 Posted: 08 Jul 2021 04:21 PM PDT Are you looking to save time and use Instagram more efficiently and effectively? Incorporating Instagram PHP scripts and widgets is the easiest way to automate routine functions, download images and videos from Instagram, and do tasks like scheduling and publishing posts. Instagram bots help build and engage with followers.    Do You Need an Instagram Script or Bot?Would you answer "yes" to any one of these questions?
CodeCanyon offers different types of Instagram PHP scripts and bots, ranging from automation tools to downloaders. If you want to learn more about PHP in general and brush up your skills, why not try our free PHP tutorial? You'll start as a PHP beginner and end up with a solid set of programming skills. The Best PHP Instagram Scripts & Bots on CodeCanyonCodeCanyon offers high-quality social media PHP scripts and bots, which you can purchase and use forever with free updates.    Some of the benefits of these Instagram PHP scripts and bots include:
Here are some of the best-selling Instagram PHP scripts and bots on CodeCanyon. Automation Tools and Bots1. XeroIni—Instagram Post PHP Script Scheduler and Marketing Tool   XeroIni is a best-selling Instagram post PHP script. This marketing tool will help you and save you time if you run a big Instagram account. XeroIni is a complete Instagram marketing software which allows you to publish and schedule post on Instagram business accounts, reply on comments, and comment on a post. The Instagram post PHP script also contains the option for post analytics, hashtag search and more. 2. Stackposts—PHP Script Social Marketing Tool   Stackposts is a social media marketing tool that helps you to easily auto-post and schedule Instagram posts, as well as posting on Facebook, Twitter, and much more! It also can manage multiple social networks, increase your traffic, and engage your audiences. Just upload the media you want to post, type your caption, and use the handy calendar to decide when you'd like your post to go out. Features include:
3. Midrub Instagram PHP Script   Midrub lets you schedule posts for selected dates within seconds. It also helps you obtain valuable insights such as the most popular hashtags and creates ads based on that information. You can also obtain insights for published posts, as well as moderating and replying to comments for connected accounts. It also lets you view the history of your content, such as scheduled, draft, and published posts. If you wish to generate reports for published posts, you can do that as well. Midrub also provides the following Instagram bots:
4. Warbler Instagram PHP Script   Warbler is the best Instagram script to save time over posting content manually. Warbler allows you to schedule and automatically post your photos on specified times of the day. It also helps in collecting valuable information about posts, likes, shares, etc. Other features include:
5. DM Pilot—PHP Instagram Bot and Scheduled Posts   DM Pilot is an automation tool and bot that lets you publish or schedule any content from your browser. DM Pilot also offers a web-based direct messenger where you can chat with your customers and send messages, attachments, posts, stories, and emojis, all from the browser. Some notable features of this script include:
6. Social Bot—PHP Instagram Bot   Social Bot is a great PHP Instagram bot for increasing your followers and popularity. This bot will create activity on your account, interacting with other users, and liking and commenting on pictures. The script is easy to set up and can start to increase the number of your followers right away.
Instagram Downloader Scripts and Other Instagram Scripts7. Instagram Downloader PHP Script   Even with permission from the copyright holder, downloading images from Instagram is neither easy nor straightforward—that is, until Instagram Downloader Script arrived on the scene. With one click, this simple, lightweight script allows you to download photos and videos to your hard drive for use in an online exhibition, a feature on a website, or for whatever other purposes you've gained permission to use the image. 8. Instagram Image and Video Downloader   Imagine you are on an Instagram feed, and a photo or video captures your attention, and you want to save the video or photo or offline. How do you do that? With this downloader script, you don't even need to use the Instagram API to download photos or videos. Just install the script and it will provide a download button and a share option after download. 9. All Social Media Video Downloader   All Social Media Photo & Video Downloader allows you to download photos and videos on Instagram as well as other supported video platforms such as Instagram, Twitter, and Facebook. It is simple to use and does not require an API or database. It also supports multiple languages, and you can add or remove any language through the panel. Other features include:
10 . BioLink Instagram Script   Instagram allows only one link from your Instagram account, which can be very frustrating if you want to take advantage of a large following to promote different services you offer or if you're going to share content on several sites. BioLink provides a workaround to this problem. Users register and create an account on your website—powered by the BioLink script—where they can add as many links to relevant sites as they want. They can then add their custom profile URL from this site to their Instagram bio, guaranteeing that when a visitor clicks on the link, they will be guided to the webpage containing multiple links. BioLink also allows you to get day to day analytics of your posts and integrates with Google Analytics. 3 Free WordPress Instagram PluginsThe premium PHP scripts above offer great features and the most flexibility, but you can also take advantage of free WordPress plugins and widgets for Instagram if you are on a budget. 1. Blog2Social   Blog2Social can auto-post, cross-promote, schedule, and automatically share your blog posts to Instagram and other social networks. It automatically creates posts for your content and auto-posts at the best times, hence saving the time and pain of manual sharing. 2. NextScripts: Social Networks Auto-PosterNextScripts automatically publishes posts from your WordPress blog to your Instagram account. The process is automated; write a new post, and it will be published to the configured social network. 3. Smash Balloon Social Photo FeedThis free WordPress plugin allows you to display Instagram posts from your Instagram accounts, either in the same single feed or in multiple different ones. Wrapping UpManaging social media accounts is not an easy task, but with these Instagram PHP scripts, all the posting, tracking, and managing are done automatically. If you are still not sure, here are some of the tasks they can do and help you save time.
Discover More PHP Scripts and ResourcesExplore thousands of the best and most useful PHP scripts ever created on CodeCanyon. With a low-cost, one-time payment, you can purchase one of these high-quality PHP scripts and improve your website experience for you and your visitors. If you need more inspiration or resources, check these out:
Editorial Note: This post has been updated with contributions from Maria Villanueva. Maria is a staff writer with Envato Tuts+.  |
| Posted: 08 Jul 2021 06:55 AM PDT If you're constantly hearing about eCommerce, it's because it is a fast-growing trend. Recent U.S. Census Bureau figures estimate that U.S. eCommerce sales totaled $215 billion for the first quarter of 2021. That's more than a 39% increase over the same period of 2020. Other countries also show recent growth in eCommerce sales.   Do you want to join the trend? If so, learn all you can about eCommerce and the steps you need to go through to set up a business online. Many articles make eCommerce seem easy, and it can be if you do your homework first. But, if you jump into eCommerce without putting much thought into it, you might be setting yourself up for failure. Remember that eCommerce is a way of doing business. If you want to succeed, you need to treat it like a business. That means following some defined steps like those that I'll cover in this high-level tutorial. Are you ready to learn more about eCommerce? Let's get started. 1. eCommerce DefinedSo, what is eCommerce? Simply defined, eCommerce refers to business transactions conducted through the Internet. Anytime you buy something from an online site, you are participating in eCommerce. eCommerce can refer to sales of physical products like clothing, books, cosmetics and many other things. It can also refer to digital products such as software, eBooks, and apps. Finally, eCommerce sales also include services such as consulting. A common misperception is that businesses that market their products through eCommerce don't have a physical presence. The truth is that many popular retailers have both a brick and mortar store and an eCommerce site. That being said, one of the big advantages to starting an eCommerce business is that you don't need an offline store to succeed. You just need a product that you can sell online. 2. Decide What Product to SellIt may seem easy to decide which product to sell, but give it some serious thought. You want to sell a product that sets your eCommerce business up for success. Here are the four main questions to ask when deciding what to sell:
Depending on your business, you may need to ask other questions as well. In this section, we'll look at questions one, two, and four. In the next section, I'll discuss question three. The first question is crucial. Just because you want to sell something doesn't mean you can get enough of it to sell. If a product is unavailable or the materials to make the product are hard to get, that product may not be a good choice for eCommerce. Your cost to produce or acquire a product (question two) is an important consideration. If the price you pay for the product (or for materials to make the product) is too high, there may be too little room for profit. Don't forget to include labor costs into your decision-making. Even if you can get a product at a reasonable price, that product still might not be a good choice. Check the online marketplaces to see how many other sellers offer the same thing (question four). If there are too many sellers in the market, the product may not be a good choice, though some competition is often a good indication of a profitable niche. Here are some questions to ask when looking at potential competitors:
Now, let's take a closer look at question three. It's time to identify your target market. 3. Find Out Who Needs Your ProductFor you to sell your product, someone must want it. If there's no demand for a product, your eCommerce business will have trouble succeeding. Of course, you can try to generate a demand for the product, but that can be difficult to do. To discover your target market, do some research. Here are some steps to take:
Learn how to create a market research survey to begin your research, as well as how to build a minimum viable, agile product:
After you've determined that there's a need for your product or service, it's time to develop a business strategy. 4. Organize Your BusinessYou've done your research. You've found out that there is some demand for your product or service. You've discovered that your product or service is cost-effective to produce. You're going to go ahead and start an eCommerce business. Now's the time to organize your business. Give some thought to questions like:
It's best to deal with these questions early in the process. It's better to get it right now than to try and fix it later. Depending on the complexity of your business structure, you may need to hire an attorney to set up your business properly. A CPA can help you with tax questions. Naming a business is an important task. Your business name should be catchy and easy to remember. Preferably it is related to your product. Make sure that your business name is not already being used. Also, check to make sure that a domain name for your business is available. Read through our series that provides more guidance on how to choose the right name for your business, you can get started with the following article: I'm a big believer in business plans. The process of creating a business plan causes new business owners to think about the tough questions. It also gives them goals to measure the progress against. Some startups resist creating a business plan, but I think most new businesses are better off with one. And that includes eCommerce businesses. Your business plan doesn't have to be formal nor are you "locked in" to your initial plan. In fact, if you don't need to show it to a partner, investors, or financiers, then you can still draft one for your own use. It's still a good idea to have one. This tutorial provides some helpful guidance on how create to a fluid business plan that can change as your business changes: After you select a product and organize your business you are ready to develop a marketing strategy. Before you craft your eCommerce website, you need a plan in place. 5. Develop a Marketing StrategyNow that you have decided what you are going to sell and defined your business structure, it's time to decide how you are going to market your business. Since we are talking about eCommerce, that marketing strategy involves the internet. You have several options:
Each approach has pros and cons. Pros and Cons of Using Your Own SiteIf you sell your product from your own site, you have more control over the process. You may also have better access to your customers. For example, you can create a forum, blog, or other customer interface on your site. However, you need to drive traffic to your site. And you are responsible for site maintenance and any problems your customers have when checking out. Pros and Cons of Using an Existing Online MarketIf you sell your product from an existing online marketplace, you are bound by that site's rules. It may be difficult to differentiate your product from similar products. Plus, the market site receives a percentage of each sale. However, most established markets already have a great deal of customers who are searching for products. Plus, the marketplace site is responsible for maintenance and upkeep. They also handle problems your customers have with the site. Pros and Cons of Setting Up a Social Media StoreFacebook has recently allowed vendors to launch a Facebook Shop on a dedicated page. Other social media platforms may follow the trend. The advantages of establishing a store on Facebook is that there are thousands of users already on the platform. If you do set up shop on Facebook, remember that you do not own the platform. Selling on social media shares many of the same advantages and disadvantages as selling your product from an existing online marketplace. This article offers additional eCommerce platform choices to consider, and is part of our Fundamentals of eCommerce learning guide: Mobile eCommerceAn area that should not be ignored is mobile marketing. According to statistics from the Pew Research Center, 97% of U.S. adults owned a mobile phone as of February 2021. And 53% owned a tablet. Obviously, the potential for mobile sales is huge. Regardless of the way your eCommerce site is set up, make sure that it is mobile-friendly. To learn more about what makes a mobile eCommerce site succeed, review this tutorial: In the end, the decision of where and how to market your product or is up to you. Many eCommerce sellers start by marketing a product on a marketplace site and later establish their own site. 6. Set Up Your Web PresenceIf you've decided to use an existing marketplace to sell your products, set up your vendor account and list your products. Read all user agreements carefully before you establish your account. If you've decided to market your product from your own website, the process is a little more complex. Here are the basic steps:
As you can see, setting up your own eCommerce website involves a lot of work. If you need help with this step we have web designers and developers on Envato Studio who can perform this task for you. We also have customizable Shopify themes and a number of eCommerce themes for additional sales platforms on ThemeForest, our online site marketplace. The stylish Bazien Shopify theme is shown below:   Learn more about how to setup your first Shopify store, as well as whether Shopify is the right solution for you or not:
7. Promote Your ProductOnce you've got an eCommerce website up and running, you're ready to start selling your product. You're not done, however. You need to promote your product to draw customers to your site. Here are several ways to do that:
To reach your goals, use more than one means of promoting your eCommerce business. It's also helpful to measure which promotion is most effective. Consider adding a simple question at the end of the checkout process like "how did you hear about us?" And set up your site analytics to track where sales were driven from. Get started with developing your eCommerce mailing list by reading through our Email Marketing Jumpstart learning guide, this article is a great starting point: What's Next?You've now learned the basics about how to start an eCommerce business. If your eCommerce business is up and running, you may be wondering what to do next. If your eCommerce business is successful, here are several options:
Now's the time to take action, research what products you'd like to sell, test the market, and get your eCommerce business up, running, and making money. Discover great WordPress eCommerce themes and other top eCommerce themes on Envato Elements and ThemeForest. Editorial Note: This content was originally published in 2016. We're sharing it again because our editors have determined that this information is still accurate and relevant.  |
| Top 20 WordPress Wedding Themes (+ Tips to Build Your Wedding Website) Posted: 08 Jul 2021 06:48 AM PDT The question's been popped and now the planning begins. Creating a WordPress wedding website to let guests know all the details surrounding the big day is becoming increasingly popular, with at least 14% of engaged couples choosing to go down this route. Whether you're in the market to create a WordPress wedding website for yourself and your significant other, or you're ready to design the perfect site for a friend or client, the best part is you don't need years of design experience to build a high-quality wedding website. Scroll through the vast selection of themes on ThemeForest and once you've chosen your favorite, you can easily customize it to craft a website that tells your unique story!    Read on for our picks of some of the best wedding WordPress themes available, as well as some handy tips for building your perfect WordPress wedding website along the way. First Thing First: Why Create a WordPress Wedding Website?1. Save MoneyDepending on how many people you're inviting, sending physical invites can be pricey–especially if you have overseas guests. Buying and editing a WordPress wedding theme can be a cost-effective way to get your message out there without breaking the bank. 2. Update as You GoThe average wedding takes 528 hours; or 22 full days, to plan–and with many couples opting for longer engagements, lots can change from "yes" to "I do"! Creating a website is simple and enables couples to quickly update guests as plans progress. 3. Tell Your StoryWith a traditional paper wedding invite, you can only say so much. A WordPress wedding website takes your content up a gear by allowing guests to read the stories of your adventures together, as well as scroll through photography of the happy couple. 4. Keep Content in One PlaceCreating a WordPress wedding website allows guests to scroll through all the necessary information at one time–think information about the wedding party, gift lists, venue, accommodation, dress code, and more. Plus, there's less risk in guests losing any of the important details along the way! Top 20 WordPress Wedding Themes For 2021Now you're armed with tips and ideas about selecting your wedding website, take a look at some of the best WordPress wedding themes from ThemeForest.    1. Solene - Wedding Photography ThemeBest for Classic Wedding PhotographersSolene is one of the best-selling wedding premium WordPress themes. This wedding industry theme WordPress is built for photographers. This WordPress wedding theme covers everything for showcasing and selling photos. Solene comes with 12 beautifully designed homepages, 7 inner pages and numerous blog layouts. Be sure to check the live preview! User puursan siad:
   2. Avala - WordPress Wedding ThemeBest For Wedding VendorsDo you like elegant and minimalist wedding premium WordPress themes? Avala is waiting for you. This marriage responsive wedding WordPress theme comes with 16 beautiful homepages. This also works as a wedding industry theme WordPress. If you're a wedding planner or photographer, this theme works perfectly for you. Avala WordPress wedding theme is translation ready, fully responsive, supports WooCommerce, and much more!    3. Artale - Wedding Photography WordPressBest For Experienced Wedding PhotographersLooking for the best wedding industry theme WordPress for photographers? Artale is one of the newest and best ones. You don't need coding knowledge to use this wedding premium WordPress theme. It comes with beautiful ready-to-use demos and portfolio pages. One cool feature us that it also has password protected galleries and supports WooCommerce. Overall, Artale is a complete wedding industry theme WordPress.    4. The Aisle - Elegant Wedding ThemeBest For Wedding AnnouncementsThe Aisle is another popular wedding premium WordPress theme. This new WordPress wedding theme has everything you need for your website. From wedding announcements, photography and gallery pages, to wedding invitations, RSVP pages, and many more features. This WordPress wedding theme RSVP features a high rating and includes a YouTube tutorial to set it up.    5. Heartbeat - Wedding and Event Planner WordPress ThemeBest for Sophisticated WeddingsHeartbeat wedding website WordPress theme is one of the best wedding WordPress themes. This WordPress wedding theme incredibly customizable to fit your special day. It has an elegant design that is very responsive. Thanks to the easy page building, you won't need coding experience to make this wedding premium WordPress theme your own.    6. Monisa - Elegant & Clean Wedding ThemeBest for Stylish WeddingsIf you need a WordPress wedding website to match the elegance of the nuptials, try out Monisa. It's one of the best wedding WordPress themes online. Monisa features a modern design that looks great on any screen size. Customize the included invitation templates for an easy RSVP process. With just a click of a button, you can preview the changes you've made to this WordPress wedding theme.    7. Pratty – Wedding WordPress ThemeBest for Modern WeddingsA modern wedding deserves a modern wedding website WordPress theme. Pratty is a theme right at home in 2020 with its responsive, clean design. This wedding premium WordPress theme also features:
   8. Jolly - Wedding Invitation & Planner WordPress ThemeBest for Cozy WeddingsThis feature-rich WordPress wedding theme is perfect for your small wedding. Customize this template with seven different home page options and three header styles. You'll also be able to use advanced typography and unlimited colors to create the perfect look. Jolly is also a marriage responsive wedding WordPress theme, meaning it will perform well on any device.    9. Zefirr - Event & Wedding Agency WP ThemeBest for Low-Key WeddingsThis beautiful wedding website WordPress theme couldn't be simpler to use. Zefrir offers a wide range of customization options to get guests excited for the big day. This wedding premium WordPress theme is also translation ready, so you can create a welcoming site for wedding-goers. It's a real winner for absolute design beginners too, as this WordPress wedding website supports drag and drop page building. Zefrir is a fantastic option if you're looking for an Indian wedding WordPress theme or a template for a low-key wedding.    10. Ceremony - Wedding Planner WordPress ThemeBest for Extravagant WeddingsThis WordPress wedding theme RSVP aims to excite your wedding attendees. Entertain your WordPress wedding site's visitors with stories of how you met, engagement photos, and information about the wedding parties. For the budding copywriters out there, there's even the option to write blog posts to involve the guests in the wedding planning or share ideas for activities in the local area.    11. WoWedding - Wedding Oriented WordPress ThemeBest for New PhotographersPhotography is front and center in this striking template. There's space for a large photo of the couple on the homepage, and then for a gallery as users scroll further down. It's ideal for amateur or professional photographers who would like to tell the story of their relationship in a visual way. Plus, there's a great catalogue feature to help guests pick the perfect gift.    12. Henna - Wedding WordPress ThemeBest for Quirky WeddingsFor couples wanting to stand out from the crowd, this fully-responsive theme boasts loads of customization options like full-screen photo galleries and blog post styles. If you're looking for an Indian wedding WordPress theme but you don't have web design experience, then you'll enjoy Henna. On top of its easy customization options, this WordPress wedding theme has video tutorials and free support.    13. Lavelo - Wedding WordPress ThemeBest for Traditional WeddingsThis wedding premium WordPress theme is packed with all the content you could need for your big day. It comes with four different options for homepage layouts so you can make sure all the important info is displayed in a way that best suits you. A blog option is available where you can tell the story of how your budding relationship bloomed into a marriage proposal.    14. Sweetinz - Creative OnePage Wedding WordPress ThemeBest for Relaxed WeddingsThe first thing guests will notice is the fun animated font in the center of the homepage. The attention-grabbing text sets the tone for the rest of the light-hearted WordPress wedding website, hinting to attendees that the wedding will follow suit.    15. Alis - Wedding PlannerBest for Creative WeddingsThis eye-catching template has something for everyone – with many different homepages to choose from, you can let your creative flair take over as you pick a template that works best for your big day. Bold imagery and subtle touches like movement when users scroll over pictures make this marriage responsive wedding WordPress theme stand out.    16. Fleur WordPress Theme For WeddingsBest for Outdoor WeddingsThe Fleur WordPress theme is one of the best wedding WordPress themes available on ThemeForest. It's highly customizable and easy to use. With the click of a single button, you can see how your changes look when applied. This Fleur WordPress theme is responsive, so your guests can view the site comfortably on whatever device they use.    17. Celebration - Wedding & Class ReunionBest for Luxurious WeddingsThis template has a high-end feel, partly due to the ability to apply multiple smooth transitions to scrolling imagery. You can easily add a countdown feature to build anticipation for the big day.    18. Gretna Green - Wedding ThemeBest for True RomanticsPacked with floral illustrations and pink tones, this template will be difficult to resist for the real romantics out there. Couples often spend a large chunk of their wedding budget on flowers, so this is a great option for fans of pink roses! The flower-covered invites are particularly cute and memorable.    19. The Wedding Day WordPress ThemeBest for Romantic CouplesThe Wedding Day WordPress theme is one of the popular themes. This wedding premium WordPress theme is perfect if you don't have coding experience. The Wedding Day WordPress theme includes a collection of elegant predesigned pages for many purposes. Wedding announcements, countdown, photography and gallery pages, wedding invitations, guestbook and RSVP pages, and more. Be sure to check out this WordPress wedding theme RSVP!    20. Wedding Industry Theme WordPressBest for Wedding PlannersAs the name suggest, you can create a professional wedding website for your business with this theme. This marriage responsive wedding WordPress theme comes with a lot of features:
   Free Premium WordPress Themes From ThemeForestChoosing a premium template is the best option for your WordPress wedding website, but it might not fit in your wedding budget. If you'd rather go the free route, you can still get professional quality thanks to free WordPress themes from ThemeForest. Each month ThemeForest offers a selection of premium WordPress themes for free. What's better than getting a professional quality WordPress wedding theme at a 100% discount?    Unlike free WordPress themes you can find anywhere online, you won't have to worry about quality or functionality. Each WordPress theme that's free on ThemeForest is held to the same standard as other templates. If you're looking for a free WordPress theme for your WordPress wedding website, see what's available on ThemeForest. Top Tips for Creating a WordPress Wedding Website1. Allow the Site to Reflect Your PersonalityWith so many WordPress themes to choose from, it's never been easier to pick a theme to match the style of your wedding. Huge country wedding? You can select a theme that complements your venue in terms of color and tone. Small kitsch wedding? You can find your perfect match. 2. Provide a Simple User ExperienceLike any good website, you want it to be simple to use–especially if you are relying on the site to point guests to important information. Copywriting can help signpost key details, but you want to make sure the site points people in the right direction clearly and quickly. 3. Use Password Protection for Private ContentYour website is the digital expression of your wedding. Just as you carefully consider which people make the cut, make sure you password protect the site so only your guests are privy to information about the special event. 4. Include Local Activities and TipsIf guests are coming from afar, it's likely they will want to explore the local area. It's a nice touch to include a page with ideas about activities and events they can check out either before or after the nuptials. Learn More About WordPressWe know WordPress can seem intimidating if you're just starting to use this awesome platform. But don't worry, here I have some resources that might help you with your WordPress website. Additionally, you can check our fantastic course: A Beginner's Guide to Using WordPress and our Tuts+ YouTube channel:
Discover More Wedding Assets and Resources on Tuts+
Find Your Perfect WordPress ThemeAnd there you have it! Plenty of high-quality themes and useful tips to help you craft a WordPress wedding website to tell the story of your relationship and upcoming special day. Looking for a different theme? Search the wide range of wedding templates available on ThemeForest and find your perfect match. Editorial Note: This post has been updated with contributions from Maria Villanueva. Maria is a staff writer with Envato Tuts+.  |
| 25 Business Stationery Templates With Professional Corporate Designs 2021 Posted: 08 Jul 2021 05:55 AM PDT First impressions count, and your corporate letterhead may be the first thing a prospective client sees. That's why it's essential to convey a professional image with your business stationery design.    What if you don't have time or design skills to create a slick looking letterhead? A stationery template will help, and save you time, too. In this guide, I'm going to show you some of the best stationery templates from Envato Elements and GraphicRiver that you can use to enhance your company's image. Best Stationery Letterheads on Envato Elements (With Unlimited Use)Using a professional letterhead template increases the credibility of your business. It's good for consistent branding, too. Envato Elements offers a choice of thousands of stationery letterhead templates, and there's an excellent offer you can grab today: download as many templates as you want for one low price.    They're quick to customize, as all you've got to do is add your business logo to get a letterhead or business card you can use immediately. You can also use these for your own personal letterhead templates. Best Letterhead Templates With Professional DesignsWhether you're writing to new clients, networking with potential investors, or prepping for a big presentation, you'll need to get your branding right. These professional stationery templates from Envato Elements will help: 1. Professional Green Business Stationery.jpg) .jpg) .jpg) Love green? Then the professional green business stationery set is right for you. The green geometric pattern is eye-catching, yet simple, to make anyone who receives your letter take notice immediately. With this modern stationery pack, you can customize your corporate letterhead and start communicating for business almost immediately. It includes two letterhead sizes, so you can print it easily whether using it internationally or in the US. There's an envelope, business card, and presentation folder, too, to give you a branded presence for every occasion. This will work with any design program that can work with Illustrator files. 2. Yoga Stationery.jpg) .jpg) .jpg) For those who prefer a minimalist approach, the Yoga stationery set could be the perfect solution. In black and white, this simple letterhead design and stationery pack suits almost any business. It's a professional, fresh, clean design that works for corporate uses. It's also useful for health-related businesses looking for an understated approach. With this set, in addition to the letterhead, there are templates you can quickly customize to create portrait or landscape business cards, envelopes and presentation folders. This professional letterhead template works with Adobe InDesign. 3. ProBiz – Stationery Elements.jpg) .jpg) .jpg) The easily editable ProBiz letterhead stationery template is available in four colors, so you can easily pick the one that's closest to your business branding. This attractive, modern stationery design uses flashes of color to tempt the eye, while leaving plenty of space for typing letters and addresses. This company stationery set uses free fonts and icons and is print ready. You can use either A4 or US Letter size for your letterhead, and can easily match that with business cards, envelopes, and presentation folders. This will enhance the perception of any business with a unified, branded look. 4. Elite Stationery.jpg) .jpg) .jpg) Elite Stationery somehow combines color with minimalism in an attractive letterhead and stationery set. Suitable for businesses of all kinds, this business stationery template set is fully editable. It includes a subtle shadowed business name, along with imagery. It's also fully ready for the digital age, incorporating QR codes into the design. This stationery template includes both portrait and landscape business cards, an envelope design, an attractive presentation folder, and of course, letterheads in both A4 and US Letter sizes. There's even an invoice template. All files are editable with Adobe's design tools. 5. Iceberg Stationery Set & Invoice.jpg) .jpg) .jpg) This creative and professional stationery set offers something extra for your business—a postcard template. This allows you to send branded postcards to your customers that match your business cards and letterheads. This stationery set has plenty of space for you to include a logo and tagline, and every element is customizable. In addition to the postcard and corporate letterhead templates, it includes an invoice template, and templates for business cards (both portrait and landscape) and a presentation folder. There's detailed documentation to help you easily customize this design, editable with Adobe design products. Envato Elements - Unlimited Digital AssetsEnvato Elements has a great offer you can't afford to miss.    Sign up for Envato Elements and you get access to more than a million digital assets—from stationery templates to graphics, audio and video—all for one low price.    Download as many templates as you need to suit all your corporate identity and company stationery needs. To find the right professional letterhead template, visit Envato Elements, type in your preferred search terms, then refine your search with the filters on the left of the page. Once you've found the perfect template, and added it to your downloads, it's simple to start customizing. 20 Business Stationery Template Sets from GraphicRiver for 2021If you need unlimited access to graphic resources, then Envato Elements is the perfect choice. But if you need just one stationery template, then browse the templates below from GraphicRiver. Here are 20 of the best corporate identity and letterhead stationery templates to promote your company. Download one today, or enjoy these beautiful business stationery examples: 1. Business Stationery Design   When it comes to strong corporate stationery templates, versatility is often a huge factor. This template comes with a business card, letterhead, envelope, presentation folder, and more. Not only that, it uses free fonts and it's easy to change the colors in Adobe Illustrator. 2. Business Stationery Template   This beautifully designed collection of stationery design templates includes a letterhead, business card, envelope, and presentation folder. It's print ready—jump in and add your content or use it to jump start a customized design. 3. Company Stationery Design   This stationery template is another one with tons of bells and whistles to customize. From thank you note to a presentation folder, there's so much more than your usual suspects here. Download this one today and add your customizations. 4. Professional Stationery, Invoice, and Corporate Identity   This is a comprehensive modern stationery and corporate identity template pack. Designers will enjoy the Photoshop and InDesign templates, while there's a customizable Microsoft Word stationery template for those who are still developing their design skills. The simple design is available in dark and light themes and will meet almost any business need. As well as letterhead stationery, the pack includes templates for invoices, purchase orders, memos, presentation folders and letterheads. There are screensaver files too, enabling both creative and corporate businesses to have a holistic presence. 5. Modern Professional Stationery   The geometric shapes on this stationery pack give a modern look to your corporate letterhead stationery. Sporting a clean and crisp design, this company stationery template pack is the perfect way for your business to communicate with investors, sponsors, and customers. 6. Professional Blue Pattern Stationery   This is another corporate stationery template pack with a modern theme. The blue color palette suggests a trustworthy business and the geometric shapes are eye catching. If you're looking for a fast way to represent your business, this is a good choice. The stationery template pack includes US Letter and A4 letterheads, suitable for use in different localities. It also includes templates for business cards, envelopes, and a presentation folder. This template is easy to customize and print ready. 7. Professional Modern Stationery   These multicolored geometric shapes are eye catching, enabling any company to make an immediate statement. Editable with Adobe Creative Suite, this printable stationery pack includes an envelope template design, a corporate letterhead envelope design, A4 and US Letter letterhead designs, and a presentation folder design. 8. Stella Business Stationery   The Stella business stationery templates offer multiple ways to promote your brand. The templates pack is useful for those operating in Europe as it includes an A4 letterhead and A3 corporate folder design. Other stationery templates in the set help businesses create complementary cards, envelopes, and even branded company CDs and DVDs (if you're still using them). There are two business card and presentation folder designs, so you can choose the one that best suits the occasion. 9. Corporate Identity Stationery Package   Want an elegant approach to your corporate identity? This stationery template set with a simple, modern design will help you achieve that. Suitable for all kinds of businesses, this template set includes an A4 letterhead template, along with matching business card, letterhead, envelopes and presentation folder. If you want something a bit different, you can also create branded sleeves for your corporate DVDs. 10. Corporate Stationery   This corporate letterhead stationery pack brings a fresh and vibrant look to your business branding. Accented in yellow, the stationery templates in this set include letterhead and invoice designs for both the US and Europe, as well as business cards, envelopes and presentation folders. These business stationery templates are easy to edit so your business is prepared for any occasion. 11. Business Stationery Pack   You can keep things simple with the business stationery pack, ideal for those who want to focus on the essentials. With a modern motif, this set of corporate stationery templates is ideal for the 21st century business. It includes letterheads, business cards, presentation folders and envelopes. The blue theme is crisp and cool, and ideal for any modern business. 12. Purism Corporate Stationery   Sometimes you can't do better than classic black, white, and grey. The Purism corporate stationery templates will appeal to businesses who want this traditional approach with a bit of modern flair. The corporate letterhead template includes a style for a second page, not just the main header. This is ideal for longer communications. Similarly, the presentation folder design includes an inside design that complements the exterior. The pack also includes an invoice template, an envelope template, and three different business card designs. 13. Design Sense - Corporate Identity Template   Bold and bright, the Design Sense stationery template pack is ideal for businesses that want a bit of pizzazz. It includes a US Letter sized letterhead, as well as business cards, and an envelope template. There are templates for a DVD cover and sticker, too, which makes this set right for anyone sharing information via optical media. These files are easy to edit and customize and will be sure to wow your customers with that extra flair. 14. Corporate Design Mega Bundle   Not sure which color best suits your brand? This huge bundle of corporate stationery and letterhead templates gives you plenty of choice. The A4 letterhead designs are available in 10 different designs, from basic black to bright orange. The company stationery sets include templates for business cards, complementary cards, DVD labels, presentation folders, and some include labels and menu cards, as well. That means whether you're hosting a company event or presenting to shareholders or investors, you'll have the stationery you need for the occasion. 15. Corporate Identity - Media Play   This set of corporate identity templates helps you present your business both online and offline. In addition to letterhead, business card, envelope, and presentation folder templates, it includes other branded media assets. If you're running a campaign for your business, use the Facebook timeline cover template, the branded desktop and phone wallpaper. The bright colors and geometric shapes will get attention and enhance any presentation or communication. 16. Corporate Identity - Color Stroke   This is another colorful approach to branding your corporate presence. The pack includes A4 letterheads, two envelope sizes, business card, compliment slip and DVD templates. There's a presentation folder design, Facebook cover, and smartphone and desktop wallpaper, too. This is an attractive template set that'll help you present a coherent company image both online and offline. 17. Systym - Stationery System   In this business stationery template set, choose between six designs for letterheads, all available in US and international sizes. These are easy to customize with your own business logo. The pack includes matching invoice designs, compliment slips, and envelopes. If you produce media, you can complete the branding with CD designs. There are also multiple presentation folder and business card designs, so you can create customized branding with minimal effort. 18. Corporate Identity - Absolute Carnival   Want to have a fun approach to corporate identity? Then the Absolute Carnival letterhead stationery pack will add some flair to your letters, presentations, and networking events. This colorful stationery template set includes letterhead, project cover, and envelope template designs, as well as complementary slip, DVD case and folder templates. There are branded phone and desktop wallpaper, and a matching Facebook cover image, too. 19. Branding Identity Mega Stationery Full Pack   This is an unbelievable pack of business stationery design templates. It includes business card and letterhead design. But there's a huge list of extra professional stationery items too. Check this one out. There's a little something for everyone. 20. Corporate Stationery Templates   Isn't this stationery design stylish? From the business card and letterhead design to the envelope and presentation folder, the visual consistency here really makes for a unified presentation. Visit GraphicRiver to get one of these stationery templates, or choose from the thousands of affordable corporate identity designs available. Download Our New eBook on Making Great Presentations (Free PDF)Need more help? We a helpful resource that'll walk you through the complete presentation process. Learn how to write your presentation, design it like a pro, and prepare it to present powerfully. Grab our eBook: The Complete Guide to Making Great Presentations. It's available for FREE with a subscription to the Tuts+ Business Newsletter.    How to Customize a Photoshop Stationery TemplateSo, you've found an awesome stationery template—what's next? Let's look at some quick tips you can use to jump in and use, right now, to edit your new stationery design template. We'll use the template shown below in this demonstration. While we're going to work in Adobe Photoshop, this template is also available for use in Adobe InDesign and Adobe Illustrator. It's a lovely, versatile option for your professional stationery template needs. Feel free to work along using this template, or you can use a different Photoshop file of your choice.    Let's get started: 1. Use the Layers Panel in Adobe PhotoshopThe Layers panel is an essential part of working in Adobe Photoshop. Most professional templates are going to make use of this valuable feature. Open up your Layers panel by going to Window > Layers, as shown below. In this example, the Layers panel is open. Notice that we see folders here. Click the arrow on each layer to expand them and see their contents. Or click on the folder to select the entire folder's contents. See the little eye icon on the left of each layer? Click on this icon to hide the layer or folder. Click again to make the content visible, once more.    2. Move Design ElementsWant to move some content around in your stationery template layout? Luckily, this is easy to do in Adobe Photoshop. Select the correct layer in your Layers panel. Then, use the Move tool, as selected in the screenshot below. It's as simple as clicking and dragging to reposition the item in your layout. Notice how the text, below, is outlined and shows resize handles. This is because Show Transform Controls is toggled on, in the Option menu (this is at the top of the software screen).    3. Resize Design ElementsRemember those resize handles we just mentioned? Well, let's use them! Click on one of the nine resize handles. Click and drag to resize the active content. In this case, I made the header larger by clicking and dragging on the resize handles. Notice how the header is selected and active in my Layers panel. You can also resize and transform content in your layout by going to Edit > Transform > Free Transform.    4. Edit Type in Adobe PhotoshopMost business stationery design templates are going to contain text. Thankfully, this is also really easy to edit in Adobe Photoshop. Use the Type tool, as selected in the screenshot below. Select the correct Text layer from your Layers panel. Although clicking on any text, with your Type tool active, will also activate the text in question. Then, start editing, just as you would in most word processing software. It's that easy.    5. Save and Export in Adobe PhotoshopSo, you've made your edits to your stationery template. What's next? Well, we need to save our work. We've got a few choices here:
You can also use Export to export your work in different ways—such as the legacy option to Save for Web (good for saving at smaller file size). Keep in mind your delivery method when it comes to saving. PSD files—Photoshop's native document—are generally not web friendly. But something like a PDF or JPG might be a stronger candidate for digital distribution. Ask your printer, if printing, what high resolution file type they recommend and prefer.    5 Tips for Making Great Business Stationery Designs in 2021Ready to start using business stationery design templates? Or maybe you're looking into business card and letterhead design on your own. Here's some design tips to help you with your stationery design templates needs—whether you're looking for one, designing one, or making customizations. 1. Make it a Perfect MatchWhen choosing a business stationery template, select one where the colors and fonts are close to those used on your website. This will create a harmonious experience for website visitors who become customers. The goal here is to have your stationery template act as an extension of your existing media. This is, after all, a representation of your business.    2. Push Your BrandingAlways include your business logo to cement your brands. This isn't a time to be shy with your branding! Again, this is an extension of your existing branding efforts. So, make sure that this look like a part of your brand's visual family. This can be as simple as a modest instance of your logo or a much larger presence, depending on what best represents your visual style. If, for example, your brand typically has a modest visual presence, it's probably not time to go wild and eccentric.    3. Consider Your Entire Stationery SetMost letterhead template sets also include business card templates. Why? Because this is all about consistency. Think of your stationery set like members of a family. They should all look related in a strategic way. Take some time to think about what "members" you'd like to have in your stationery set. Do you need a business card? Will you print envelopes? How about a presentation folder? Define your needs before you start designing or customizing—have a plan.    4. Less Is Often MoreDesign is a lot of fun, and it can be tempting to add all the bells and whistles that the world has to offer. But sometimes, less is so much more. Take a look at the business stationery design below. There's plenty of "empty" space here—and that's a wonderful thing. Notice how each section visually aligns in a way that makes sense. This is things like shared margins. Visual associations, like this, can make for a more unified and professional presentation. Good design isn't about more "stuff." It's about visual strategy.    5. Keep Things OrganizedRemember those margins, we just mentioned, above? Organization is another important part of a solid stationery design. Think about all the things you'd likely include in your stationery, like your name and your contact information. These things should be easy to find and well organized in the layout. Take a look at the example, below. Contact information, dates, names, and logos are all in well-established spaces, with ample "breathing room." So, nothing's getting lost or competing with each other.    Top 5 Professional Stationery Design Trends for 2021Not sure which business stationery templates are right for your project? These business stationery design templates are perfect for inspiration. Looking at business stationery examples can be a great way to figure out what aesthetic could work for you. Let's look at some business stationery design trends that are popular in 2021: 1. Visual Interest at the PerimeterAdding interest at the perimeter of your professional stationery design has been a popular trend. You get plenty of flexibility too. Notice how this design approach still leaves plenty of clear, clean space for essential content, like body copy.    2. Visually Interesting Use of PatternPattern is another stylish design approach that has proven to be popular. Check out these business stationery examples. The pattern here adds some interesting variation in value, especially at smaller sizes. Due to its abstract nature, it could be adaptable to different projects and color schemes too. When it comes to pattern, remember not to get too busy. It should still complement your branding and not distract.    3. High Contrast Design ElementsHigh contrast, like we see in these business stationery examples, can make for a really elegant look. Think of contrast as light and dark. So, for example, the dark navy here is really high in contrast against white and gold. That contrast makes them really stand out or "pop" against each other. This design approach can work well for high end or luxury branding but has plenty of potential for other concepts too.    4. Colorful Use of GeometryGeometric elements have so much potential. Mix and match them in different colors. Use them as containers for imagery. Change up the angles and curves. Their abstract nature can make them really versatile too. Many different types of branding can work with an abstract addition, like we see in these business stationery examples. This can be a fun approach if you're looking to add a little extra to your company stationery template.    5. Clean, Classic MinimalismMinimalism can be timeless. It's not always about flashy elements and vibrant colors. Often, less is more. An approach like this can make for a very stylish, very elegant look and feel. Take a look at these business stationery examples. There's plenty of clean, open space. This breathing room is balanced with strategically placed elements in black.    More Stationery Design TemplatesLooking for even more business stationery examples you can download right now? Check out these inspiring collections from Envato Tuts+. There's even awesome freebies you can download today.
Where to Find the Best Business Stationery Templates in 2021 (Envato Elements vs GraphicRiver)If you're looking for business stationery templates, Envato Elements and GraphicRiver are outstanding resources. It's simple to find exactly what you need, as both platforms have a wealth of high quality, stationery design templates. But which one is right for your business? 1. The Key Benefits of Envato ElementsEnvato Elements is an outstanding choice if you're a creative professional. One low price gets you access to an entire library of content. This includes thousands of stationery templates, and you can download as many as you want with unlimited downloads. Even better, Envato Elements includes fonts, stock photos, graphics, and much more. It's the perfect one stop for all your professional design needs.    2. The Key Benefits of GraphicRiver (& Envato Market)But, if you only need a singular download, GraphicRiver can be a perfect choice. Choose from thousands of beautifully designed, profession templates. One download, one fee. It's a simple solution with no obligation. If you prefer your downloads on demand, then GraphicRiver is a top choice.    Which Choice is Perfect for You?Envato Elements is a perfect choice for power users. If you need a lot of content and assets, you're covered with unlimited downloads. Grab everything you need quickly, efficiently, and with one price that covers it all. Ready to take advantage of unlimited downloads? Sign up for Envato Elements today.    Or consider GraphicRiver if you prefer your graphics on demand. There's a wealth of professional content, right at your fingertips, on GraphicRiver. It's a perfect choice for single downloads when you need them. Common Company Stationery Template Questions (FAQ)As you work on your business stationery design, questions might come up. Here's a list of some frequently asked questions that can come in handy as you work on your business stationery templates: 1. How Do I Create the Perfect Letterhead?Keep in mind that your letterhead should be custom tailored to meet your needs. Other businesses may have other requirements that wouldn't apply to you. Start by making a list of essential information that should be shown at the top of your page. This could include things like:
Want to learn more about creating your own letterhead? Check out this free tutorial: 2. What Should Go on a Business Card?You've got even less space on a business card, so keep that in mind. You'll want to stick with essentials. What are the best ways for interested parties to reach you? If, for example, you don't normally use traditional phone lines, emphasize email instead. If you opt for a double sided business card, you may have more room to share content, like social media accounts. Check out these quick tips to help you figure out the best content to include on your business card: 3. What are Some Ways I Can Create a Business Card?Thankfully, you've got so many options to choose from. Here's a quick overview of some the ways you could create your business card (and/or your entire stationery set):
There's no wrong choice here. Take a look at some of your options here, in these walkthroughs from Envato Tuts+.
4. How Do I Create Business Stationery Templates?So, let's say you want to create your own stationery set entirely from scratch. It can be a lot of fun with a ton of flexibility. In fact, you can even sell your own designs when you make them yourself. Cool, right? Consider what software you'd like to develop and design in. Adobe Photoshop, Adobe Illustrator, Adobe InDesign, Affinity Publisher, and even Microsoft Word are all popular options. Want to see the process in action? Check out this free tutorial from Envato Tuts+: 5. Where Can I Find Business Stationery Examples and Inspiration?If you're not sure what business stationery design is right for you, design inspiration is a great place to start. Consider saving or bookmarking your favorites so you can narrow down the perfect aesthetic. These inspiring collections have plenty of awesome business stationery examples. In fact, you can even score some free downloads. Check them out today:
Learn More About Using Professional LetterheadsWith professional letterheads, you can create a consistent visual image for your brand. This is great for communicating with customers and others and giving your company a professional presence. Learn more about using professional letterheads in the articles below:
You can find even more corporate identity and letterhead templates in the following articles:
Grab a Corporate Identity or Letterhead Template Today!Now, it's your turn. Select one of the letterhead templates above or visit Envato Elements to check out all the stationery templates on offer. You can also see even more stationery templates on GraphicRiver. Grab a quality template today and customize it fast to get started with presenting your business to customers and potential investors. Editorial Note: This post has been updated with contributions from Daisy Ein. Daisy is a freelance instructor for Envato Tuts+.  |
| 30 Best Free Keynote Presentation Templates Designs (Download for 2021) + Video Posted: 08 Jul 2021 05:18 AM PDT Are you putting together a Keynote presentation? Whether for your business, school, or personal use, you want it to look good. The more eye-catching and professional your presentation is, the better impression you'll make.    The best way to create an attractive, professional Keynote slide deck is by using a professional Keynote template. Using a Keynote presentation template with a great design will save you time. Simply enter your information, diagrams, and photos and you're ready to go. In this article, we'll explore Keynote themes. I'll share some examples of each. Finally, I'll share more resources to help you make the best possible Keynote presentation. 10 Best Free & Pro Keynote Presentation TemplatesReady for a quick preview of some of the best Keynote presentation templates? Here's our video preview featuring premium and free Keynote templates: Want more Keynote presentation template selections? Or, are you looking for Keynote tips to help you create the best Keynote template ever? If so, keep reading to learn more. Why Choose a Premium Keynote Template?The Keynote templates you choose are important because they affect the impression you'll make. The better the Keynote design of your presentation, the more engaged your audience will be. If you're not a graphic designer, it might take you forever to create an attractive Keynote template from scratch. Or you might find yourself hiring a graphic designer to create one for you.    You may be considering getting Keynote templates for free download. But if you want a professionally designed Keynote template investing in a premium Keynote template is a much better bargain. Consider the following benefits of a professionally designed template:
Remember, a lot of people use the free Keynote templates they find online. So, you risk having your presentation look just like every else's when you rely on free Keynote templates for Macs. If you really want your Keynote slideshow to stand out, a premium template can do that for you. You can find some great premium presentation templates on Envato Elements or GraphicRiver. Here are just some of the great themes you'll find: If you're serious about making a good impression for your business, Envato Elements is your best bet. Read on to find out why. Best Premium Keynote Templates on Envato Elements (With Unlimited Use)If you do presentations often, or if you use other branded design elements for your business such as WordPress themes (and more), use Envato Elements. Get unlimited access to hundreds of the best Keynote themes for one low price.    The premium Keynote templates we feature here are designed specifically for business owners. If you need to make a good impression for your business, we've got a Keynote template that you can customize quickly. Just add your business ideas, insert your data, and showcase your company's solution to make the slideshow you need to make a sale or win over an investor. The ready-to-use templates have creative and original designs to choose from. You'll find slide designs for nearly every business need, including:
Just add your own information to one of these templates and you're ready to give your presentation! 5 Top-Notch Premium Keynote Templates on Envato Elements (2021 Downloads)Here are a handful of our best and most popular premium Keynote themes templates are from Envato Elements: 1. Momonom Business Keynote   Here's a versatile Keynote template with a modern design that'll work for nearly any business need. You'll find everything you need, like slides for pricing, infographics, company history, and more. There are 30 slides that you can edit in a few clicks. Add your own text and drag and drop your images onto the slide master. 2. BePro Keynote Business Template   This beautiful Keynote presentation is functional and comes from a seasoned design professional. It's filled with design elements such as an infographic, charts, maps, mobile device mockups, and more. Few free Keynote presentations can say that. No matter what your business, there's something here for you. Choose from over 100 different slide designs. You won't want to miss this clean and modern Keynote theme. 3. Hexon Keynote Template   With five different color variations, this unique Keynote template is great for business or personal use. Also, you'll get free lifetime updates. Easily edit this premium design from within Keynote. Here are some other features that this template includes:
4. SIMPLECO: Keynote Presentation Template   Are you looking for an easy-to-use modern presentation that really stands out? Look no further than this colorful Keynote presentation template. It features 93 unique slides. Choose from two different color themes and two different aspect ratios (4:3 and 16:9). Unlike Keynote themes that are free, the template includes animation. It's a real bonus if you want to be sure of capturing your audience's full attention. 5. Brooke Keynote Template   You'll love this modern, stylish Keynote template. It comes in a widescreen (16:9) aspect ratio and has 15 custom slides. This Keynote template is great for creatives and other professionals who want to use their presentation to make a statement. Try out Brilliant Ideas instead of one of the free Keynote presentation templates found online. 5 More Premium Templates to Download Now From GraphicRiver for 2021We also have a ton of premium business Keynote templates available on GraphicRiver for individual sale. These designs are all designed to give your presentation the best professional look. You download one and use it right away.    Here are five unique professional Keynote templates ready for you to make your own: 1. Kimberly Creative Keynote Template   The Kimberly Creative Keynote Template is super easy to use. It's drag-and-drop ready to make it easy for you to add your pictures, logo, or other illustration. Plus, each template design is fully editable. It comes with fast, free technical support. Create your presentation using the 38 professionally designed slides. Don't miss this premium theme if you need to make a professional presentation fast. 2. Bermuda Business - Keynote   Bermuda is a classy and modern Keynote Template. The dark color scheme stands out but is also completely editable. Its 35 unique slide designs include resizable graphics, device mockups, and infographics. Bermuda makes a great option for a fresh business presentation. 3. Verzus Minimal Keynote Template.jpg) .jpg) .jpg) Are you looking for a powerful and versatile minimal Keynote template? Verzus Minimal Keynote template offers plenty of flexibility and tons of unique design layouts. There are hundreds of different slides to choose from. Verzus makes a great alternative to Keynote themes that are free. Here's what some customers had to say: "The best minimal template I've ever seen in my life! Amazing" "Fantastic selection of clean and crisp templates to allow me to focus first on the content." "I was very impressed with the slides - they helped me immensely when I was creating presentations for my team. They were easy to modify, and very tasteful and classy." 4. Earth Keynote Theme.jpg) .jpg) .jpg) Here's a template based on free fonts with tons of original infographics. It includes an Elements pack with over 500 vector icons. Plus, the transitions are animated to help you capture and hold your audience's attention. This attractive Keynote theme comes with many popular slide designs, including:
Instead of free Keynote presentations, trust in Earth to show off your ideas. 5. Renewable – Solar Panel & Renewable Energy Keynote Template   Design professionals made the Renewable template to give you a creative option for making an energy-focused presentation. It includes many popular slide designs such as device mockups for a laptop, monitor, phone, and more. There are useful data slides included too. And unlike Keynote presentation templates for free download, it comes with documentation. 30 Free Keynote Presentation Templates for Download in 2021Paid Keynote templates usually offer the most options, support, and more. But sometimes purchasing a premium template just isn't in your budget. Maybe you're a student working your way through college and you've got a presentation due. Or maybe you own a startup and you're strapped for cash. Either way, you've decided to download a Keynote template for free. If that's the case, Envato Elements and GraphicRiver have you covered there too. Every month, Envato Elements and Envato Market offer select premium templates available for free. Are you interested? You can find the free premium-quality files from Envato Elements here. There are also premium-quality assets available for free from Envato Market here. We've also found the best free Keynote templates for 2021 that you could download. Sources for the best free professional Keynote templates for free download on this list include:
Note: The free Keynote templates for Macs linked to here are hosted by their respective sites. Their availability depends on the hosting site. Also, some of these free templates have special terms. For example, they may only be available for non-commercial use. Read the terms of use carefully before you download a template. If you've decided to download Keynote presentation templates for free, here's a list for you to explore: 1. Yellow Keynote PPT Template    This bright Keynote template is designed around yellow and purple colors. Choose from slides including charts, process maps, device mockups, and more. 2. Engineering Keynote Theme. This is a modern, almost futuristic, abstract design that showcases a high-tech look. The predominant color for this design is blue. It's a good choice if you've been searching for Keynote templates for free download 3. Cutpaper. If you've ever made patterns using construction paper, you'll relate to this original free Keynote presentation template. This Keynote theme that's free includes orange and yellow for a fall look. 4. Green Energy .jpg) .jpg) .jpg) The Green Energy includes a cover page and more slides for the body of your presentation. As the name suggests, the main color of this template is green. It's one of the nicer free professional Keynote templates. 5. PaintDrip Keynote Theme. Imagine that the top half of a wall is painted, and the paint is dripping down onto the unpainted half. Then you've got a good idea of what this Keynote template free download looks like. 6. Metro. Here's a subway-themed free Keynote template that includes a cover slide design and many body slide templates. This free Keynote presentation template has a modern look and feel. 7. FREE - Blockchain Presentation    This is one of many free professional Keynote templates that can be used for a variety of business purposes. It's got a wide array of infographic and design slides. There are 135 unique slide layouts are included in total. 8. Pink Purple Celestial Swoosh Keynote Theme. Use this unusual design as a background for nearly any presentation. It's got a modern, abstract feel to it. The contemporary touches are nice to have in free Keynote presentations 9. Green Chalkboard. This is another free Keynote template for the educators out there. This presentation slide design looks like an old-fashioned green chalkboard with white chalk writing on it. 10. Epic Circle Keynote Template .jpg) .jpg) .jpg) This free Keynote presentation template features an abstract circular design on a dark background. Make sure the text you add to this screen is white so that it can be read. 11. Brain. The focal point of this presentation design is the silhouette of a head with a visible brain illustration inside. The cover and body slides could be used for any type of slideshow that features ideas or innovation. Few Keynote presentation templates for free download can take an audience inside the mind like Brain. 12. Stand Out Keynote Template. If you want to make an impact with your presentation, this free professional Keynote template could be the answer. It's got a bold design and typography. 13. Web 2.0. Here's a simple, but attractive slide design. This free Keynote template design features a light blue background with a grey text box. This works for many different types of classes. 14. PASTEL - Presentation Template    Living up to its name, the Pastel Keynote template presentation download is built on soft colors. It includes plenty of room for images and other visuals. Use it if you like Keynote themes that are free and have a minimal style. 15. Orange Curve Free Keynote Template Download. This is a colorful and modern free Keynote presentation. The abstract design is made up of what shapes against a bright orange background. 16. Marketing Plan. This isn't just for marketing professionals. This Marketing Plan free Keynote presentation template has a slide design for the title of your presentation as well as some body slides. 17. Bluetiful. Here's another Keynote presentation design that keeps it simple. Your students will enjoy the dark blue title box against the light blue background. 18. Blue Chevron Keynote Theme .jpg) .jpg) .jpg) The wave pattern on the free Blue Chevron Keynote Theme is almost hypnotic. This modern Keynote design is definitely eye-catching. 19. Blocks. Color blocking works for slide presentations too as illustrated by this presentation template with different-sized rectangles on it. Use the rectangles for images or try them with a solid color. It's a good choice if you're hunting Keynote presentation templates for free. 20. Free Keynote Theme From the Earth to the Moon. This unique Keynote theme is out of this world. It features a photograph of both the moon and the surface of the earth. Try it if you like your free professional Keynote templates with an outer space touch. 21. Gallery. Showcase your photos and other images using the free Gallery keynote theme. This theme was designed with plenty of picture placeholders to hold your illustrations. 22. Space PowerPoint & Keynote Template    If you're looking for Keynote presentation templates for free download, don't miss this minimal template. It works for PowerPoint and Keynote. 23. Team. If you're making a team presentation this might be the Keynote template free download you need. It includes 10 slide designs. 24. White Burst Abstract Keynote Template. This abstract blue, white, and black design will make your next Keynote presentation stand out. It's one of the more unique free Keynote presentation templates. 25. Cloud Sea Keynote Theme. This photo template for Keynote might make an impact. Use it as part of your next Keynote presentation. 26. AIR Minimal Keynote Template    AIR has over five dozen custom slide layouts available for your use. Also included are 450 vector icons and graphics that you can edit right inside of Keynote. Few Keynote themes for free download have that 27. Japan Keynote Template. This free Keynote template has a clean and modern design with pops of red color for accents throughout the template. It includes 10 slides. 28. Free Simplistic Keynote Template. If you're looking for a simple Keynote design, this template fits the bill. It also comes with 10 premade slides. 29. Blue Chalkboard Keynote Template. This professional and free Keynote template has a simple design. Use it for all kinds of school and business presentations. 30. Green Network Keynote Template.    This free Keynote template would be best suited for technology related presentations. It features a bold design reminiscent of Matrix. Where to Find the Best Premium Keynote Templates in 2021 (Envato Elements vs. GraphicRiver)Are you looking for the best Keynote templates available right now in 2021? Envato offers two winning options to find the top choices for premium Keynote themes: Envato Elements and GraphicRiver. But you might be wondering which one is the best, and which one you should use. Let's explore the key features and benefits of both sites to help you decide. 1. The Top Benefits of Envato ElementsEnvato Elements is a subscription-based download service. What does that mean? Simply put, you'll pay a low, flat monthly rate as an Elements member. And that membership will give you access to unlimited downloads of all kinds of premium digital content.    Plus, download stock music, images, videos, fonts, photo project templates, and more. Many of these resources can be useful in building your slides, too! 2. The Top Benefits of GraphicRiver (Envato Market)GraphicRiver has equally amazing, professionally designed creative resources. But it works on a pay-per-download model. That means you buy each item individually—no membership required. This is ideal if you're working on a one-time project, or don't want to pay a monthly fee. Here are the current top trending premium Keynote templates available on GraphicRiver today.    Plus, you can explore all kinds of other content like graphics, photos, video, audio, and more. Choosing Elements or GraphicRiver (What's Best for You?)Choosing between Elements and GraphicRiver really depends on your mission. Suppose you're a creative that frequently engages in new projects. Or you're looking to explore different design concepts to find one that's just right for you. Envato Elements is your best bet because you can try out as many templates and designs as you want. Sign up for Envato Elements now.    But if you're just working on a single project, purchasing a single Keynote template from GraphicRiver is a great option. Head over there now to choose a design that's right for you. Keynote Versus PowerPoint: Which Should You Choose?Apple Keynote and Microsoft PowerPoint are the two major presentation apps available today. Chances are you're familiar with one or both, but it really pays to explore which one is best. PowerPoint remains the most widely used presentation software. But Keynote offers serious advantages that you should look at: 1. Mobile IntegrationWith the widespread adoption of Apple devices, Keynote has really taken off in popularity. In fact, it comes pre-loaded with newer versions of Apple's macOS. Plus, Apple has built an excellent version of Keynote for iPhone and iPad that's available as a free download from the App Store.    Your projects integrate seamlessly between devices. That's a compelling reason to use Keynote. It's the ability to work from anywhere. 2. Powerful AnimationsKeynote's animation tools are arguably easier to use than PowerPoint. They can be quickly added, switched, reordered, and moved at the touch of a button. While PowerPoint has these tools, Keynote refines them. Plus, Keynote has unique features like Magic Move that can instantly bring new life and style to your slide deck. 3. Ease of UseAnother key feature of Keynote is its ease of use. Many of us are familiar with PowerPoint simply because it's been around so long and is so popular. But even a novice slide designer can quickly pick up Keynote and start building incredible things. Apple's customary intuitive design philosophy is reflected throughout. 4. Easy Layout ToolsKeynote includes a multitude of built-in layout tools that live in a series of clearly defined menus and sidebars. That means you can retool slide designs to fit your needs without spending a lot of time. For example, when you drag a content element across a slide, alignment rulers will appear automatically. These help you position the content perfectly relative to other items around it. Check out the article below to see the layout options that make Keynote the best option. 5. Different StylesPowerPoint presentations look great—but they look familiar, too. Chances are, most of us have seen many PowerPoint slide decks. So, a top advantage of Keynote is simply that it's different. It's an easy way to revitalize your presentations. By using a Keynote theme, you can subtly change the look and feel of your next presentation. Even if audiences can't put a finger on the difference, they're sure to be refreshed by the variety. For a full and detailed comparison of Keynote and PowerPoint, check out our article below: How to Quickly Customize Keynote Template Slide DesignsYou've seen all the wonderful Keynote slide templates (free and premium). Now you might be wondering how to customize them to fit your needs and match the rest of your business and brand materials. Let's go through the steps of customizing Keynote template slide designs. For this purpose tutorial, I'll be using the premium Brilliant Ideas Keynote template from Envato Elements.    Envato Elements offers thousands of professionally-designed Keynote templates for one low monthly price. What's more, on top of Keynote templates, you can also download thousands of other assets such as fonts, icons, stock photos, and more. All these assets can be used in your presentation and you can download as many as you need. 1. Customize the Cover SlideThe first thing you should do is to customize the cover slide for your presentation. This includes customizing the title with your information and deciding whether you're happy with the default cover style. Easily choose a different master slide by clicking on the Change Master and selecting a slide design you like. To edit the title, simply double-click the text.    2. Change the FontsUsing legible fonts is incredibly important if you want to make sure everyone can read your presentation. But it's also important for the fonts to match your brand. Easily customize the fonts at the same time as you're customizing the text. You can also speed up this process. Edit all the different text parts such as titles, headings, and body text on one slide and then updating the styles in the Text tab.    3. Edit Master Slides to Speed Up the ProcessTo quickly customize all the slides and slide elements in your Keynote template, the best way to do that is to edit the master slides. There, you can change the background colors, fonts, and more. The changes will be immediately visible when you add a new slide design to your presentation.    4. Add Your Design Elements and ContentOnce you're happy with all the changes, all that's left to do is add your own content. Begin adding your photos, charts, icons, and the content of your presentation. When you're done, click Save and if you plan on giving out handouts, don't forget to export the presentation as a PDF as well by going to File > Export As > PDF. Keep in mind that the steps listed here can be used to customize a free Keynote template. But premium Keynote templates come with more customization options than their free counterparts. Remember, with an Envato Elements subscription you can get unlimited access to tons of the best Keynote themes (and other design assets) for a low monthly fee. 5 Quick Tips to Get Started Using KeynoteWhen you download a Keynote presentation or you're wondering how you're going to use these templates, calm down. It doesn't take long to learn to customize premium and free Keynote templates for Macs. Here are five quick tips to help you get started: 1. Learn the Basics of Using KeynoteKeynote is a simple and intuitive tool, but if you've never used presentation software before you may find it scary and overwhelming. Take baby steps and dedicate some time to learn the basics. Check the step-by-step tutorial to learn about layout dimensions in Apple Keynote. 2. Master Text & ShapesText and shapes can make or break your presentation. Master these essential tools in Apple Keynote and you'll be producing better presentations than most. 3. Add Animations to Keynote SlidesHumans are wired to pay attention to moving objects. Take advantage of human nature by using subtle animations to make your presentation more interactive and engaging. Just remember one thing, use animations in moderation, you don't want to create chaos. 4. Add Video & AudioStatic presentations can get boring. Think about adding relevant multimedia to engage with your audience. Here are some ideas for you to include: a demo of the product, customer success stories, testimonials, field research. Check a tutorial below to learn more. 5. Prepare Alternative FormatsStuff happens. All the time. Whether it's an informal presentation or a conference with hundreds of attendees, if something goes wrong you need to a backup plan. Learn how to convert your Keynote presentation to other formats. This way you're prepared when the computer, hard drive, cable or anything else doesn't work. 5 Top Keynote Presentation Slide Design Trends for 2021Templates like these give you a great start building amazing presentations in 2021. But for the most impact, it pays to marry them with the latest ideas in Keynote design. Read on for five of the top Keynote slide design trends of 2021: 1. Cut Clutter to Stay Focused   Let's face it: slides packed with content are distracting and confusing to your audience. In 2021, slide design is going minimalist. By maximizing open space and cutting out fine print, your ideas have the chance to shine. Always remember that slides should be bright, clean, and easy to read from the back of a room. 2. Add Plenty of ImagesEver heard it said that a picture is worth a thousand words? That's truer than ever when it comes to Keynote slide designs in 2021. Audiences appreciate visuals. They add color and flair to every slide. Plus, they're useful tools to introduce your team, highlight a concept, or share a product. To make even better image slides, learn how to add animated GIFs to your Keynote presentation here: 3. Use Device Mockups   In 2021, chances are you've got a website or app to share. Sure, you could use a basic screenshot, but a device mockup brings your online presence to life. It takes that screenshot and overlays it on a realistic 3D representation of a phone, tablet, or PC screen. This gives an audience an unmatched appreciation for how your app really looks! 4. Animate Slides With Magic MoveMagic Move is a powerful feature unique to Apple Keynote. With it, you can seamlessly animate objects from one slide to the next. It ensures continuity and provides an unforgettable transition. And thanks to Keynote, you can add the effect with just a few simple clicks. To get started with Magic Move, visit our tutorial showing how it can wow your audience: 5. Share Data With Infographics   Gone are the days when audiences would accept wordy, dull descriptions of concepts and ideas. Modern Keynote design trends toward the use of infographics. These are visuals that merge information and graphics to clearly illustrate all kinds of ideas. Use them to build timelines, relationship maps, trends, project plans, and much more. The possibilities are virtually limitless. Benefits of Using Premium Keynote Presentation TemplatesYou might be new to seeing premium Keynote themes. You may even be asking yourself are they really better than free Keynote presentations. While the free downloads are tempting, premium options give you a lot of benefits:
Benefits of Envato Elements (The Power of Unlimited Use)   It's tough to find a more helpful tool for creatives, entrepreneurs, and professionals than Envato Elements. For a low monthly fee, download as many creative assets as you want. That means Keynote themes, stock photos, music tracks, and more, all available without limits. Experiment and create to your heart's content. What could you do with unlimited? Sign up for Envato Elements to design without limits. Common Keynote Presentation Questions Answered (FAQ)Our tips will work with Keynote templates with free downloads, too. It's a great way to combine your template with new techniques. Let's look at five of the most common questions that Keynote beginners ask when working in the app: 1. Can You Work With Others on Your Keynote Presentation?Collaboration helps your presentation become the best it can be. Why not invite others to help you work on your presentation? With the help of the following tutorial, it's easy to share and bring others into your document. You can even work together in real-time. This tip also works with free Keynote presentation templates. 2. Can You Import Documents to Keynote?The worst-case scenario when you're building a presentation is redoing work. Maybe you've received a document like a PDF into your presentation. Luckily, there's a solution! Learn how to import and convert a PDF to work with Keynote in this article: 3. How to Export Keynote to Other FormatsKeynote is a macOS and iOS app. Naturally, that means that many users will resist using it if they prefer other platforms. To help others work with your presentation, learn to export the file as a PPTX, PDF, and more. It helps practically anyone view and work with your presentation. This tip also works with free Keynote templates in 2021. 4. Does Keynote Support Importing PowerPoint Files?Switching presentation apps is tough. There's plenty to learn. More importantly, you probably need to work with presentation files you've used in the past. Learn how to take a PowerPoint document and convert it for use in Keynote: 5. Can You Share Keynote Presentations Online?It's not always possible to bring all your colleagues into the same conference room. Sometimes, you'll need to stream and share a presentation to bridge the gap. Keynote Live is a great feature for exactly this purpose. Use our guide to broadcast your presentation in realtime: Learn More About Using KeynoteWe've got templates and other resources to help you learn more about using Keynote. Here are just a few resources to help:
Learn More About Making Great PresentationsNow that you know where to find free and premium Keynote presentation template downloads, you're on your way to creating an eye-catching slideshow that'll set your presentation apart. Plus, don't forget that you can use the right template to help strengthen your organization's brand. Another way to improve your presentation is to learn more about how to make a good presentation. To do that, you can grab our eBook: The Complete Guide to Making Great Presentations. It's available to download for free with a subscription to the Tuts+ Business Newsletter.    The eBook will help walk you through the complete presentation process. Learn how to write your presentation, design it like a pro, and prepare it to present powerfully. Use the Right Keynote Templates to Give a Powerful PresentationYou've just explored some of the best premium and free Keynote templates and themes for 2021. No matter what type of presentation you're creating, the right template will save you time and help your presentation to look more professional. Use one of the professional Keynote templates available from Envato Elements and GraphicRiver to give your Keynote presentation an extra edge. Otherwise, download one of the many Keynote templates for free. Just keep in mind that everyone has access to those free Keynote slides templates, so your presentation may not come across as unique. Good luck with your next presentation! Editorial Note: Our staff updates this post regularly—adding new free keynote templates for 2021 for designers and entrepreneurs. We also include relevant tutorials and tips so you can find and download the keynote presentation that fits your needs the best.  |
| 31 Best Brochure Mockups (Using an Online Mockup Generator) Posted: 08 Jul 2021 05:00 AM PDT Brochures are an inexpensive and effective tool for communicating information to a wider audience. These single foldable sheets are perfect for highlighting products and services, making announcements and presentations, creating menus, or breaking down lengthy information with images, charts, maps, and text. If you're looking for modern and versatile brochure mockups to show your brochure designs to a client or to display your brochure on your website, here are 31 fabulous mockups that you need to see. 31 Best Brochure Mockups From PlaceitMockup of the Front View of an Open Brochure   This open brochure mockup is simple and can fit four high-res images. It has a convincing shadow and an editable solid color background. You can add text and your logo for good measure. Open Trifold Brochure Mockup Lying on a Red Surface   Do you need a trifold brochure mockup? Then you'll like this simple and modern option. It features a nice red background that can complement three of your photos. Try out this pamphlet mockup if you want a clean choice from the Placeit online brochure maker. Brochure Mockup Featuring a Person Handing Out Brochures   Show a person holding a brochure in this mockup. You'll be able to add your brochure cover image and display it three times. You can also change the color of the brochure in this mockup. Mockup of Two Wrap-Around Brochures in a Plain Setting   Here's a simple mockup for your wrap-around brochure designs. It lets you show every panel in style and contrasts your content against a solid color background. This standing brochure mockup is a top choice if you have a wrap-around design. Man Holding a Vertical Brochure Mockup   This unique vertical open brochure mockup is super easy to customize. Just upload two of your images and tweak the background and brochure colors. You can also add text to complete this pamphlet mockup. Woman Reading a Vertical Restaurant Menu Mockup   This terrific rectangle brochure mockup of a woman reading a menu is easy to customise. Just upload your image, change the colour of your brochure, and your job is done. You'll be surprised at how quickly this holding a brochure mockup comes together. Mockup of a Bifold Brochure Lying on a Solid Color Surface   If you're looking for a bifold brochure mockup that allows you to adjust the background colour, check out this A4 bifold brochure mockup, which features a slightly open brochure lying on a plain background. After you've uploaded your brochure cover image, you can change the background to any colour you need. Bifold Brochure Mockup Lying on a Bicolor Surface   This A4 bifold brochure mockup is a variation of the bifold brochure mockup featured above. With this mockup, the brochure is opened to show the inside content, and the background is split in two so that you can adjust the colour of the top and bottom half separately. Woman Reading a Restaurant Menu While Sitting Down Template   This A4 bifold brochure mockup is an excellent template for restaurants looking for an image that allows them to show a client perusing their menu or for designers who want to show clients a photorealistic image of their menu design. Square Booklet Standing in a Black Environment Mockup   Sometimes, you need to display your brochure design without any distractions. This sleek and sophisticated square rectangle brochure mockup is perfect for such occasions. Set against a black background, the standing brochure mockup is super easy to use. Square Booklet Lying Over a White Surface Mockup   This square brochure mockup is a variation of the bifold brochure mockup featured above. The main differences being that this brochure is lying on the surface as opposed to standing and the background is light grey rather than black. Brochure Mockup Featuring a Woman Sitting on a Stairway   Use this pamphlet mockup to show an employee reading a company brochure. This template is even easier to use than the other trifold brochure mockup featured here because, instead of needing to upload three images, you only need to upload one that will cover all three sections of the brochure. Mockup of a Trifold Brochure Open Against a Transparent Backdrop   Transparent backgrounds are awesome because they allow you to add your mockup quickly and easily to any background you choose. To use this trifold brochure mockup, make sure your images are divided into three equal parts, and then upload each one in order. Menu Template Lying Over Dishes Near a Glass of White Wine on a Wooden Table   Looking for a rectangle brochure mockup to show off a menu cover design? Then check out this bifold brochure mockup, which features a rustic table setting with a menu sitting on a set of plates. Mockup of a Woman About to Open a Booklet While Sitting Down in a Wooden Desk   This A4 bifold brochure mockup features an over-the-shoulder shot of a woman looking at the cover of a brochure while sitting at a wooden table. It's a great template for those looking for a creative way to display their brochure cover design. Coffee Shop Menu Lying Next to a Latte Coffee Template   This rectangle brochure mockup is billed as a template for a coffee shop menu. And indeed, it's an excellent menu mockup, but the template could also be used for any number of other types of brochures. Set of Three Brochures Template Lying on a Transparent Surface   These rectangle brochure mockups are great for testing three versions of a design or for a related series of brochures. The slightly open brochure in the foreground also allows you to upload an interior image, which increases the mockup's photorealistic quality. Trifold Brochure Template Floating Over a Multicolor Surface   Jazz up your brochure presentation with this funky trifold pamphlet mockup. Each leaf of the brochure is clearly marked to make it super easy to upload your design. When you're done, have some fun choosing four different colours for the mockup background. Woman Covering Her Face While Showing a Booklet Catalog Mockup   A playful way to display your brochure cover, this A4 landscape brochure mockup shows a woman holding a brochure so that it covers her face. Mockup Featuring a Brochure Standing On Top of a Wooden Surface   Set against a plain wood background, this accordion fold brochure mockup allows you to show off three sides of your brochure layout. Each panel of the standing brochure mockup is clearly marked for ease of use. Closed Booklet on a Black Surface Mockup   Use this elegant A4 landscape brochure mockup with its slate grey background for corporate brochures, high-end fashion, a jewellery business, or any other category where you want to communicate sophistication. Mockup of a Trendy Young Woman Reading a Menu While Sitting in a Restaurant   Showcase your awesome menu design with this beautiful A4 bifold brochure mockup featuring an over-the-shoulder image of a young woman studying a menu in a restaurant. It's a cool open brochure mockup that you could benefit from. Brochure Mockup Template of Two Brochures Being Hung by Paper Clips   Another cool and playful mockup, this A4 bifold brochure mockup is a clever way to showcase your designs. The template allows you to customise both the brochure colour and the background colour. Brochure Mockup of Three Brochures Hung With Paper Clips   If you like the concept of the previous mockup but need an A5 bifold brochure mockup instead of A4, then check out this mockup, which offers three brochures as compared to two in the case of the template above. Another great feature of this template is that each brochure can be coloured separately. Woman Holding a 3 Panel Brochure Mockup   This gorgeous trifold brochure mockup is perfect when you want your design or message to hold centre stage. The gatefold brochure mockup can serve myriad uses, including sales announcements and instructions for using a product or service. Top Shot Mockup of a Horizontal Catalogue About to be Opened by a Woman While on a Wooden Table   Here's another mockup which would work just as well when you want your design to stand out. The A4 landscape brochure mockup features an overhead shot of hands framing a brochure. Bifold Brochure Mockup Lying Next to a Laptop in an Office   Are you looking for a natural scene in your product catalog mockup? This editable template sets your design in a simple office setting. You can upload a nice high-res photo of your cover to complete the look. Mockup of a Woman With a Catalog on a Wooden Surface   Add a human touch with this product catalog mockup from Placeit. The scene frames your cover well and brings your design into focus. It's an interesting variation to the popular holding a brochure mockup style. Mockup Featuring Two Trifold Brochures Placed Against a Solid Color Background   Here's a unique open brochure mockup that you should check out. It features two different catalog mockups with customizable colors. You can upload as many as six of your photos to display here. Bifold Brochure Mockup of a Menu Lying on Top of Table   Whether you have a menu or other type of pamphlet, this versatile bifold brochure mockup is a great option. It features a natural scene that can be customized with your photo and text. Try it for your promotions. Woman Reading a Small Catalog Template While on a Wood Surface   Let's round out our list with this minimal product catalog mockup. The wooden surface frames your high-quality image without being a distraction. It's a top choice if you want an open rectangle brochure mockup in a natural setting. How to Use an Online Brochure Mockup GeneratorYou've seen some great catalog, pamphlet, and brochure mockups above. But if you've never used Placeit, you might not know how to use the online brochure maker. Luckily, this walkthrough will show you how to use the easy mockup editor. 1. Navigate to Placeit's Brochure Mockup Page. Sign Up for Free!   2. Select a Mockup Template You LikeNow look through the mockups available and select the one that will allow you to show off your design to the best advantage.    3. Upload Your DesignWhen you select your brochure mockup, it will open up in the Brochure Mockup Maker. Upload your design using the button to the left of the mockup, and select your brochure colour if needed.    4. Download Your Completed MockupThat's all there is to creating a terrific brochure mockup. Now you can download your mockup, and just like that you've got a great mockup ready to use.    Make Your Own Terrific Brochure MockupAs you can see from these fabulous brochure mockups, Placeit has a great selection of mockups you can use to show off your designs or promote your business. I hope these examples have made you excited about all the possible ways you can display your designs. Why not add your design to your favourite mockup and share it with us here? We'd love to see which you choose. Of course, Placeit is more than just an online brochure maker. If you're interested in other cool mockups for computers, iPads, sweatshirts, and more, check out this roundup of the best mockups in different categories, all available at Placeit:
 |
| How to Design a Product Catalogue Posted: 08 Jul 2021 05:00 AM PDT    Printing a beautifully laid-out product catalogue can help you attract customers and drive up sales. Catalogues contain important information about products that can help people make better purchases. In this Adobe InDesign product catalogue tutorial, you'll learn how to design an attractive product catalogue, what pages to consider creating for a catalogue design, and the best print design practices when you're creating a product catalogue template. The result of this tutorial will be a product design catalogue that contains multiple master pages templates to easily incorporate your images. Looking for more product catalogue examples or InDesign product catalogue templates? Envato Elements offers a wide range of catalogue designs and millions of assets like photography and fonts for you to use with a single subscription.   
Tips for Catalogue Design TemplatesDesigning a product catalogue template can get complicated if it's your first time. There are tips and tricks that can save you time and that will allow you to edit your product catalogue template easily and fast. Here are a few things to consider when you create a product catalogue:
   What Pages Should Your Product Catalogue Template Include?There are certain pages to consider when you make a product catalogue template. These pages can help you organize your content effectively and convey a clear idea. The following pages are standard in every product catalogue template because they have proven to be successful at displaying products in a cohesive manner. Let's take a look:
   What You'll Need to Create Your Product Catalogue TemplateTo make a product catalogue template, you'll need access to Adobe InDesign and some fonts and images. The fonts we'll be using are: You may want to use your own images, but if you'd like to use the free images shown in this product catalogue template, the links are listed below:
Download the fonts and images and make sure the fonts are installed before you start the tutorial.
1. How to Set Up a Product Catalogue TemplateStep 1To create a product catalogue template, open InDesign and go to File > New > Document. Choose Print from the options at the top of the window. Select the A4 preset from the options below. Check Facing Pages as we'll be creating a publication. Set the Number of Columns to 3 and the Column Gutter to 0.5 cm. Set the Top margin to 2 cm and the Bottom, Inside and Outside to 1.5 cm. Set the Bleed to 0.3 cm. Click Create.    Step 2Go to the Pages panel and select the A-Master by double-clicking on the spread. Go to Layout > Create Guides. In the Create Guides window, set the Rows to 5 and the Gutter to 0.5 cm. Below, select Fit Guides to Margins. Click OK.    Step 3Go to the Layers panel (Window > Layers). Double-click on Layer 1 and rename it Background. Click on the Add New Layer button to add a new layer, and name it Images. Create two more new layers, naming them Overlay and Copy.    Step 4Go to the Swatches panel (Window > Color > Swatches). Click on the dropdown menu and select New Color Swatch. Set the Color Type to Process and Color Mode to CMYK. Add the following values:
Repeat the New Color Swatch step to add the following swatches:
   Step 5Go to the Pages panel (Window > Pages). Double-click on A-Master to set up the template. Using the Text Tool, create a text box that has the following measurements:
Place the text box just above the top margin and align the x-axis with the right-hand bleed. Go to the Swatches panel and set the fill color to Turquoise. Add a page number by double-clicking on the text box, right-clicking, and going to Insert Special Character > Markers > Current Page Number. Select the content and go to the Control panel. Set the Font to Magdelin SemiBold, the Size to 8 pt, and the Tracking to 50.    Select the text box and press Command-B to open the Text Frame Options. Set the Inset Spacing to:
   Step 6Press Option and drag the text frame we created in the step above. Place it on the opposite page. In the Control panel, set the alignment to Right. Press Command-B to open the Text Frame Options and set the Inset Spacing to:
   2. How to Create Master Pages for a Product Catalogue TemplateStep 1We'll create five different Master Page spreads that will help us add pages with preset layouts to the product catalogue design. We'll be creating one index spread, two content spreads, and two product spreads. In the Pages panel, right-click on A-Master and select New Master. In the New Master option window, set the Prefix to B, the Name to Index, and Based on Master to A-Master. Click OK.    Step 2For the B-Index Master Page, we'll create an image-based table of contents. In the Layers panel, select the Image layer. From the Tools panel, select the Frame Tool (F). Using the guides and columns we created at the beginning of the project, create frames that fit between one and three columns, and the same for the rows. I added a fill color from the Swatches panel so that I could see where the frames are placed.    Step 3Select all of the frames and press Command-C to Copy. In the Layers panel, lock the Image layer and select the Overlay layer. Press Shift-Option-Command-V to Paste in Place. Select all the frames, go to the Swatches panel, and select the Turquoise swatch. In the Effects panel (Window > Effects), set the Opacity to 60%.    Step 4Lock the Overlay layer in the Layers panel and select the Copy layer. Using the Text Tool, create text frames for each image frame. Add a page number and some section content. On the Control panel, set the text to the following:
Open the Text Frame Option Window by selecting the frame and pressing Command-B. Set the Inset Spacing to 0.5 cm for all sides.    Step 5In the Pages panel, right-click on A-Master and select New Master. In the New Master option window, set the Prefix to C, the Name to Content-1, and Based on Master to A-Master. Click OK.    Step 6In the Layers panel, unlock all the layers. Select the Background layer. Using the Rectangle Tool (M), create a rectangle to act as an element on the background of the left-hand page. I placed mine on the bottom left. Make sure that the rectangle is touching the bleeds on the left and bottom sides. Use the Swatches panel to set the fill color. In my case, I used the Salmon color. Using the Rectangle Tool (M), add a background to the right-hand page. Use the Swatches panel to set the color to Grey.    Step 7Lock the Background layer in the Layers panel. Select the Image layer. Using the Frame Tool (F), create a frame that fits inside the margin of the left-hand page.    Step 8Lock the Image layer in the Layers panel, and select the Copy layer. In the Swatches panel, set the color to Black. Using the Text Tool (T), create a text frame that fits the first two columns on the left-hand page. Here you can add product details and sections. In the Control panel, set the text to:
Select the text frame and press Command-B to open the Text Frame Options Window. Set the Inset Spacing to 0.5 cm on all sides.    Using the Text Tool, create two text frames: one for the title and another one for the content. Place the frames in the center of the page. Select the Line Tool (\) from the Tools panel and draw a vertical line between the top and bottom text frame. Set the Thickness to 0.5 pt. Go to the Swatches panel, and set the color of the text frame to White. In the Control panel, use the following settings:
In the Paragraph Formatting Controls, set the Space Before to 0.5 cm.    Step 9In the Pages panel, right-click on A-Master and select New Master. In the New Master option window, set the Prefix to C, the Name to Content-2, and Based on Master to A-Master. Click OK.    Step 10In the Layers panel, unlock the Image layer and select it. Using the Frame Tool (F), create two frames. The first one should start from the first column of the left page and end on the first column of the right page. The second frame should occupy the last two columns and the first two rows of the right page.    Step 11Using the Text Tool (T), create a text frame at the bottom of the left page. In the Control panel, set the Font to Volgue Bold, Size to 24 pt, and Text Alignment to Align Center. Set the Vertical Justification to Align Center.    Step 12Using the Text Tool (T), create a text frame on the last two columns of the right page and under the second text frame you created above. In the Control panel, set the Font to Magdelin Text, Size to 9 pt, and Tracking to 50. In the Paragraph Formatting Controls, set the Space Before to 0.5 cm, Drop Cap Number of Lines to 3, and Drop Cap Characters to 1.    Step 13In the Pages panel, right-click on A-Master and select New Master. In the New Master option window, set the Prefix to D, the Name to Products-1, and Based on Master to A-Master. Click OK. In the Layers panel, select the Background layer. Using the Rectangle Tool (M), create rectangles to act as part of the background and add dimension to the page. Use the Swatches panel to add a Fill Color.    Step 14In the Layers panel, lock the Background layer and select the Image layer. Using the Frame Tool (F), create an image frame with a Width of 8.7 cm and a Height of 10.18 cm. Place the frame at the left margin of the left-hand page and set the Y-axis to 4.7 cm.    Step 15In the Layers panel, select the Copy layer. Using the Text Tool (T), create a text frame on the left side, under the image frame created on the step above. Here, you can information like the product number and name. In the Control panel, set the Font to Magdelin SemiBold, Size to 8 pt, and Tracking to 50. Create another text frame on the right side, under the image frame. Here, we can add a price. In the Control panel, set the Font to Magdelin SemiBold, Size to 14 pt, and Tracking to 50.    Step 16Select the image and text frames, and duplicate them by pressing Option and dragging the elements. Fit four on a single page, and repeat this step for the opposite page.    Step 17In the Pages panel, right-click on A-Master and select New Master. In the New Master option window, set the Prefix to D, the Name to Products-2, and Based on Master to A-Master. Click OK. In the Layers panel, select the Background layer. Using the Rectangle Tool (M), create rectangles to act as part of the background and add dimension to the page. Use the Swatches panel to add a Fill Color.    Step 18In the Layers panel, lock the Background layer and select the Image layer. Using the Frame Tool (F), create an image frame that fits the width of the column guides and has a Height of 10.18 cm. Place the frame in the first column of the left page and set the Y-axis to 4.7 cm. Duplicate the frame by pressing Command and dragging. Place six frames on the top row and six on the bottom row.    Step 19In the Layers panel, select the Copy layer. Using the Text Tool (T), create a text frame on the left side, under the image frame created in the step above. Here, you can information like the product number and name. In the Control panel, set the Font to Magdelin SemiBold, Size to 8 pt, and Tracking to 50. Create another text frame on the right side, under the image frame. Here, we can add a price. In the Control panel, set the Font to Magdelin SemiBold, Size to 14 pt, and Tracking to 50. Duplicate these two frames by pressing Command and dragging. Place the duplicates under each image frame.    3. How to Edit Your Product Catalogue TemplateStep 1In the Layers panel, double-click on the regular pages of your product catalogue. We'll create a cover. In the Layers panel, select the Background layer. Using the Rectangle Tool (M), create rectangles to act as part of the background and add dimension to the page. Use the Swatches panel to add a Fill Color. Using the Frame Tool (F), create a rectangle within the margins of the cover. Click on the image frame and press Command-D to place an image. Locate the Smile image and click Open. In the Layers panel, select the Copy layer. Using the Text Tool, create a text frame over the image. Here you can add the season of your product catalogue template, title, and company name. In the Control panel, use the following settings:
   Step 2For the rest of the product catalogue template, you can add any of the Master Pages. Drag the desired Master Page to add pages to your catalogue. In my case, I added one B-Index page and a C-Content-1 Page for the spreads after the cover. Unlock the elements by pressing Shift-Command and selecting an element or multiple elements. You can drag and drop images into the image frames and edit the text.    Step 3For the product spread of the catalogue, I used one page from each of the D-Products Master Pages so they aren't exactly mirrored. Unlock the elements by pressing Shift-Command and selecting an element or multiple elements. Drag and drop images into the frames and edit the text as you wish. Remember, you can always move a few elements to make the spreads unique, and you can mix and match the Master Pages in your product catalogue template.    4. How to Export Your Product Catalogue TemplateStep 1Go to File > Export. Set the Format to Adobe PDF (Print). Click Save.    Step 2In the pop-up window, set the Adobe PDF Preset option to Press Quality. Select the Marks and Bleeds option from the left side menu. Check All Printer's Mark and Use Document Bleed Settings. Click Export.    Conclusion: Your Finished Product Catalogue TemplateYour product catalogue template design is finished! Save the document as an InDesign file so you can use it again as a template and customize it with every new project. You can mix and match the Master Pages, and you'll have a different product catalogue design every single time!    In this tutorial, you have learned how to design a product catalogue template. We looked into how to set up Master Pages to have pre-designed layouts that you can mix and match. You learned some important pages to create for a product catalogue design and the best print practices to take into consideration to make sure your catalogue is in tip-top shape. Looking for product catalogue examples and customizable catalogue designs? Envato Elements offers thousands of InDesign editable templates that can save you tons of time.
 |
| From Photoshop to After Effects: How to Animate Custom Characters (Part 2) Posted: 08 Jul 2021 01:45 AM PDT In the first part of this tutorial we explored how to create and rig our custom character using Adobe Photoshop and Cartoon Animator. We also exported the project to After Effects, automatically reconstructing the scene structure and animation identically. Now you will learn how to animate your own 2D characters with the help of Cartoon Animator, Adobe Photoshop and Adobe After Effects, using the strengths of each program. What You'll Learn in This Character Animation Tutorial
What You'll NeedTo follow along with this tutorial you will need a PSD editor. If you don't have Photoshop, try Affinity Photo, Krita, or Photopea. You'll also need your own version of Adobe After Effects and Cartoon Animator. You can download a free trial version for Cartoon Animator on the Reallusion Website. You'll need a character to animate. If you don't have a character design already, Cartoon Animator has a content library with a good selection of stock characters you can alter. Character kits are also available for sale on Envato Market and with the Envato Elements subscription. You will need a scene. We used the following graphic pack from Envato Elements, click on the link to download:    1. How to Add Animations to Your Custom CharacterNow that we have our custom character fully rigged and prepared, it's time to add some ready-made animations to it. We'll start in Cartoon Animator. Make sure that the program is in Stage Mode. This is usually indicated on the bottom left of the screen. If you are not in Stage Mode just click on the Back Stage button located on the left tool bar.    To add a ready-made animation to your fully rigged character, simply go to the Content Manager and then select the Animation tab to browse through the library of different animations you can use.    Next we need to navigate to the selection of animations that we are going to use for our character. The animations we're using in this example are found here: Animation Template > Motion > 1_G3 Human > _Turners_Female > Side    To add an animation to your character, simply use the mouse to click and drag the animation onto your rigged character. This will automatically start the animation on your character. Otherwise you can simply click on the play button at the bottom of the screen.    2. How to Use the TimelineNow that we are familiar with the content manager and how to add animations to our custom character, let's combine multiple movements to create a complete animation. To do this we need to familiarise ourselves with the Timeline. First we need to open up the timeline. To do this go to Window > Timeline (F3) which will open up the timeline editor. This is where we can edit the animation keys and animation clips for the character.    Located on the top left of the timeline is the Track Selector. Clicking on this button opens up a dropdown menu that allows you to show/hide any object that is in the scene. In the example below we have our custom character, named Red_S, and the original dummy we used in Part 1 of this tutorial, named Dummy_2 Font Side.    Upon selecting your character you will notice that there are some Track Buttons located to the right of the character name. These include:
Clicking on these will display the names of the names of the main tracks and sub-tracks including any keyframes associated with them. In this tutorial we are going to add some motion to our character so click on the Motion track button to display the keyframes. 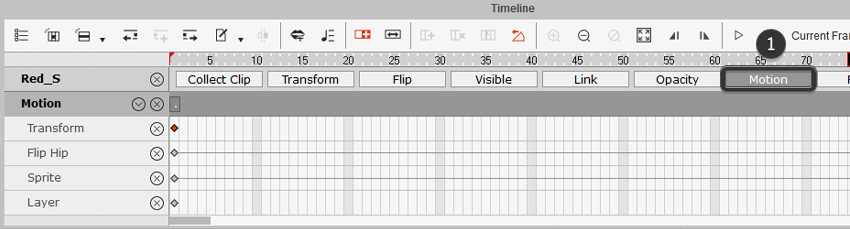   At the very top of the timeline is the Toolbar. This contains lots of different options associated with the using the timeline. For this tutorial we will only be focusing on these areas:
   Time ScrubbingNext we have the Time Scrub. This allows you to "scrub" or move your animation back and forth in time without having to play it. The Time Scrub consists of the following:
   3. How to Combine Multiple Animations with a Custom CharacterIn this section we will learn how to add multiple animations to the custom character. Select the Idle_Stand animation and then click and drag it into your custom character.    You will then see the animation added automatically to your character. This will also be reflected in the timeline, where you can adjust it. Select it and drag it to the very start of the timeline so that the animation begins at the very start.    Adjust Time RangeExpand the Time Unit Bar using the mouse to click and drag the right edge. This will display a greater range of the timeline which will allow you to see more animations as we add them to the character.    Add More MotionsClick and drag the Run(1S) animation to the custom character to add the second animation.    Make sure to move the Run(1S) animation close to the end of the previous animation (in this example the Idle_Stand animation). This will blend to two animations seamlessly together so that when the first animation finishes, the second one will start.    Now let's repeat the steps again by clicking and dragging a third animation to the custom character. For this tutorial, we are going to use the Run Fast(2L) animation.    Make sure that the new animation is next to the previous animation by clicking and dragging it into place. For the Run Fast(2L) animation, we can also extend the duration by clicking and dragging the right edge and moving it to the right. This will make the character run animation last a little bit longer.    For the next animation in the sequence, we will use the Run Fast & Roll animation. Click and drag it on to the character to apply it.    Move the new animation so that it is connected to the previous animation.    The final animation we are going to use for this sequence is the Run Fast(3E) animation. This will show the custom character skidding to a halt after she dives and rolls.    Move the animation close to the last animation to finish the sequence.    Add End FrameMove to the end of the animation and use the End Frame Marker button to end the animation.    Preview AnimationOnce you are happy with the animation sequence and how it is laid out on the timeline, click on the Play Preview button to see what it looks like!    Break TimeWhen you are learning a new skill, it helps your memory to take lots of small breaks as you go. Relaxing, even as short as 15 seconds, helps with learning. So take a small break, and then we will continue. Adjust Your AnimationSometimes you may need to make some adjustments to the animation. Move the animations around if you need to using the steps outlined above. Once you are happy with the animation sequence you can import the project to Adobe After Effects.    4. Import Your Project into Adobe After EffectsTo import your animation into Adobe After Effects you need to go to Windows > Cartoon Animator—AE Script.jsx which will open up a new panel. This script (now officially out of beta testing) takes our animation from Cartoon Animator into After Effects. It's a very useful update, with transparent background video exports and methods for taking objects from Cartoon Animator into After Effects—without overwriting the project.    Click on the Import Project (JSON) button and locate the project location. Select the JSON file you exported from Cartoon Animator.    This will open up the character running animation that we created in Cartoon Animator! Now we can treat this animation as if it were any other After Effects project. For example, let's add a new background into the project.    5. Create a Background for the Animation in PhotoshopOpen the background into Adobe Photoshop. You can open the file directly or import the assets straight from Adobe Illustrator. For this tutorial the background will consist of three separate layers.
In the image below we have added the foreground lamp on top of the background on a separate layer.    The third layer we have used a soft round bush to create the lamp glow using the following colour:
Save your file once you are happy with the composition we can import the background into Adobe After Effects to animate it.    6. Import the Background from Adobe Photoshop into After EffectsTo import our background PSD file you need to go to File > Import > File.    Locate the background PSD file that you saved and make sure to choose Composition—Retain Layer Sizes from the drop down box under Import As. This will allow us to import the PSD file as close as possible to how it looks like when we saved it in Adobe Photoshop.    Once you click on the Import button, you'll be greeted with another window. Here you want to choose the following:
   Once you click on the OK button, Adobe After Effects will create a new composition containing all the layers from the background PSD file. We will use this as our main render composition.    7. Add the New Background to the Animation in After EffectsOpen up the Scene Composition by double-clicking on it either in the Project Panel or in the currently open composition.    Hide the current background by clicking on the Eye Icon next to the background layer.    Now that the background is removed from the Scene composition, we can apply our custom character animation which we created in Cartoon Animator into the new background. Open the PSD background composition (in this example we have named it Night City Background) and then click and drag the Animation comp into it. Position the Animation comp above the Background layer and below the Lamp layer.    Adjust Positions and Resize ElementsWith the elements that make up the animation in one composition, we can start to resize and reposition everything until. Move things around until you are happy with the way that it looks.    8. Animate the BackgroundCreate a Precomp of the background layer by right-clicking it and selecting Pre-Compose. Make sure to select Move all attributes to new composition.    Set Region of InterestThis will create and open a new composition for the background layer. Select the Region of Interest button located between the 'Full' and 'Active Camera' drop down menus at the bottom of the preview panel. Then select the whole background by clicking and dragging the with mouse.    CropNow go to Composition > Crop Comp to Region of Interest.    Create a Moving BackgroundGo back to the Night City Background composition and select the Background pre-comp. To create a moving background, add an Offset preset to the background pre-comp layer. To do this simply select the background layer and then go to Effect > Distort > Offset or type in Offset in the Effects and Presets panel.    Make sure the timeline is set to the beginning of the animation and create a keyframe for Shift Center To.    Move forward a few frames in the timeline and using the mouse, keeping an eye on your character animation. Create a keyframe for Shift Center To just before she is about to move. You may need to zoom in on the timeline to do this accurately.    Move forwards in the timeline until your character animation stops moving. Then change the Width Value to a high number to create a moving background. Then scrub the timeline backwards and forwards (or click the play preview button) to see if you need to increase the speed of the background by having a higher number, or decrease the speed by having a lower number.    Add EasingSelect the last two keyframes of the background layer by clicking and dragging the left mouse button. Right click the keyframe selection and then choose Keyframe Assistant > Easy Ease (F9).Click on the play preview button to see what the animation looks like and make any adjustments to the keyframes if needed.    9. Animate the ForegroundSelect the two foreground layers that make up the lamp:
Then right-click and create a precomp using both of these layers.    Make sure to select Move all attributes into the new composition and then choose a name for it. For this example we will name the new composition Foreground.    Go back to the Night City Background composition and select the Foreground layer. Using the Background keyframes as a guide and create keyframes for Shift Center To. Make sure to use the exact same timing so that the foreground moves at the same time as the background. Use a lower number on the second keyframe than the one used for the Background layer so that it moves slightly slower, which will create a parallax effect.    Make sure that you have selected the Night City Background comp and go to Composition > Composition Settings (CTRL + K) to open up the options. Here we can make some final adjustments to our animation such as the duration of the video. For this example our character animation lasts for 12:10 seconds. So make sure that the time duration in Composition Settings is the same as the time duration for your character animation.    Awesome! You're Finished!Congratulations! And that's how you can animate a custom character using Cartoon Animator and Adobe After Effects! Now that you are familiar with the techniques, why not experiment with different character designs or use another background image? Once you have imported your animation into After Effects you can check out even more tutorials below and apply them to the project. Next in this animation this series we'll explore Cartoon Animator's transparent video features, which let you create intersting animation workflows in Premiere Pro, Resolve, Final Cut Pro X or any other video editing program.    In the meantime, I hope you've found this tutorial useful and I'll see you next time, on Envato Tuts+!
 |
| From Photoshop to After Effects: How to Customize Rigged Characters for Animation (Part 1) Posted: 08 Jul 2021 01:45 AM PDT With the help of Cartoon Animator, creating and rigging your own character designs for animation couldn't be easier. Cartoon Animator provides a fully-functional PSD in-and-out feature that lets you synchronize your changes from an external editor like Adobe Photoshop or Affinity Photo with character rigging in Cartoon Animator. In this tutorial you will learn how to use a combination of Cartoon Animator, Adobe Photoshop and Adobe After Effects to create everything you need to animate a character design. We'll show step-by-step how to rig your own 2D character design for animation. In the next part of this tutorial, we'll continue with the custom character workflow, learning how to take your animation from Cartoon Animator into After Effects for more refinement and added effects. Later in this animation this series we'll explore Cartoon Animator's handy transparent video features, which allow fast and flexible animation workflows in Premiere Pro, Resolve, Final Cut Pro X and other familiar non-linear editors. This tutorial builds on a few of the skills we learned in previous tutorials. You don't need to do the other tutorials first to follow along here, but if you find yourself stuck and want to practice with another project they're a good place to start, or continue, your learning:
What You Will MakeHere is the rendered animation from the completed tutorial. By the end of these steps you'll be able to make the same thing! On this page you will learn to rig a character for animation, and in the next part we will refine and complete the animation. What You'll Learn in This Character Rigging Tutorial
What You'll NeedTo follow along with this tutorial you will need a PSD editor. If you don't have Photoshop, you might be using Affinity Photo, Krita, Photopea. You'll also need your own version of Adobe After Effects and Cartoon Animator. You can download a free trial version for Cartoon Animator on the Reallusion Website. You'll also need a character to animate. If you don't have a character already, Cartoon Animator has a content library with a good selection of stock characters you can alter. Character kits are also available for sale on Envato Market and with the Envato Elements subscription. 1. Set Up the PSD EditorThe PSD Editor in Cartoon Animator saves a lot of time creating your characters and animations, letting you synchronize the editing from Photoshop with the existing character that you are working with in Cartoon Animator. Let's get started. In Stage Mode, you will see a brush icon button at the top right of the screen (Launch PSD Editor Button). Click the button and you will then be prompted to choose the external editor you want to work with. For this tutorial we will use Adobe Photoshop, but if you use one of the other editors and they will work similarly.    Select the executable file for your PSD editor by clicking on the open file icon.    Select the Photoshop.exe file on your computer and click Open.    Once you have selected the Photoshop.exe you will see that the brush icon button will change into the Adobe Photoshop icon. Now we can work in Cartoon Animator and Adobe Photoshop at the same time!    2. Open a Character Template DummyBefore we begin to create and rig our own custom character, let's take a look at the Content Manager inside Cartoon Animator. Here we will be able to browse through the library of character templates, heads and body shapes that we can use as a starting point. You can access the Content Manager by going to Window > Content Manager or by pressing F4 on the keyboard.    Once you have access to the Content Manager, select the Actor tab and then select Template.    From here you can browse through all the different types of characters, heads, body types and accessories that you can use for your animation. To create a rig for your character we need to navigate to Actor Template > Character > _G3 360 > 1_G3 360 Human > Dummy for 3D Motion to access all the available Dummies that you can use. From here you can choose the angle which fits closest to your character:
   For this example we will be using a character which is facing the side at an angle, so let's use Dummy_2 Front Side by clicking and dragging it into the scene.    With the dummy selected, click on the Zero Key button at the top to make sure that it is on the scene route.    3. Create a Custom Character in Adobe PhotoshopWith the dummy still selected, click on the Composer button. This will take you into Composer Mode where we can isolate our object and start making adjustments to it.    In Composer Mode you can now see the bones, which automatically come with the dummy model that we are using.    In order to edit the dummy character and to import your own custom character, we need to use the PSD Editor. To do this, click on the PSD Editor button located on the bottom left of the screen.    This will open up Adobe Photoshop and synchronize the character in both programs (Adobe Photoshop and Cartoon Animator). From here we can use Photoshop to import a custom character into our rig.    Now we'll open up the layer folders for each body part and replace the contents with your own custom character design. For example, let's open up the folder RL_Image > Hip, which contains the Hip layer.    Replace the Hip layer with your own character design by importing it into the same Photoshop file. Make sure that the layer name is exactly the same as the layer being replaced (in this case it is called "Hip"). You can do this by merging the two layers together or deleting the old layer. Make sure that your own custom character is broken down into the same parts as the dummy.    Continue to replace each layer until your whole custom character is complete.    Once you are happy with the way your character looks, go to File > Save to save your character and all the changes you have made will be reflected in Cartoon Animator. If you need to make any further changes to the character design, simply make them in Adobe Photoshop and then save the file to synchronize.    Break TimeWhen you are learning a new skill, it helps your memory to take lots of small breaks. Relaxing, even for as short as 15 seconds every once in a while, helps with learning. So take a short break now, and then we will continue. 4. Rig Up Your Own CharacterNow that you have successfully imported your custom character into Cartoon Animator, you may need to make some small adjustments to the bones to make sure they're are aligned to our custom character. Click on the Transform Bone button located at the top menu bar.    Upon clicking on the Transform Bone button we'll be able to click and edit the bones of our custom character. You can do this by clicking on a specific bone that you want to move and then click and drag it into the position that you want it in on top of your character.    You can also use the scene manager on the right of the screen to select your bones that you want to move or edit.    In order to add new bones to your character you will need to click on the Bone Editor button. This will give you more options to choose from when creating, editing and adjusting your bones. To add new bones simply click the Add Bone button.    Once you've clicked on the Add Bone button, just click anywhere on your character to create new bones using the Left Mouse Button. Click the Right Mouse Button once you have finished adding your bones. You can also find your newly created bones, and see how they are connected to your overall rig, in the Scene Manager. Here you can also rename your new bones by double-clicking on the name using the mouse.    To connect a bone to a new one, simply select the bone node, which is the small circle at the end of your bone. Once that has been selected, click on the Add Bone button and any new bones you create will be connected to the node you previously selected.    5. Test Your Rigged CharacterBefore we start animating our custom character, we need to check to see if our rig works. To do this click on the Preview button located near the centre of the top menu bar.    Upon clicking the Preview button, you will then be able to move the bones on your rig to see how it affects your character. Below you'll see that the joints are disconnected from each other when we try to move the arm. This is because we don't have the Stretch Bind activated.    Stretch Bind the BonesTo activate the Stretch Bind for our joints you need to head over to the Layer Manager, which is located on the right of the screen. Find the joint that you want to edit and then on the far right section you'll see a small diamond shape. Click on it to activate the Stretch Bind. Do this for all the joints of your character, including the knees, ankles, elbows and wrists.    Once you've activated Stretch Bind on all the joints of your custom character, you can click on the Preview button again to test that your rig is working correctly.    6. Adjust the LayersYou may also need to adjust the layer order of the different parts that make up your custom character. In the example below you'll see that the right arm is placed in front of the body incorrectly. To change this we need to access the Layer Manager. This is usually located on the right side of the screen along with the Content Manager and Scene Manager.    To access the Layer Manager click on the tab at the bottom.    Locate the right arm (or whichever layer you wish to move) and then simply click and drag that layer to the correct location. In this example we want to move the right arm all the way down so that it is behind the rest of the body parts.    Move all the parts of your character in the correct order using the Layer Manager. Once you are happy with the way your custom character looks we can start to import the project into Adobe After Effects. 7. Import Your Project to Adobe After EffectsOK, we have completed the preparations for our character. In order to prepare us for animation, let's go ahead and setup Adobe After Effects so that we can import our project. To do this simply click on the Ae button located on the top toolbar or go to Render > Export to After Effects. This new script allows us to seamlessly move our animation from Cartoon Animator into After Effects. Now officially released, it includes useful features like exporting video with transparent backgrounds and a way to add objects from Cartoon Animator into After Effects without overwriting the project.    From here you will need to click on the Download Script button to download the script, and then install. To install the file into Adobe After Effects, unzip the Zip file and then paste the file Cartoon Animator—AE Script.jsx into the ScriptUI Panels folder, which is by default located at the following path:
If this folder does not exist, then create a folder with the name ScriptUI Panels.    Head back to Cartoon Animator and make sure that you have checked the following:
Once you've checked through all the options click on the Export button and choose a desired destination for your new Adobe After Effects file.    Congratulations! You've completed Part 1 of 2 in this tutorial. You can now import a custom character into Cartoon Animator by synchronizing the program with Adobe Photoshop, all the different ways that we can create and edit a a custom character rig, and then how to export your character to After Effects. In the next part of this tutorial, we'll take you through step by step on how to can create an animation for your custom character and then take it into Adobe After Effects to complete the animation. You can also check out even more tutorials below and apply them to the project. In the meantime, I hope you've found this tutorial useful. I'll see you next time, on Envato Tuts+!
 |


.jpg)
.jpg)


.jpg)
.jpg)


.jpg)
.jpg)
.jpg)
.jpg)


.jpg)
.jpg)
.jpg)
.jpg)


| You are subscribed to email updates from Envato Tuts+ Tutorials. To stop receiving these emails, you may unsubscribe now. | Email delivery powered by Google |
| Google, 1600 Amphitheatre Parkway, Mountain View, CA 94043, United States | |


0 Comments