Envato Tuts+ Tutorials |
| What Is a PowerPoint Slide Deck? (PPT Presentations for 2021) Posted: 11 Jul 2021 05:55 AM PDT When you've got to give a big slide deck presentation, it can be a bit daunting to get started. You might already be feeling nervous about speaking in front of a crowd. Or you could be running short on preparation time. a PowerPoint slide deck can help!    And don't forget to prepare those speaking aids or slides! Having a visual to go along with your presentation is usually expected by an audience. That's why we use Microsoft PowerPoint to build out slide decks easily. You can use a PowerPoint slide deck template from Envato Elements to build one quickly. We'll learn how to do just that in this tutorial. Download Our Free PDF eBook on Making Great PresentationsWe want to make sure you know about this resource which will help you write, design, and deliver the perfect presentation. Download our Free eBook: The Complete Guide to Making Great Presentations.    Now, let's dive into learning how to build PowerPoint slide decks. What Is a PowerPoint Slide Deck?A PowerPoint slide deck is a collection of slides that are in the same presentation. You'll hear "slide deck" used somewhat interchangeably with "presentation." Like a deck of cards, each slide is a key part of the overall package.    "Slide deck" and "presentation" are sometimes used interchangeably. For example, you'll frequently see the term "deck" used when it comes to pitching your company or startup. Presentations can be supported with a slide deck. You'll approach building that PowerPoint deck differently based on the type of slide deck presentation. But the fact remains that slides are a helpful supporting tool when presenting. Save lots of time and make a great visual slide deck presentation by using a professional PowerPoint slide deck design from Envato Elements. PowerPoint has a bad reputation for being a tool that presenters lean on. While your slides should aid your presentation, they shouldn't contain every word you say. It should be used as a tool to enhance your presentation. What Is a PowerPoint PPT Slide?If a slide deck is a collection of slides, then what is a PPT slide? Slide decks are made up of individual slides. Each slide brings something new to the table. A collection of slides comes together to build a successful PowerPoint presentation.    Think of a slide as an individual card in a deck. No matter what card game you're playing, every card has a role. You can't win a hand of poker or rummy without bringing many cards together. And you can't build a successful slide deck presentation with an individual PPT slide.    Building a PowerPoint marketing plan is much easier when you use a pre-built template. Let's learn more about the tips and skills you can use to reduce the work in building your next marketing plan. 5 Quick Tips for Making Better PowerPoint Slide DecksTo help you build an engaging presentation we have outlined five quick tips that you can put in place: 1. Reduce the Content on Each SlideLess is more when it comes to presentations. Start by opening up the slide deck and then find ways to reduce the content by half. That could mean removing entire slides, reducing the number of text bullet points, or removing multimedia from each slide. We've got the tendency to overcrowd slide decks with content. We often write a presentation while preparing the slide deck at the same time. In doing so, we run the risk of using the presentation file as an overcrowded note pad.    A PowerPoint slide deck should only be the most important points of the presentation. Why show the points that you'll be speaking aloud in writing as well? There's no need for redundancy. 2. Build Each Slide in Phased IntroductionsWhen you cut to a new slide, it can be a mistake to show everything at once. The same idea as the prior tip applies: the less you show, the better chance that your audience has of actually digesting the information. Cutting to a slide with everything already showing is the fastest way to lose the audience's attention. As soon as you cut to a slide that has a wall of text, you'll lose the audience's attention. In the example below, there are basically four content blocks surrounding the center. Instead of showing them all at once, I'll use animations to bring them on in groups.    To build your slides, introduce them in stages. You can use PowerPoint animations to bring parts of the slide in stages. Instead of showing the entire slide contents, try phasing in various parts of it using animations. Don't show an entire text box. Instead, bring each bullet point on with a single mouse click. This will help to hold the audience's attention. If you want to learn more about animating elements of your PowerPoint slides, check out the tutorial below. You don't have to use eye-popping and sophisticated animations to introduce your slide's elements. 3. Content First, Style LaterWhen you're preparing a slide deck, the content of the presentation is your number one priority. Instead of starting off in PowerPoint, start off with pen and paper. Write the content and structure of the PowerPoint presentation deck first. Then you can add the supportive visuals and slides. There's plenty more to learn when it comes to building supportive PowerPoint presentation decks. Make sure to check out Cassie McDaniel's tutorial that features 22 tips for building out great decks: 4. Use Illustrations & Graphics to ExplainYou can explain everything in text boxes, but your audience is sure to zone out and lose focus quickly. Instead, it helps to use charts and graphs that can help you translate ideas into graphics. Check out the two tutorials below to learn more about building engaging visuals for your audience.
5. Let the Conversation ContinueA slide deck presentation is a chance to grab an audience's attention. The last thing you want to do is let the presentation be the last point of contact with your audience. That's why I always recommend that your presentation include a contact or follow-up slide. Using a slide that showcases your social media or simply asks the audience to get in touch is a great way to take the next step with your business.    What Types of Presentation Can You Give?Every presentation is different. There are many types of presentations that you can give to make an impact on an audience. Here are the categories that I tend to think of presentations as spanning:
Before you even open PowerPoint, you should understand what type of presentation that you're giving. This will help smooth out the writing process and give you a clear goal to aim for. How to Build a Slide Deck QuicklyFor any creative project, you can cut many hours out of your work if you avoid recreating the wheel. In other words, don't build slides from scratch. Use a presentation deck template from Envato Elements to get a head start. Best of all: you can customize these presentation deck templates in five quick steps. Let's learn how. We'll use the Visionare PowerPoint Presentation from Envato Elements in this mini-tutorial.    Let's get started: 1. Pick Out Slides to EditThink about how to make a slide deck support your message. Remember, slides are a visual aid, not a presentation by themselves. Choose only slides that support what you're already discussing.    In PowerPoint, find Slide Sorter on the View tab. From here, click and drag to reorder slides in the deck. Hold Shift and click on unwanted slides, then press Delete. Start editing by clicking Normal back on the View tab. 2. Add Custom TextCustom text is a key part of how to create a slide deck fast. Templates like this have text placeholders already built-in. To edit, click and drag to highlight any block of text.    Then, simply start typing (or paste in words from elsewhere). It's that simple. Repeat throughout the presentation deck as needed. 3. Add ImagesHow to create a slide deck that inspires audiences: it's a common question. One of the best ways is to build an illustrated deck. Image placeholders make it a breeze.    Simply browse to an image stored on your computer. Drag it over the placeholder and drop it into place. PowerPoint will import and scale the photo to fit perfectly. 4. Change Object ColorsChanging object colors on your presentation deck has several advantages. It lets you add contrast or share your brand's special colors. Click on any object to get started.    On the Home tab, find Shape Format, then choose Shape Fill. A color chooser menu opens, where you can click to preview (and apply) any color you want. 5. Delete Unwanted ObjectsPre-built presentation decks include all kinds of content. But keep in mind, you don't have to use all of it!    To build cleaner slides, you can click on images, text boxes, and other items to select them. Then, press Delete on your keyboard. It's a helpful way to ensure templates always work for you. Learn more about customizing PowerPoint template designs (or read on for more great tutorial resources): Top 5 Design Trends For PowerPoint Slide Decks In 2021It's important to present modern designs in your PowerPoint slide decks. This will give your presentation the best possible chance of succeeding. To help you stay on top of modern design trends, we've got a list of the top five design trends of 2021: 1. Add SpaceAdd space around the different elements on your slides is an excellent way to add a modern feel. To help create this modern look, try to reduce the number of elements on your slides. This will allow you to add space to your slides that looks natural.    2. Layer, Layer, & LayerLayering your presentation deck designs will give your slides a more professional look. Layering the different elements on your slides will add a sense of depth. This helps create an eye catching design. Try using various color blocked shapes as the base layer and then layer on your text and images.    3. Use Simple FontsSimple and easy to read fonts will instantly give your presentation deck a modern feel. Sans Serif type fonts are going to give your slides a clean look. Be sure to choose the appropriate font sizes as well. Having headings and body text make for a visually appealing slide design.    4. Include High Quality ImagesIncluding high quality images is a must if you want to feature a modern looking design that'll deliver. Envato Elements has a wide variety of high-quality images. You can use these images for your presentation decks. Lean towards bigger image sizes on your slides.    5. Use a Simple Color SchemeSimple color schemes work best for presentation decks. Picking two or three colors is plenty to deliver a trendy looking presentation. Adding more colors can make the design seem disconnected. Try using one main highlight color throughout your slides.    Looking for even more templates? Don't miss out on the next section where we cover even more presentation templates that you can download. Discover More Top Selling Microsoft PowerPoint Presentation DecksStill haven't found the perfect PowerPoint slide deck for your upcoming presentation? Don't worry! There are plenty of best-selling PowerPoint presentation decks to download. Check out the articles below for more great presentation deck templates:
Now let's look at the differences between Envato Elements and GraphicRiver. Where to Find the Best PowerPoint Templates in 2021 (Envato Elements vs GraphicRiver)For any creative project, you can cut many hours out of your work if you avoid recreating the wheel. Instead of drawing each slide design from scratch, use a premium PowerPoint template. Here's how I think about it: when you've got to give a presentation, you've got a limited amount of time to prepare. Why spend it building slides from scratch? You've seen two marketplaces that offer solutions as you learn how to create a slide deck. So, which one is right for you? Let's compare: 1. Key Benefits of Envato ElementsEnvato Elements is a subscription-based service that's truly tailor-made for creatives. Elements includes more than 500 PowerPoint slide deck templates. This allows you to skip the design process. That's not all that Elements has to offer. You also have access to stock photos, graphics, and more. These types of creative assets are the perfect complement to a presentation. You don't have to buy these files one at a time. Instead, grab them all with a single subscription to Elements.    2. Key Benefits of GraphicRiver (& Envato Market)GraphicRiver is the top choice for pay-as-you-go marketplaces. It's remarkable just how many digital assets are inside the library. When you need a single presentation deck template, then head over to GraphicRiver. It's a quick and efficient way to get the designs you need for a presentation.    Your Choice (What's Right for You?)Envato Elements is the best choice if you're learning how to create a slide deck. The freedom to experiment is priceless. Even if all you only download PowerPoint presentation templates, it's worth the subscription. You can keep using the files you've downloaded even if you decide to stop subscribing to Elements thanks to the licensing agreements. Sign up for Envato Elements now.    Or just grab a single presentation deck template on Envato Market. It's a cost-effective way to start quickly. Check out these top PowerPoint slide deck themes that you can use for a head start on designing your presentation: 5 Top Presentation Deck Templates from Envato Elements (For 2021 Slides)Envato Elements has thousands of presentation deck templates ready for you. Here are five top designs trending now: 1. Coftofee - PowerPoint Template   When you consider how to create a slide deck, it pays to think about your message. A flexible template is a great choice because it gives you a lot of creative power. Coftofee delivers just that, with 150 slides and five custom color schemes. All you've got to do is drop in your own content. 2. Drove Creative - PowerPoint   Think building an amazing presentation deck takes forever? Think again. Drove Creative makes it a breeze, thanks to powerful use of master slides. In essence, these let you make bulk edits in a single step. Plus, you'll find a full set of vector icons and resizable graphics throughout. 3. Simple Work Presentation   Whether you're making a business or personal presentation deck, versatility is a must. Simple Work lives up to its name, with 33 slides created in beautiful HD resolution. Simply drag and drop content onto the slides. Every graphic is fully editable, letting you have full creative control at every turn. 4. Station PowerPoint Presentation   Wondering how to make a slide deck more interesting? Station is packed with ideas and designs to help you do exactly that. Bright colors feature on each slide. There are charts and infographics that present your ideas in unforgettable style. Also included are maps and vector icon sets. 5. Be PowerPoint Presentation Template   Be is a presentation deck made in a minimalist style. It really helps your content stand out. Choose from dozens of sleek layouts, including images and device mockups. It's quick, easy to edit, and sure to impress even the toughest audience. Let's now go over a few FAQ's for Microsoft PowerPoint. Common Microsoft PowerPoint Questions Answered (FAQ)Do you have questions about Microsoft PowerPoint? Below, we've collected five of the most frequently asked questions and provided answers to them: 1. Can You Print Your Presentations?Yes, you can! PowerPoint supports the printing of all your presentations. This makes it easy to distribute your presentation if you need to. Printing out your slides can use quite a bit of ink. Check out our tutorial below on how to print your slides and still use less ink: 2. How Can I Be Engaging and Effective With PowerPoint?PowerPoint can be quite intimidating if you're new to the software. But don't worry! As long as you've got a professional template, all you need to do is add your content to the placeholders. This will instantly give you a professional looking presentation deck. For more information on how to create engaging presentations, check out the article below: 3. Does the Quality of My Template Really Matter?Absolutely! When you use a low-quality template, your presentation will be much less impactful. The templates on Envato Elements are professionally designed. This ensures that you're only using the most impactful designs. For more information on how to make a slide deck from a template, check out the tutorial below: 4. Where Should You Start?Starting a presentation deck from scratch or even with a template can seem like a daunting task. The number one priority when starting a presentation deck is the content. Before you even get into the design customization, you need to have quality content to add to your slides. Check out this article on how to write a professional PowerPoint presentation: 5. How Do You Change PowerPoint Templates?Using PowerPoint templates are a must if you aren't a professional designer. Thankfully, it's very easy to switch in and out of PowerPoint templates. To find out how to change PowerPoint templates check out the article below: Looking for even more helpful tutorials on how to create a slide deck? Check out the next section where we offer up even more great resources! Learn More About Using PowerPoint (Helpful Tutorials on Envato Tuts+)This PowerPoint presentation deck tutorial showcased some of my favorite resources and tips for building a PowerPoint slide deck. There's still plenty more to learn to help you rapidly build out a slide deck that you feel confident showing to an audience. Check out these other helpful PowerPoint tutorials:
Grab This eBook on Making Great Presentations (Free Download)This eBook will help you learn how to write, design, and deliver great presentations. Download The Complete Guide to Making Great Presentations for FREE with a subscription to the Tuts+ Business Newsletter. Get your ideas formed into a powerful presentation that'll move your audience.    Now's the Time! Go Make Your Own PowerPoint Slide DeckWhat is a PowerPoint slide deck? Using custom PowerPoint PPT slide templates from Envato Elements can save you a lot of time on your presentation deck. Be sure to browse through more great PPT slide deck templates on GraphicRiver. Select the PPT slide deck templates you like. Then, build your own PowerPoint slide deck. How do you build your slide decks? What are your favorite tips for helping reduce the time you spend in PowerPoint? Let me know in the comments section below this tutorial. Editorial Note: This tutorial was originally published in June of 2018. It's been comprehensively updated to include new information and slide deck examples—with special help from Andrew Childress and Daniel Strongin.  |
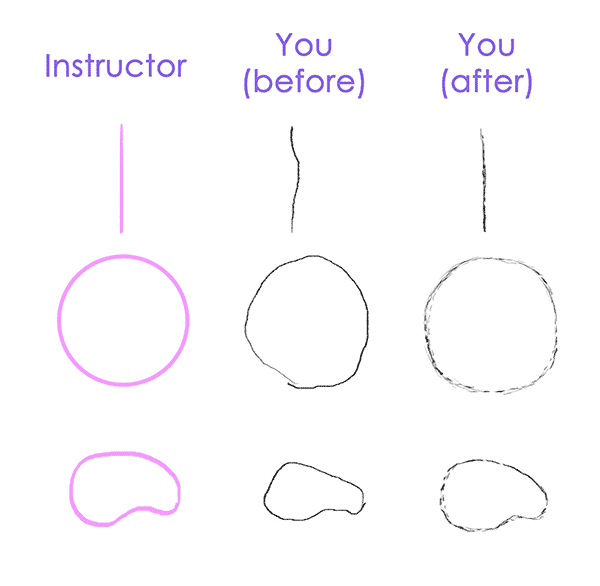
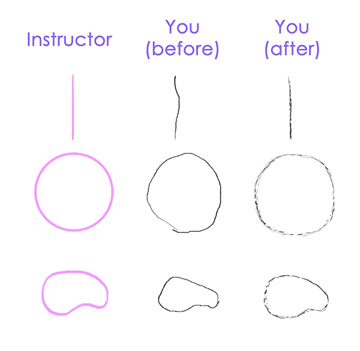
| I Want to Draw: Simple Exercises for Complete Beginners Posted: 11 Jul 2021 05:00 AM PDT Do you struggle with a simple circle from the first step of every tutorial? Do your straight lines keep bending, no matter how hard you try? Do you seem to be unable to draw two points with a given distance between? Do your pictures look wrong even after repeating carefully every single step from a detailed tutorial? These problems may come from a lack of basic skills that are ignored when learning how to draw. In fact, these skills are obvious for someone who's been drawing a lot, but they also can be easily forgotten after a few years without a pencil in your hand. So are you ready to catch up with the best drawing exercises for beginners? If you're looking for a pre-game motivational boost before taking on this challenge, check out the accompanying article, What's Your Excuse? Why Can't You Draw? If you're drawing digitally, perhaps you want your work to look as if it was created with pencil and paper. If this is the case, may we recommend one of the many Photoshop brush sets available on GraphicRiver, including this Classic Art Brush Pack.    1. Break the Straight LineYour problem: you're not able to draw a straight line/perfect circle.   Step 1Straight line drawing by hand isn't real. It exists only in vector, as the shortest way between two points. You can cheat and use a ruler, but most likely your hand will never learn how to draw a perfectly straight, long line. Even if it starts as something perfect, the longer you draw it, the more mistakes can be made. What does it mean? If drawing a long line is almost impossible, we can use short lines that our hand is more adapted for. This way it won't matter what tool you use to draw straight lines; they'll usually come out pretty good. Just look at the picture below. The shorter the lines, the closer to the original the picture is.   Step 2Let's say you want to draw a flower like the one below. You can see it's built of a straight line, a perfect circle, and a few curves with precise angles. I guess you can draw it very slowly, very carefully, driving the lines from point to point, with your tongue stuck out and sweat on your face. But... why? Drawing isn't a chore, it should be fun!   Step 3Technical drawing (straight lines, perfect circles) requires concentration. It's about drawing things exactly as they are. There's no space for creativity or personal style, since style comes from diversity. Is it really what you want to do? Draw the same things exactly the same way all the time? If you do, well, there's no tutorial for you. Because drawing—creation—is about keeping your hand relaxed while being focused on a final effect instead of creating a series of perfect lines. That's what you need to learn—how to keep relaxed, sketching quickly and carelessly. Let's try to draw this flower once again, shall we? But this time, follow these simple rules:
    Step 4Wasn't that fun? If you narrow your eyes, it even looks quite done. Now, fill the spaces between the lines with the ones it's lacking. The rules from the previous step still apply.   Step 5You can now stress the defined lines with a marker or pressing the pencil harder. This step isn't necessary; you can skip it.   Step 6It's done! It doesn't look exactly like the original, but you can see some style in it, a bit of your personal character, a real work of your hands! You can notice it even looks more natural than the original, because nature isn't perfect. What's most important, once you cross the boundaries, you can easily change everything! Paradoxically, the less accurate your straight line drawing is, the more natural the results.   Step 7Now that you've learned how to draw a straight line, what should you practice?
  2. How to Create Your Own Style of ArtYour problem: you feel you can only draw things other people have already created. Your drawings never look like something that's truly yours. If that's true for you, then it's time to learn how to make your own art style.   Step 1So you can draw circles and straight lines, right? That's not really good. You may be stuck in mathematical rules and technical drawing—you're great at repeating, but not creating. How can you help yourself? Well, the first step of this tutorial is good for you too, but there's another trick you can use. As I said before, style comes from diversity. If you're redrawing a picture carefully, line by line, without adding anything new (because it would be a mistake!), you can't end up with something different. The original wasn't yours, and your drawing is just a copy. I don't say you shouldn't follow tutorials anymore; you should just be more creative and—paradoxically—less precise when doing it. How to lose a reasonable bit of precision? Let's start with this simple exercise: draw a few simple shapes with your hand shaking, as if you were feeling nervous. Do it until you feel your hand is relaxed.   Step 2Let's try this simple tutorial now. Do this the same way as usual, but in Step 4 shake your hand when drawing the final lines. Draw a few of these heads, changing the level of twitch every time.   Step 3Surprised? Every head looks different than the original, but you can recognize what you've just drawn. Also, you used the same proportions for them all, yet none of them looks identical. How could it have happened? When you were learning how to write, your teacher wanted you to repeat lines from a template. You were spending a lot of time drawing (not writing) every single letter as if it was a small masterpiece. Then, with time and experience, you developed your own character of writing, your own style. Your letters look different than mine or your friends', but still, we can all read what you write. Your style changed because you wanted to write fast—to write down your thoughts, not to draw perfect but meaningless letters. Apply this rule to your drawings. Think about what you want to achieve, not about the lines. Draw fast, and your personal, unique hand movement will have a chance to shine. 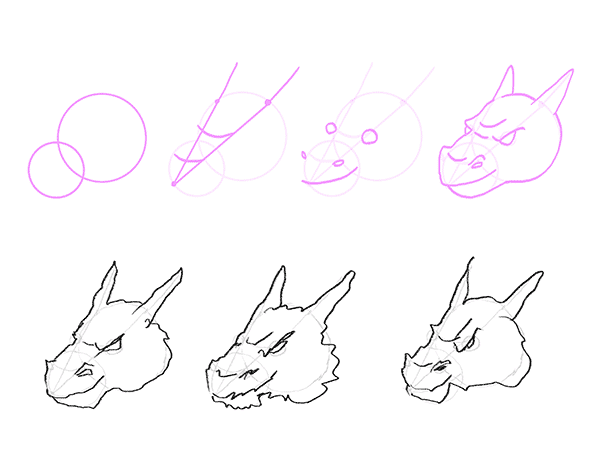  Step 4There's another thing that adds up to your style: creativity. Do the same tutorial once again, this time changing the step results to your needs. You're learning how to draw a dragon's head, but what if dragons in your mind have longer mouths? No problem! You don't need to find more drawing exercises for beginners for that. Just adjust the rules to your needs.   Step 5Alright, so you now know how to make your own art style. What's next for practice?
  3. How to Measure and Draw ProportionsYour problem: your proportions always look off. You feel unable to draw a given distance without using a ruler or other tools.   Step 1Incorrect proportions are a huge problem for an aspiring artist. Luckily, it can be overcome if you don't ignore it. First, what are the proportions, actually? Proportions aren't a distance measured in some unit. They define the location of an element relative to others. That means that if you want to draw the whole picture (set of elements) two times bigger, all the distances need to be doubled too.   Step 2Let's train our eyes to see and redraw proportions. First, try to redraw this picture, but two times smaller:   Step 3Now, take a ruler and check if you got it right: the distance should be two times smaller than on the screen. And, how's your result? Probably not very good, if you're reading this drawing proportions tutorial. Notice that the circles should be two times smaller too, and that seems almost impossible: how can you draw a circle that's twice as big, if you don't even know the original size? The answer is that we need at least two elements to talk about relativity. No matter what size the first element is, it can't be unproportional, if there's only one! So let's try again. Draw only the first circle.   Step 4Now imagine two lines coming from the center of the circle. There's a third imaginary line connecting both circles. Can you see what angle it creates? Draw this line on your picture, without adding the second circle for now. If you have problems with seeing the angle, try to divide the right angle into thirds, then every third into thirds again. Each of them is 10 degrees.   Step 5We need to set the distance now. How many circles can be put between both centers in the original? Apply this relationship to your picture. For the first time, it's best to print the original and draw the other circles physically. Later, you can try only pretending you're drawing them (keeping the pencil right above the paper/screen and seeing the circles in your mind).   Step 6It's almost done! Now we need to check what the size of the second circle is in relation to the big one. A good method for this is to imagine the second circle inside the first one to clearly see the proportions.   Step 7Done! You can use the ruler once again to see how accurate it is. This method is really good when your eyes aren't trained to see proportions yet, and with time you may not need to draw the guide elements anymore.   Step 8You've done it! You went through all the steps in learning how to draw proportions. For more practice, do the following:
  4. Free Your HandYour problem: you find drawing parallel or concurrent lines very hard. The second line always goes in the wrong direction somehow.   Step 1This happens sometimes when you're trying too hard. You want to be precise and, as a result, you draw slowly and carefully, giving your hand more time for mistakes. Try to draw both lines fast: does it change anything? If yes, well, I'm glad I could help! If no, a little training may be needed. Drawing snakes is the greatest and the most complex training I can think of. It lets you practice proportions, planning lengths, changing size and angles, and, most importantly, it teaches your hand how to move gracefully. If you're reading this paragraph, you probably have problems with snakes too—they're thick at one point, then thin and thick again, totally messy and wrong. But we can fix it! Start with a row of circles, each one smaller than its predecessor. End the row with a single point.   Step 2Connect the corresponding ends of the diameters. A simple snake is done! Of course, there's more to learn.   Step 3Now draw a series of the same circles, but changing their positions vertically too.   Step 4Connect them again.   Step 5Let's increase the difficulty level. Do the same as before, but now leave bigger spaces between the circles.   Step 6Connecting the circles may be harder now, because you need to draw the arches. This is the actual practice. Draw the snakes, long and short, straight and curled, using bigger spaces between the circles every time you see you got it right. If you do this long enough, your hand should learn the proper movement.   Step 7What to practice?
  5. Learn What Things Are... And Why They AreYour problem: you can't draw from imagination. Everything goes right when you follow a tutorial, but then you can't remember the steps, or there's only one pose that turns out OK.   Step 1Even though the best drawing exercises for beginners won't help you here, you'll be glad to hear this isn't as big a problem as it seems. You only need to change your attitude. The problem is that you learn how to draw lines instead of what the object is. There are two kinds of information:
Matrix information is a template to create the same thing all over again. It's hard to remember, and it's useful only in a few cases. Vector information is scalable. It means that when conditions change (different pose, size, style), the elements adjust to them, because they're attached to proportions, not position. Here's an example: Matrix Dog Head Information
Vector Dog Head Information
  If you'd like to change something, for example open the mouth, matrix information fails. It's fixed, scalable only in terms of size, and it's even more useless when you want to create a pose in 3D space. How can you learn in vector, then? Step 2Take an object and analyze it. There are two ways of thinking you can use now (I'll use a glass as an example):
What do you think? Which way better describes the essence of a glass? The first one is fast and great when you start your adventure with drawing, but it will only let you draw this particular position. You may try to go into a 3D world, learn perspective, add some motion, and suddenly it turns out you don't really know how to draw a glass.   Step 3Another example is anatomy. You may learn the curves of a body in one pose, but it doesn't tell you anything about what the same body looks like when running/sitting/fighting. A simple "why" has never been that powerful. Why is this part bulging? What's it used for? Why is it long/short? Why is this part connected to some particular one?   Step 4What to practice?
  Now You're Ready to Draw!If you've followed the tutorial carefully, after some practice you should be able to follow intermediate tutorials flawlessly. While these drawing exercises for beginners may seem boring, they're essential and need to be learnt. If you tried them and they seemed trivial, that's great, you're ready! But if you had some problems, it's really better to stop here and practice until you overcome them. More Useful Drawing ResourcesIf you want the best simple drawing tutorials and exercises for beginners, stick right here on Envato Tuts+! Our instructors have put together many helpful guides that will help you develop your skills. Here are just a few to get you on your way:
 |


| You are subscribed to email updates from Envato Tuts+ Tutorials. To stop receiving these emails, you may unsubscribe now. | Email delivery powered by Google |
| Google, 1600 Amphitheatre Parkway, Mountain View, CA 94043, United States | |


0 Comments