Envato Tuts+ Tutorials |
- 42 Best Webcam Borders for Twitch & Stream (Using a Twitch Border Maker)
- 25 Best WordPress Coworking Themes for 2021
- How to Answer the “What Do You Do for a Living?” Question
- 20 Best Free Microsoft Word Envelope Templates to Download for 2021
- The Basics of Drawing Type & Creating Your Own Handwritten Font
- How to Prepare for a Phone Interview
- 15+ Best WordPress Themes for Non Profits
- 25 Best Infographic Google Slides Templates To Make Presentations in 2021
- Creative Arabic Calligraphy: Designing the Letters
- 33 Best Mailchimp Responsive Email Templates (2021 Newsletter Designs)
- A to Z of Adobe XD: Tips & Tricks!
- 25+ Best Free Calligraphy Fonts (Free Downloads)
| 42 Best Webcam Borders for Twitch & Stream (Using a Twitch Border Maker) Posted: 09 Jun 2021 08:00 AM PDT Want to know how to make a Twitch border?    Check out this tutorial, which will show you how to create a border for Twitch, as well as sharing 42 of the best Twitch border templates available at Placeit. Premium Twitch Border Maker From PlaceitPlaceit is an excellent source for finding the best Twitch border templates. All of the templates are easy to customise using the Twitch border maker.    You can buy just one Twitch border design at a time for a small fee or sign up for a monthly plan that allows you to create and download as many designs and other resources as you like for one low monthly fee. How to Make a Twitch Frame With the Twitch Border MakerStep 1: Select a Twitch Frame Template
  
   Step 2: Choose a Colour Scheme and Frame
  
  
   Step 3: Add Text to Your Template
   Step 4: Move and Resize Your Text and/or Border
   Step 5: Download Your Twitch BorderWhen you are happy with your design, just click the Download button at the top of the page. This will take you to the download page, where you have two options for purchasing your Twitch border design.    You can either pay a single fee or sign up for a monthly or yearly subscription that offers you unlimited downloads of all Placeit's designs, mockups, logos, videos, and gaming templates.    Now that you know how to make a Twitch border quickly and easily, let's take a look at some of the best Twitch Border templates you can find at Placeit. 42 Best Webcam BordersOBS Camera Border With Double-Lined Frame   The OBS Camera Border With Double-Lined Frame is designed to deliver maximum attention to your Twitch stream. Customise your Twitch border easily with the border maker. Just add your own image for the background, select a border that reflects your style, add your text and brand colours, and download your customised template for a small fee. Overlay Border Design for a Twitch Stream   Here's another cool overlay border design that brings maximum attention to your screen content. This is great if you love medieval themes but want to customise them to add your own great imagery. Streaming Border Overlay Maker for Twitch Accounts   This terrific, dark background is the perfect foil for your text and an eye-catching frame if you're looking for a streaming border overlay. With the Twitch border maker, customisation is easy and quick. Twitch Frame and Webcam Overlay With an LGBTQ Avatar Graphic   Looking for a simple yet stylish Twitch frame and webcam overlay? Here it is, complete with an LGBTQ avatar and graphics for you to customise any way you want. Twitch Frame Design for a Stream Starting Soon Announcement   Twitch borders come in many designs. Here is a Twitch frame design that's all about accentuating your stream starting soon announcement. Twitch Camera Border   Simple and bold, this is a terrific Twitch camera border to give your viewers a full view of the action on the screen. Webcam Border for Twitch With Dripping Paint Effect Panels   The perfect webcam border for those who aren't afraid to express themselves with bold colours. Of course, you can use this very same template with toned-down colours if you so desire. Stream Border Template for Twitch Starting Livestreams   Check out this cool and modern stream border template. A great choice for those who like both simplicity and style. Twitch Webcam Overlay Template for OBS   This Twitch Webcam Overlay Template for OBS integrates web with just about any background. Give your stream a stylish modern look when you choose this Twitch border. Twitch Webcam Border Design Featuring a Colorful Webcam Frame   Check out this fancy Twitch webcam border design. This is not a template for shrinking violets. It's for the bold and daring who are confident in their game and want a template that reflects that. Webcam Border for Twitch With Pastel Colors and Sticker Icons   From bold and daring to soft and sweet, this webcam border for Twitch is the right choice for you if you're all about love and want to show it. Ended Stream Border for Twitch with Dynamic Graphics   Go out in style when you use this stream border for Twitch to announce the ending of your stream. The template is easy to customise, so you can change the border style, colours, and text to suit your own taste. Cool Webcam Borders Featuring a Live Cam Window Section   Here's a great street-image-themed backdrop to accentuate your cool webcam border. The template combines a gorgeous flowing frame with a simple webcam frame to create a look that will stand out. Twitch Facecam Borders for OBS   Just to make the point about how easy it is to create different-looking templates from the same theme, here is a template that uses similar elements to the one above, but creates a completely different look. OBS Camera Border for Gamers With Simple Tech Frame   A great OBS camera border for gamers, this template is specifically designed to encourage donations. Just add your own image for the background, select a frame that reflects your style, add your text and brand colours, and your Twitch border is ready for download. Stream Webcam Border With a Nightclub Setting Background   How about this stream webcam border with a nightclub background? Use the Twitch border maker to customise this awesome Twitch border to your taste and style, or just change the text and leave everything else as is. Webcam Border for OBS Gaming Livestreams   Check out this macabre webcam border for OBS. As always, the template is super easy to customise. Just follow the instructions above How to Make a Twitch Frame With the Twitch Border Maker section, and you'll be downloading your template in no time. Twitch Camera Border for Shooting Games   If you're looking for a war games theme to complement your stream, then this Twitch camera border for shooting games is a good match for you. You can customise this template as little or as much as you want. Bloody Twitch Webcam Border Template   Not your average Twitch webcam border template, this template is all about accentuating horror and fear. So if that's a theme you dabble in, this is the frame for you. Camera Border OBS Stream Template   This dynamic camera border OBS stream template has everything you need to create a standout frame. Just select your background, choose your style of frame, add your text, and you're done. Facecam Borders for OBS With Modern Neon Frame   Looking for a terrific facecam border for OBS? Look no further—this Twitch border is exactly what you've been looking for. Simple but eye-catching, the template offers loads of frames, each more awesome than the next. Cool Webcam Borders for Horror Gamers Featuring Spooky Graphics   This is a cool webcam border that can be adapted in a multitude of ways to suit your needs. Don't hesitate to experiment with the template to find the design that's right for you. Stream Webcam Border Template with a Delicate Style   Need a webcam frame makeover? How about this cool stream webcam border template, which offers a great selection of stylish frames you can customise to reflect your own taste. Webcam Border for OBS With Simple Design   Use this gorgeous webcam border for OBS to thank your followers. They'll feel appreciated and throw the love right back at you. Futuristic Camera Borders OBS for a Twitch Account   This camera borders OBS can be adapted in a myriad of ways to create a look that is unique to your channel. Don't hesitate to experiment with the template to find the look that's right for you. Twitch Overlay Template for a New Livestream   Get everyone excited about your upcoming stream with this Twitch border template. Use the image provided, choose from any of the range of images provided, or upload your own. Then all you need to do is add your text, change the fonts and colours as needed, and your overlay is ready for download. Twitch Overlay Border Template With a High-Tech Style   This Twitch Overlay Border template provides a terrific background foil for the webcam overlay. Select colours that will call attention to your frame rather than distract from it, and then add as much or as little text as you care to. OBS Borders With Cool Dashed Lines   The awesome OBS Borders With Cool Dash Lines is designed to encourage donations. Just add your own image for the background, select a frame that reflects your style, add your text and favourite colours, and your Twitch border is ready to use. Twitch Facecam BorderThis Twitch facecam border has an otherworldly quality that will make your stream stand out. The Twitch border maker offers a number of options to customise the template and make it your own. OBS Streaming Border With Pointed Shapes   It may just be an illusion, but this OBS Streaming Border With Pointed Shapes screams danger. If that's just what you're looking for, add your details, change the colour scheme, and you're done. Webcam Border for Stream Featuring Semi-Transparent Panels   If you love abstract patterns and vibrant colours, this webcam border for streaming is a great choice. It provides space for social media icons and any other text you wish to add. Border for Twitch Gaming Fans   How amazing is this border for Twitch gamers? It's a great choice for those we really like to stand out from the crowd. And what's truly great is that there are a nice selection of cool frames to choose from, so if this one doesn't quite tick all your boxes, check out the others which come with this template. Twitch OBS Border With a Wavy Surface Design   If you want to live stream yourself while gaming, why not create a great Twitch OBS border so your viewers can feel as if they're right there with you? Use the Twitch border maker to customise the template as little or as much as you care to. Webcam Border PNG for a Gaming Channel With Tech-Circuit Graphics   A great techno-themed webcam border PNG, this awesome template is easy to customise. Twitch Camera Border for Streamers   Here's another great street image you can use as the backdrop for your Twitch camera border. It features a simple frame within a frame, with plenty of space for your details and social media platforms. Simple Twitch Border Maker for a Starting Soon Live Stream   Getting ready to stream? Let your fans know that you're getting ready to enter the stream with the Simple Twitch Border Maker for a Starting Soon Live Stream. Webcam Border for Streamers   This surrealist webcam border for streamers is an excellent choice for those looking for something a bit different. Have fun with the customisation to make it even more surreal and uniquely yours. Cool Webcam Borders for Live Accounts   With its gorgeous futuristic background and bold contrasting border, this cool webcam border is a great choice when letting your fans know you're streaming live. Twitch Border Maker for a Stream Ended Screen With Neon Lines   When your stream has come to an end, you can let your fans know with this Twitch border template. Customise it any which way you want to reflect your own style. OBS Camera Border for Gaming Streamers   Bring your viewers into the moment with this OBS camera border template. Use the Twitch border maker to upload a placeholder image to get a good idea of how your template will look, and then continue to customise your template around the image to reflect your gaming identity. Webcam Border PNG With Retro Frame   Need a clean and simple webcam border PNG for your Twitch account? How about this one. If you like the layout but the Twitch border doesn't quite do it for you, there are plenty of other options to choose from. Twitch Webcam Border Featuring a Trippy Natural Landscape Background   How awesome is this Twitch webcam border template? Make your background as busy or as simple as you like, and then select a frame that suits your taste, add your colour scheme and text, and you're done. Easy peasy. Cool Twitch Stream Border   All good things must come to an end, even great articles about cool Twitch stream borders. So we're ending with this terrific border that's great for saying "au revoir" to your fans. Make Your Own Twitch Borders TodayThat's it for our list of the best Twitch borders available at Placeit. Now that you know how to make a webcam border, why not use the Placeit Twitch border maker to create your own unique stream webcam borders? And if you're interested in more information on creating resources for Twitch, check out these articles below:
 |
| 25 Best WordPress Coworking Themes for 2021 Posted: 09 Jun 2021 07:30 AM PDT A coworking WordPress theme is the best way to get your website up and running quickly so you can start advertising your coworking spaces. If you want to create one of the best coworking websites in order to attract new coworking customers, then the best WordPress coworking themes are to be found on Envato Market. I've highlighted some of them in this article to get you up and running effortlessly. Find Amazing WordPress Coworking Themes on Envato MarketIf you're looking for the best WordPress coworking themes then Envato Market should be your first stop. This premium marketplace offers thousands of WordPress themes for various types of websites, coworking space rental websites included. Purchase individual themes, customize them to your needs, and use them on your website. The themes found on Envato Market have attractive and modern designs and have been optimized for the best user experience, including fast loading times and SEO. Best Premium WordPress Coworking Themes For 2021Take a look at some of the best WordPress coworking themes from Envato Market to download for use in 2021 and beyond. 1. Worksquare—Coworking and Office Space WordPress Theme   The Worskquare WordPress coworking theme is a responsive choice that has all the necessary features to showcase your coworking or office space. It includes nine modern demos and an easy to use booking calendar. The coworking theme is also easy to customize and is translation-ready. 2. Coworkshop—Coworking Space WordPress Theme   This modern theme starts off our list strong. It has a sharp and clean design that's perfect for showcasing your coworking space and listing out its benefits and different membership or rental options. This theme is responsive and highly customizable. It also comes with 6 premade homepage options and a number of premade inner pages. 3. WotaHub—Coworking Space WordPress Theme   If you're looking for a stylish and modern WordPress coworking theme, the WotaHub will fit the bill perfectly. This theme has a stunning header area which you can use to showcase your space and you can easily include a video that gives them a tour of the space as well as video testimonials. The theme is fully responsive and comes with a number of customization options. 4. Coworking Co.—Creative Space WordPress Coworking Theme   The Coworking Co is a bright and bold coworking WordPress theme. You can use it as a one-page theme or a multi page theme. On top of making it easy for interested individuals to book a tour, you can also sell digital and physical products thanks to the integration with WooCommerce. The theme also integrates with Tickera, has a plethora of customization options, and is optimized for SEO. 5. Around—Multipurpose Business WordPress Theme   Around is a multipurpose Business WordPress theme that offers website styles for creative businesses such as coworking spaces. Around helps you build fully-featured modern website that integrates with industry standard plugins such as WooCommerce, Events Calendar, and Elementor Pro. If you want to build one of the best coworking websites, have a look at the Around theme. 6. Crework—Coworking and Creative Space WordPress Theme   The Crework theme has a clean and simple design but is packed with powerful features. You can show all the benefits and amenities that are included in your coworking space. The WordPress coworking theme has stylish pricing tables to display pricing options and you can easily customize fonts, colors, and more. It's also optimized for SEO and comes with Google Maps integration. 7. Hub2B—Coworking Space and Digital Agency WordPress Theme   The Hub2B theme has a fresh and modern design along with all the necessary pages to create a powerful website that shows off all the benefits of your coworking space. You can also share a video tour as well as share testimonials from past customers. The theme is fully responsive, integrates with Gutenberg and WooCommerce, and includes an easy to page builder so you can customize your pages. 8. CoWork—Open Office and Creative WordPress Theme   The CoWork theme has an elegant and modern design. The theme includes not only all the features necessary to showcase the benefits of your coworking space but it also comes with pricing tables, booking pages, gallery, and an FAQ page. The theme also has a powerful theme options panel that will allow you to customize every aspect of your website. 9. Codesk—Creative Office Space WordPress Theme   The Codesk theme has a creative design. It's optimized for mobile devices and comes with more than 3 elegant homepage layouts that you can import with a single click to speed up your website setup process. The theme is also easy to customize and it integrates with the Elementor page builder. 10. Spase—Business and Coworking WordPress Theme   Spase is a minimal and clean coworking theme for WordPress. It offers a number of premade demos that you can install with a single click to speed up your website setup process. You can customize colors and fonts, upload your own logo, and adjust a number of other visual tweaks to make this theme your own. The theme is also responsive and optimized for SEO. Making the best coworking websites is a breeze with Spase. 11. Workspace—Creative Office Space WordPress Theme   The Workspace theme comes with 6 premade homepage layouts and a powerful page builder that lets you easily customize those pages. The theme also has an extensive theme options panel so you can easily customize colors, fonts, and more. Workspace has useful features to showcase all the benefits of your coworking space, including pricing tables, accordions, video tour, testimonials, and more. 12. LeadEngine—Multi-Purpose WordPress Theme   The LeadEngine is a multipurpose, modern WordPress theme that can be used to create any type of website, including one to promote and showcase a coworking space. This theme comes with a powerful page builder plugin with more than 200 blocks such as testimonials, pricing tables, accordions, and more. You can easily use those blocks to share all the benefits of your coworking space. The theme is also responsive. 13. MultiOffice—Coworking Space Theme   MultiOffice is a WordPress theme designed to make coworking better. It features every element, layout and option that a new coworking website may require. One-click demo importing, with drag-and-drop design means that you'll be up and running effortlessly to create and customize the coworking space WordPress theme. 14. Qhab—Сoworking and Office Space WordPress Theme   The Qhab theme has a modern and edgy design. It's packed with features that will help you showcase all the benefits of your coworking space as well as different pricing options that are available. You can share a video tour as well as video testimonials from past clients. The theme is also responsive and integrates with AccessPress and Booked plugins. 15. Start Flow—Startup and Creative Multipurpose WordPress Theme   Start Flow is another clean and modern WordPress theme that you can use to create a coworking space website. You can easily add a call to action in the header to prompt visitors to book a tour as well as share testimonials and pricing options. The theme is easy to customize and fully responsive. It was also optimized for SEO and integrates with WooCommerce. 16. Startit—Fresh Startup Business Theme   The Startit theme is a fresh and modern business theme perfect for startups and coworking space. It has cool features such as pricing tables, video tour, galleries, testimonials, FAQ pages, and more. With some customization, you can make the best coworking websites with Startit. You can use both WPBakery Page Builder and Elementor to customize the page layouts. The theme also has an extensive theme options panel to customize colors, fonts, and more. 17. WorkSpace—Creative CoWorking Office WordPress Theme   WorkSpace WordPress theme is a responsive theme with a modern and functional design. You can easily create a powerful website for showcasing your coworking benefits and services. The theme has an intuitive visual interface and a powerful theme options panel. It's also compatible with WPBakery Page Builder plugin and optimized to load fast. 18. Nomad—Business and Coworking Space Theme   The Nomad theme has a modern design for making the best coworking websites. It includes a number of premade demos to choose from. You can easily install the demos with a single click and the theme is also easy to customize. It comes with a number of premade pages and features to create a powerful website for showcasing your coworking space. 19. Click—Multi-Purpose WordPress Theme   The Click is a wonderful multipurpose theme for WordPress with tons of powerful features. For starters, it comes with a powerful theme options panel that lets you customize every aspect of your website. Secondly, it has a number of premade demos that can be imported with a single click. And finally, the theme comes with Visual Composer page builder so you can easily add testimonials, pricing tables, and more to showcase all the benefits of your coworking space. 20. Scape—Multipurpose WordPress Theme   The Scape theme is a multipurpose theme with tons of premade layouts and customization options. It also integrates with some of the most popular WordPress plugins and was optimized to load fast. Edit layouts with the page builder to make the best coworking websites for clients. Best Free WordPress Coworking ThemesIf you're not ready to buy a premium theme, a free coworking theme is a good starting point. This will allow you to get your website up and running and experiment with it until you're ready to invest in a premium design. Keep in mind, though, that a free theme comes with limited customization options and features as well as support. That said, be sure to check the Free WordPress themes on ThemeForest, which are changed every single month. Get notified of new free WordPress themes by signing up for the Envato Market newsletter.    Let's take a look at some free WordPress coworking themes from around the web. 1. Unos Business—Free WordPress Theme   The Unos Business theme has a bold and bright design. You can use it to showcase your coworking space and the theme allows you to customize fonts, colors, and your backgrounds. Unos Business is a nice choice if you want a coworking co creative space WordPress theme free download. 2. Online Business—Free WordPress Coworking Theme   The Online Business is a good starting point if you want a simple and clean theme. You can customize colors and upload your own logo and create galleries to showcase your office space. 3. Modular Lite—Free Business WordPress Theme   The Modular Lite theme has a clean design and can be used for interior business websites. You can use the header area to invite people to book a tour and there are three feature boxes that you can use to display different pricing options or benefits of your coworking space. 4. Business Times—Free WordPress Theme   The Business Times has a modern design with the ability to add galleries and sliders to showcase the benefits of your coworking space. The theme is responsive and you can customize fonts and colors. 5. Business Hour—Free WordPress Theme   The Business Hour is a free theme with a simple design. You can display photos of your coworking space and include the benefits as well as pricing options. This coworking co creative space WordPress theme free download is also fully responsive. Five Quick Tips For Coworking WordPress WebsitesNow that you've seen different coworking themes that are available for WordPress, here are five quick tips that will help you design the best coworking websites. 1. Put a Call to Action Above the FoldYour call to action is what will prompt visitors to take action and check out the coworking spaces you have available. Make it easy to find by placing it above the fold, before they have to scroll down to see the rest of your website.    2. Be Generous With ImagesShowcase your coworking space in all its glory. Include plenty of images so potential customers can easily see what they can expect. 3. Include TestimonialsTestimonials are a great way to build trust and encourage visitors to inquire about a coworking space. Written testimonials are great but if you can consider including a video testimonial or two for extra impact.    4. Focus on Promoting a CommunityCoworking is about community and unity. Therefore, you marketing messages should focus on promoting community and the benefits of working together with like-minded individuals. 5. Optimize for MobileFinally, make sure your website looks good on mobile devices as well as on desktop devices. Considering more than half of all internet traffic comes from mobile devices, you need to make it easy for people to view the available spaces and book a tour using smaller screens and keyboards.    Learn More About WordPress From Envato Tuts+Envato Tuts+ is a great platform for picking up new skills. Our team of instructors has made tutorials, guides, and courses across many topics including WordPress and web design. If you want to dive further into these topics start with the articles below:
If you're a visual learner, check out our YouTube channel! It's filled with helpful video tutorials and guides for WordPress and web design. Check out our playlists and explore our channel. You can also watch this video to get going: Effortlessly Create and Launch the Best Coworking WordPress Themed WebsiteWith the help of WordPress and coworking WordPress themes, you can launch your website quickly. Stop by ThemeForest and browse through our collection of the best WordPress coworking themes to find the best theme for your site. -- Editorial Note: This post has been updated with contributions from Johnny Winter. Johnny is a staff writer with Envato Tuts+.  |
| How to Answer the “What Do You Do for a Living?” Question Posted: 09 Jun 2021 06:55 AM PDT Let's say you're attending an event for work. You know some of the attendees, but not all of them. Some people are handing out business cards; others are talking to their colleagues.    After getting a drink, you head over to your friend. Then someone joins you, and after a brief introduction asks, "What do you do for a living?" We hear this question a lot, we ask this question a lot. But few of us think hard about what our answer means to others. The Typical Responses to the Question: "What Do You Do for a Living?"Some people automatically answer this question with their job title. Those who respond with a general job title sometimes do it to avoid confusing people, like Anna Daugherty, a Digital Marketing Manager at PITSS America LLC.
It's short and to the point, but it doesn't fully describe what she does or the kind of technology company she works for. Compare this with saying, "We're experts in application modernization and digital transformation for legacy Oracle systems," which Daugherty agrees is a mouthful and often leads to blank, confused stares in conversations. Others try to be funny or avoid the question entirely. The truth is, it's hard to blame people who try to avoid the question with humor. Who knows, they might have tried answering directly before but got tired of explaining the complexities of their job, or the stereotypes they had to deal with. The True QuestionIf you think about it, the question "What do you do for work?" can be interpreted in different ways:
That's why in some cases, asking someone what they do for a living can come across as offensive. Situations Where this Question is Offensive1. A Condescending ToneAsking this question with a derisive or arrogant tone sends the wrong message. It's as if you're assuming the other person is unemployed or earning less than you are. 2. At a Hospital or Religious ServicePlaces where people might be grieving or facing a challenging time in their life aren't good venues for such a question. Why? These people are stressed and burdened with problems, which makes them prone to seeing the question in a negative light. The question might be interpreted as, "Maybe you're not working hard enough or maybe you're not earning enough, otherwise this wouldn't have happened to you." 3. Cultures That Value PrivacyAsking "What do you do for a living" is offensive in some European countries, because it's seen as an invasion of their privacy. As some Quora answers suggest in this thread, work matters aren't openly discussed with strangers in European countries, and it's not a culturally accepted conversation starter like in the U.S. They would rather you ask about their preference in vacation spots and sports team, at least according to the thread. The Importance of Answering WellBehind the double meanings, this question gives you a chance to shape how people perceive you. Answer correctly, people will get curious about what you do. If you're lucky, you might amaze some people and make others jealous. You get instant credibility and new-found friends in whatever event you're in. If your answer is boring, you'll just get a polite nod and the conversation eventually dies down. Then you'll be standing on your own, wondering what to do or who to approach next. Wouldn't it be amazing to answer confidently and get a positive response every time? Answering Strategies Based on Social ContextSince this question can be interpreted in different ways, you don't have to limit your answer to your day job. The best answer depends on where and why the question is asked. Casual or Social GatheringsIn this situation, the question "What do you do for a living" is a conversation starter. Yes, it's boring. But it's safe to ask and people are already expecting to hear it. You might feel uncomfortable answering this question, especially if there are negative stereotypes surrounding your job or if few people understand it. Here Is a Conversation I Overheard at a PartyFriend: "I'm a social media manager" Stranger: "Oh so you spend the whole day playing on Facebook?" For some jobs, you're lucky to get a weird or funny response like this. Others just get a blank stare because people don't know how to react to their jobs. Worse yet, some job titles make people desperate to leave your company. Just imagine how some people would react after hearing, "I'm a financial adviser." If you're financially savvy, you probably won't get scared off. Others are quick to end the conversation, because they feel like the other person will start convincing them to get an investment account or life insurance. Remember, you're in a casual event. No one is doing any job interviews or looking for anything to buy. Even if such events offer an opportunity to meet potential clients and employers, that's not the point of the event. Next time someone asks you this, try to gauge their reason for asking. Then tell them what you're passionate about, and then ask about their interests. Your Conversation Might Go Like ThisStranger: "What do you do?" You: "I'm passionate about cooking and scuba diving. What do you love to do?" Your acquaintance will either:
Eventually, you will start talking about the things you love. Isn't this better than talking about your job in a party where people are trying to forget about their office problems? Business EventsThis includes trade shows, job fairs, seminars, training events, conferences, boot camps, and any other event where you meet people for work or business. For freelancers and those working at startups, this can also include network mixers and startup pitch competitions. In general, you'll meet two types of people in these events:
Of course, decision-makers don't attend these events just to scout people. They're also there to learn and make new connections as well. So they have lots to do and little time to do it in. Because of this, they try to avoid information overload. Decision-makers only talk to people that interest them, and they're quick to decide who is worth their time. Below are two ways you can be worthy of their attention. 1. Focus on a NicheFocus on a niche to avoid getting labeled as a commodity. Here a good example: Designer: "I'm a designer specializing in wall mural designs for restaurants and retail stores." That sounds more interesting than simply saying you're a designer. If you say this, people will wonder if they've seen your work before. Here's another niche example: Health Insurance: "I help Baby Boomers navigate their entry into Medicare." This is better than saying, "Our agency sells Medicare supplements," says Danielle Kunkle of Boomer Benefits. It identifies their target audience and niche, Medicare and Baby Boomers. Kunkle continues, "People stereotype insurance agents as a sort of used-car salesman, and we differentiate ourselves from this by being educators first and salespeople second." Notice the words "insurance" and "sell," typical words on elevator pitches of insurance professionals, are not in Kunkle's answer. 2. Mention a Problem You SolveTalk about the challenges or problems you solve as part of your job. It's even better if you can paint this problem as a dilemma, an issue with no clear solution. Example for a Fitness Trainer: "I'm a Fitness trainer specializing in creating easy and fun exercise programs for clients who don't enjoy going to the gym." The first question you'll probably get with this introduction is, "How do you do that?" Others might think you create home exercise videos then upload them on YouTube, but either way this response gives you an opportunity to continue the conversation. You might think these two strategies only apply if you have an interesting profession. That's why I used commonplace jobs as an example. Whatever you do, you can make it sound interesting by highlighting your specialty or the problems you solve. Networking Events"What do you do?" is a common question in networking events. Whatever job title or description you use to answer this question barely tells the whole story of what you do. Yet the mere mention of a job title subconsciously triggers people to judge you, based on what they know of your work. A Couple Clear Examples of ThisJob 1: Programmer in Silicon Valley Stereotype: Cushy 6-figure salary, stares at the computer all day, probably an over-inflated ego Job 2: Career Coach Stereotype: "People are either suspicious, or they immediately tell me everything they hate about their careers. Coaching gets a bad rap because it's easier to tell others what to do, than to make changes yourself", says Career Coach Carlota Zimmerman. To avoid stereotypes, think of your answer as the first step in teaching the other person about you and your job. Share something little known about your profession instead of answering with your job title alone. Examples of Information to Share
3 More Strategies to Better Answer "What Do You Do For a Living?"1. Share a StoryTell a story about one of your more exciting days at work. When possible, include context to help the listener understand the more technical aspects of your job. Not sure how to tell your business's story? This tutorial can help you: 2. Show Your Weak SideBeing vulnerable shows humility, which can dispel negative stereotypes attached to some high-paying jobs. Talk about the struggles you faced in your journey, and some of the sacrifices you made along the way. Sharing your mistakes and challenges humanizes you, and makes people more likely to open up to you as well. 3. Show Others What Your Job Means for themShow others how your job is relevant to their daily life. Don't worry; it's easier than it sounds even if your job is technical or complicated. Your Job: Penetration Specialist. Sounds boring, right? Not if you describe it in this way: Stranger: What do you do? You: I fight bad guys looking to steal your money and private information. Stranger: Are you a police officer? You: No, I try to break into websites (with permission) so I can find loopholes in their online security. Then I help them write code to strengthen their website's defenses so hackers can't get in to steal your data. It sounds more fascinating compared to describing yourself as a hacker or programmer. Job: Money Lender for Real Estate Investors "I'm a hard money lender specializing in working with real estate investors doing flips, holds, and new construction." "When I tell people this, their eyes glaze, I get a confused nod, and we move on with life", says Aaron Norris of The Norris Group. Now he responds in a way that makes his work familiar to people with no real estate background. "Have you ever seen shows like 'Flip this House' on HGTV? We provide loans for their projects." Norris admits this response doesn't fully explain his work. But hearing the TV show's name helps people connect the dots between what's on the TV show and his line of work. Some Situations Call for Self-Promotion"What do you do for a living?" How you answer this question shapes people's first impression of you. In casual settings, it's okay to answer this with no intent to promote yourself or your business. But what about the other times, when you meet a decision-maker that could potentially hire you or do business with your company? You shouldn't think twice about promoting yourself. You're doing yourself and others a favor by talking about what you're good at. If your skills can solve the problem of whoever you're talking to, then it's not self-promotion. Instead, it's a two-way street where you help each other out. That's why you should always have an elevator pitch and personal brand statement ready. Read these Envato Tuts+ guides to learn how to create a personal brand that goes beyond your job title:
How do you handle the question "What do you do for a living," and how do you adapt it to different social situations? Let us know your best tips in the forum. Browse through our professional resume templates on Envato Elements or GraphicRiver to find a great resume design. Editorial Note: This content was originally published in 2017. We're sharing it again because our editors have determined that this information is still accurate and relevant.  |
| 20 Best Free Microsoft Word Envelope Templates to Download for 2021 Posted: 09 Jun 2021 05:55 AM PDT If you're sending snail mail and want your mail delivery to stand out from the rest, a Microsoft Word envelope template could help you achieve that.    There are lots of scenarios where you'd want to send a special kind of envelope. Here are just a few:
In both cases, you want to make sure not just that it looks good, but that all the text elements are in the right place. An envelope template for Word will help you create the perfect professional or festive envelope without the hard work of designing it yourself. In this guide, I'll share some premium and free envelope templates for Microsoft Word to help you create the look you want. Besides the envelope templates for Word on Envato Elements, I'll share some of the window envelope templates for Word available on GraphicRiver. Best Envelope Templates for Word on Envato Elements and GraphicRiverIf you're wondering how to make an envelope, a template in Microsoft Word could be a great choice. Envato Elements has a great offer you won't want to miss. Download as many Microsoft Word envelope templates as you want, all for one low price.    Here are some of the reasons it makes sense to use standard and window envelope templates for Word. Premium templates give you peace of mind because you don't have to worry about fiddly design and layout details. That also saves you time. Plus, you can be sure that your envelope is going to look good and make a great first impression on the recipient. To find the perfect envelope template for Word to download, visit Envato Elements and click on Graphic Templates. Type    You can also find more envelope templates for Word to download on GraphicRiver. 5 Premium Microsoft Word Envelope TemplatesTo help you get started, here are some of the best envelope templates for Word available on Envato Elements and GraphicRiver: 1. Letterhead and Envelope Templates   This colorful Microsoft Word envelope template set features a design with abstract, geometric shapes. It'll help your letter stand out when the mail arrives. It includes a matching letterhead template, and both are sized for A4 paper. 2. Stationery   This easy to edit stationery pack includes envelope templates for Word to download and customize. The design is attractive and there are three color schemes so you can choose the one that works best for your business. 3. Letterhead Templates   No need to wonder how to make an envelope template in Microsoft Word. Use this template set instead. It's got a snazzy design in three colors and is easy to customize. You'll be able to make recognizable and appealing mail outs in no time at all. 4. Minimal Identity   This minimalist design is available in A4 and US Letter sizes, and includes not just envelopes, but letterhead, invoice, business card and presentation folder templates. It's easy to change the colors to match your brand, giving you a complete corporate identity package. 5. Corporate Identity   The Microsoft Word envelope templates in this template set feature a range of highlight colors. So, you can choose the one that best represents your company. You can also create a holistic brand image by using the included letterhead, business card, invoice, certificate and presentation folder templates. 20 Top Free MS Word Envelope Templates to Download (2021)If you want standard and window envelope templates for Word, going premium is a good option. As well as saving you time, you'll get professional design without having to do it yourself.    That's why it makes sense to check out the premium freebies available from Envato Elements. You won't just get free envelope templates for Microsoft Word; there are all kinds of premium templates on offer. Here's how it works:
But if budget is a major concern, we've got you covered with these Microsoft Word envelope templates that are free to download: 1. Financial Business Envelope   There are several free envelope templates for Microsoft Word on the Microsoft Office website. This one has space for a logo and makes it easy to change colors. 2. Envelope (Red Design)Here's a Microsoft Word envelope template, a free download from Microsoft Office. This accessible template is for the standard No. 10 envelope size. 3. Business Letterhead and Matching EnvelopeNo need to think about how to make envelope templates in Microsoft Word. This freebie from Microsoft office helps you create the envelope and the letterhead. 4. Writer Stationery DesignThis letterhead set has a matching Microsoft Word envelope template, free to download from Free Printable Stationery. It's writer themed and includes a laptop design. 5. AlanaHere's a beautifully designed corporate identity set from Behance. It includes a stunning envelope design. 6. Wedding Invitation Envelope   For a more festive occasion, this free Microsoft Word envelope template from Microsoft Office will help you capture the celebratory mood. 7. Envelope TemplateWondering how to make envelope template in Microsoft Word? It couldn't be simpler with this foldable example from All Free Printable. 8. Clean Corporate StationeryThis is a minimalist, beautiful design which incorporates a letterhead and business card, as well as the envelope. 9. Envelope Address TemplatesIf you want to make a great first impression, there are 36 free envelope templates for Microsoft Word in this set from Template Lab. 10. Free Envelope TemplatesThis is another set from Template Lab. It includes more than 40 Microsoft Word envelope templates, that are free to download. 11. New Year Gift EnvelopeThis Chinese New Year lucky red envelope is beautifully designed. It includes a Year of the Ox theme. 12. Box Envelope TemplateThis is another DIY free Microsoft Word envelope template from All Free Printable. 13. Envelope - Blue RoseDeviant Art is a great place for inspiring design. This beautifully drawn envelope template for Word will get the right kind of attention for your business. 14. Envelope - Seven FishThis ornate envelope design is available on Deviant Art and is sure to make an impression on the recipient. 15. FlowersFree Printable Stationery offers this floral letterhead design with a matching envelope template Word download, available for free. 16. Eid Mubarak Envelope   This themed Microsoft Word envelope template set is colorful and appealing, with images suitable for Eid observances. 17. Medical StationeryThis letterhead and free Microsoft Word envelope template includes a caduceus, symbolic of the medical profession. 18. TechnologyIt's not a window envelope template for Word, but the legal size technology-themed envelope template complements the matching letterhead perfectly. 19. Valentine Envelope LetterheadFor more romantic letters, consider this free envelope template for Word with a clouds and hearts design. 20. Two Hearts Envelope LetterheadRed and blue hearts are part of the theme in this free template for Word from Free Letterhead Templates. 5 Quick Tips To Use Professional Envelopes in Word 2021If you're thinking about using envelope templates for Microsoft Word, here are a few tips to help you get more from the experience. 1. Choose the Right Size   Make sure that your envelope and letterhead match up. There are envelope templates for Word in A4, US Letter and other sizes, so check your template carefully. 2. Avoid Obscuring the Address WindowIf you're using a window envelope template in Word, make sure that when you insert your letter, the address shows up in the right place. You should also avoid covering the address window as it looks unprofessional. 3. Don't Forget the Zip Code   Zip codes are essential if you want your letter to reach the right place. Especially when using a Word window envelope template, ensure the zip code is visible to ensure speedy delivery. 4. Reduce the Number of ColorsWhen choosing your template, pay attention to the number of colors in the design. The more you have, the more ink you'll use or the more it will cost to print them. If you can, stick to a single highlight color for cost-effective mailings. 5. Make Your Branding Consistent   The best way to look professional is with consistent branding. So, if you're using a Microsoft Word envelope template, choose one that includes a matching letterhead to make the best impression. Discover More Top Microsoft Word Template DesignsWe've shared some attractive premium and free envelope templates for Microsoft Word. To choose even more Microsoft Word templates, see the guides below:
Learn More About Making Great Word Documents in 2021Now that you have your template and some tips for using it effectively, why not hone your Microsoft Word skills? You can use our comprehensive Microsoft Word guide, plus the articles below:
Create Your Next Microsoft Envelope With Envato ElementsAs you've seen, using a premium template can help you save time and effort, and make a great impression with professional design. Remember, you can find plenty of attractive Microsoft Word envelope templates on Envato Elements for one low price. There are also single-use envelope templates for Word on GraphicRiver. Get your Word envelope template and create the perfect envelope today!  |
| The Basics of Drawing Type & Creating Your Own Handwritten Font Posted: 09 Jun 2021 05:00 AM PDT   Ever wanted to give your digital layouts and designs a truly personal touch? In this typography drawing tutorial, we'll look at how you can create a font from your own handwriting, for use on your computer. The typography drawing tutorial will be split into three parts. Firstly, we'll look at the basics of drawing a typeface. Then, once we're warmed up, we'll see how you can optimize your handwriting to ensure high quality and versatility. And lastly, we'll analyze some different methods for getting your font onto the computer and converting your hand-drawn letters into a digital font.    Looking for ready-to-use handwritten script fonts? Scroll down after this tutorial. We have a selection of top handwritten fonts from Envato Elements. You can also try the free handwritten fonts from Envato Elements, or check out our recommended handwritten script fonts available to download: What You Will Learn In This Typography Drawing Tutorial
1. Practice Typography DrawingWhat you'll need for the first part of this typeface drawing tutorial:
You probably write scribbled notes or lists every day, but you're rarely conscious of your handwriting. When you suddenly become very aware of your own handwriting, it can start to look unnatural. You should first get into a more natural mode of writing. I find the best way to do this is to practice drawing a typeface. This is also really useful as it makes you more aware of the key characteristics of a typeface, and makes you more able to recognise common features (consistencies) between different characters within a typeface. This will prove useful when we start to refine our own handwritten characters, and optimise them for digitisation. Step 1Lay your ruler flat across the page, at a horizontal angle, as straight as you can make it. Take your sharpened pencil and, pressing down moderately hard, draw a line above the top edge of the ruler. If your ruler is a standardised 30 mm-wide ruler, you can keep the ruler in place, and draw a second line along the bottom edge of the ruler. This has the benefit of ensuring both lines are perfectly parallel. Otherwise, simply create two horizontal lines, 30 mm apart. The lower line represents the Baseline, and the top line is the Cap Height. Mark out the top 10 mm third of the total height between the lines and draw a third horizontal line with your ruler and pencil, pressing down more lightly to make a slightly fainter line. This line represents the x-height. Swot up on your typography terms, such as x-height and baseline, in my article on The A to Z of Typography.   Step 2You can repeat the sequence of lines, using the same measurements from Step 1, to create a page filled with lines. This is your own writing grid, on which you can practice drawing typefaces.   Step 3Open a software program where you can easily edit text, such as Adobe InDesign, or even Microsoft Word or Pages. Select a classic Serif typeface, such as Adobe Caslon Pro, which is shown here, or Garamond. To practice drawing a typeface it's best to pick a serif to draw at first, as sans serif typefaces have more subtle features, and can be more tricky to draw accurately if you're a beginner. Type the following characters: 'H n o y', with a space between each. These are good characters to pick, as they display a range of different features: two vertical stems and a crossbar on the 'H', an aperture and serifs on the 'n', a fully enclosed counter on the 'o', and a sweeping descender and diagonal arms on the lowercase 'y'.   If you're working in InDesign you can also switch on the baseline grid (View > Grids & Guides > Show Baseline Grid) to more easily see how the proportions of the characters line up with each other.   Blow up the characters at large scale on your screen, or zoom in. Now you can start to draw the characters. Alternate between using your ruler and drawing strokes by hand. Don't worry if your attempts look a little messy—the aim of this exercise is for you to become comfortable with drawing type, and to observe the characteristics of the typeface and the similarities (or differences) between each character.   You will notice that serif typefaces are based on the principles of symmetry and order. Extend the strokes from the edge of the characters and notice the angles and proportions. Stems are almost always the same width, whatever the character, but you might notice that the size of the serifs is slightly larger on the uppercase 'H'. Notice also that some parts of the characters are thinner; these sorts of stroke are called hairlines. Step 4Though we won't apply all of these characteristics to our handwritten font, it's really important to recognise that all typefaces are governed by a set of rules, whether formal, which is more common with serif and sans serifs type, or informal, which is more common with hand-drawn, painted or handwritten typefaces. Once you've practiced drawing a typeface, or several typefaces if you want, you should start to do a bit of research on handwritten typefaces, to help you think about how you want your handwritten font to be organised. Go to a font resource site like FontSquirrel or DaFont and take a look at the handwritten fonts available there. Pick a font that you think shares qualities with your own handwriting and download it. Choose a software programme that will allow you to view the full set of characters in the font. Adobe InDesign is a good choice, but you could also use Glyphs, which we'll take a closer look at later on. In InDesign, create a text frame and set the Font to your newly downloaded font. Here, I've chosen Wagnasty. Go to Window > Type & Tables > Glyphs to open the Glyphs panel. You'll be able to see the full set of characters available in the typeface.   Make a note of the types of characters that are present, and what's notably absent. For example, in Wagnasty we've got:
This is a basic set of characters that would allow you to write most things in the English language without too much of a problem. You should also note if the font has any additional weights, e.g. bold or italic. More often than not, a handwritten font will have only one regular weight, as the font needs to look authentic. Applying a different weight might look unnatural. Most handwritten fonts have a similarly basic set of characters. Like Callie Hand:   Or some might include a few more, like Journal, which includes some quirky hand-drawn symbols or images:   2. How to Write Your Own CharactersNow that you've practiced typeface drawing, and had a look at the range of handwritten typefaces out there and the characters available within each typeface set, you can start to think about putting your own personalised typeface together. For this section of the typography drawing tutorial you'll need the following:
Step 1Many people will have developed over time two or more variations of their handwriting. When I write down longer passages of text, my handwriting tends to join together, and slant slightly to the right, creating an italicised cursive type.   However, there are a number of problems with trying to convert cursive, or script, handwriting to a digital font. You would have to ensure that the kerning (space between characters) is set down very precisely, so that the characters always appear perfectly joined up. You would also have to ensure that every combination of characters would look perfectly joined up, which is very difficult without having to spend hours post-editing the script on your computer. So, unless you're looking for a headache, it's recommended that you look to digitise handwriting that is not cursive. Instead, it should have stand-alone characters that will not need to be refined to correspond precisely with any given neighbouring character. Luckily, I often use a different variation of my handwriting, usually for annotating documents or writing quick notes. It's all set in uppercase, and is not joined up. It too has a slight italic slant.   Pick out a short passage from a book, and copy out the text onto lined paper using your natural handwriting style. While doing your best to keep the writing natural, try to make sure the characters are not joined up or touching too much. It doesn't matter if you mix upper- and lowercase letters. But note, if you want to do that, you will have to eventually create a full set of uppercase characters and a full set of lowercase characters.   You can also practice writing out a few symbols, such as exclamation marks or brackets.   You can use this book passage as a useful reference for when you start to create your final handwriting sample. It doesn't always feel natural to write individual characters, in an A to Z order, so you can look over to the passage and see how you created a 'G' or an 'F', for example, when you were writing in a flowing, natural way. Step 2Return to your drawing paper. Take your pencil and ruler and, following Steps 1 and 2 of Part One of the tutorial (above), draw a sequence of three lines, representing the cap height, x-height and baseline. In Part One, we created a group of lines that measured 30 mm in total height. However, if you tried to write naturally at this scale, you would certainly struggle! Reduce the total height between the Cap Height and Baseline to 6 mm; mark out the top 2 mm third of that to show the x-height.   You might even find that this is still too large to allow you to write naturally without straining. Write a couple of characters onto the paper, to see what size you naturally write your characters. Reduce the total height to 4 or 5 mm if you're more comfortable writing at a smaller scale. Repeat the sequence of lines until you have filled the page.   Step 3Take your ink pen (the black ink will create good contrast for scanning later on) and rotate the paper just a little anti-clockwise. This is to avoid straining the arm too much as you write. At the same pace you would normally write, write the uppercase characters from A to Z in one go, along the same line if you have room.   If you make any mistakes, simply try again on the next line down. But don't worry about any minor errors or quirks in the writing. You want the writing to look organic and natural, and perfecting it too much will get rid of that. Referring back to the list of characters we noted in Part One of the tutorial, write down other characters in the same natural style, and at the same scale. If you want to, you can also write a set of lowercase letters, a to z, as well.   Step 4Allow the ink to dry completely, and then take an eraser and carefully rub out the pencil lines around the characters so that you are left with a lovely set of clean characters, ready to be scanned.   3. How to Scan and Digitize Your Handwritten Script FontIn this part, you'll learn how to make a handwritten font in Illustrator. For this final part of the tutorial you will need:
Note: We'll take you through the process of using Glyphs in this tutorial, but there are loads of great type editing programs out there. I personally find Glyphs to be very user-friendly, but many typographers will also put forward strong cases for FontLab and RoboFont. Step 1Setting the scanner to a high dpi (I scanned at 1600 dpi), scan in your handwriting sample. Save the file as a TIFF or JPEG. Then open Adobe Illustrator and create a New Document. Go to File > Place and select your scanned image. With the image selected, open the Image Trace panel (Window > Image Trace). With the Preview box checked, set the Mode to Black and White, and adjust the Threshold, Paths and Corners levels until you're happy with the accuracy of the trace. Click Trace.   Then, with the image still selected, go to Object > Image Trace > Expand. As a final step, Control-Click (Mac OS) or Right-Click (Windows) > Ungroup. Now you need to get rid of all the white sections on the image. Open the Layers panel (Window > Layers) and create a new layer. Drag it down to sit the new layer below the image layer. Select the Rectangle Tool (M) and drag to create a rectangle that extends across the whole artboard. Set the Fill to a contrasting bright color. Now you can see more easily where there is white on the image. Select the white area around the outside and delete. Select the smaller white areas inside the bowls and counters of characters, and delete.   You've successfully vectorized your handwriting—great work! Step 2Now open your font editing software. Here, I'm going to take you through the process of digitising your handwritten font using Glyphs. Go to File > New to create a new Glyphs font. On the left-hand side of the Glyphs window that opens you'll see a menu of options, listing groups of characters you can add to the font. Click Letter to view the full set of menu options. To insert uppercase letters, select Uppercase. A full set of uppercase characters, from A to Z, appears in the window. Double-click a character to edit it directly.   Hop back over to Illustrator and select the relevant vector character. Go to Edit > Copy.   Return to Glyphs, and go to Edit > Paste. Glyphs will place the vector in the window, ready for you to scale and adjust. The numeric values at the bottom of the screen are editable, allowing you to adjust the space to the left and right sides of the character, affecting the kerning.   To the left of the window you can see '-' and '+' symbols, which allow you to scale the character. You can also manually adjust the scale, using the Scale (S) tool accessible in the tools panel running along the top of the window.   You should use the guides on the screen as a guide, sitting the bottom of the character on the Baseline, and the top of the character (if it's uppercase) meeting the Cap Height line. Step 3You can flick back to view the full set of characters by clicking the Font tab towards the top of the window. Repeat the process above, double-clicking characters in Glyphs to open them, and flicking back and forth between Illustrator and Glyphs, copying and pasting characters across.     You can also start to add in other sorts of characters, using the left-hand menu in the Glyphs window. You will have to manually add Numbers and Punctuation marks, selecting them from the pop-out menus and selecting Generate.       Step 4Once you've added all the characters for your font, you can give it a name. Go to File > Font Info to open a new window.   Give the font a suitable name, and you can also add in additional details, such as your name, your website and your Copyright info. Once you're done, simply close the window.   Step 5Once you've edited the characters in your font, you can export it as a digital font. Go to File > Export.   Keep the default options as they are, to create an OpenType Font, then click Next. Save the font in a folder that's easily searchable.   You can exit Glyphs and navigate to your chosen folder, to view the font file.   You can then install this on your computer, as you would any standard .otf font.   Your Own Handwritten Script Font Is Ready!Your handwritten font is now complete, and it's ready to use as a digital font across your own documents. Use it to add a personal touch to notes or annotations, or incorporate it into design layouts to make your artwork truly unique!   Let's recap what lessons we've covered in this tutorial. We looked at:
Awesome work! Have fun creating more of your own fonts—why not experiment with different hand-drawn or painted styles? 5 Top Handwritten Script Fonts From Envato ElementsNow you know how to draw fonts and how to make a handwritten font in Illustrator. But if you want to save hours of work, you need handwritten logo fonts ready to use. Envato Elements is the best place to get handwritten script fonts. If you're a digital creator, you'll love our subscription-based marketplace. For a low monthly fee, enjoy unlimited handwritten script fonts. You can also get unlimited premium fonts, graphic templates, actions and presets, and more. Here are some of the best handwritten logo fonts from Envato Elements: 1. Bellmounts: Handwritten Script Font (OTF, TTF)   If you're looking for the newest and coolest handwritten script fonts, Bellmounts is the one for you. This cool handwritten signature font features OpenType ligatures, which makes it perfect for branding. Handwritten logo fonts like this feature multilingual support, so they will look great in any language. 2. Shifters: Handwritten Marker Font (OTF, TTF, WOFF)   Shifters is a cool and modern handwritten marker font. If you like the rustic, handwritten look for your designs and branding, check this out. This handwritten brush font comes with numerals, punctuation, accents, multilingual characters, ligatures, and alternates. It's one of our most complete handwritten logo fonts. 3. Rovey: Handwritten Serif Font (OTF, TTF)   Handwritten serif fonts are a popular trend thanks to their unique look. And Rovey is one of our top handwritten serif fonts. This handwritten serif font is perfect for creative designs, logos, and branding. And it comes with stylistic sets and a bonus handwritten script font! Combine both to create the best designs! 4. Maska: Thin Handwritten Font (OTF, TTF)   Are you a fan of thin handwritten fonts? Maska is one of our coolest thin handwritten signature fonts. Maska comes with OpenType features like stand ligatures. This thin handwritten font looks fantastic on invitations, stationery, branding, and as a handwritten logo font. 5. The Edensick: Thick Handwritten Font (OTF, TTF, WOFF)   Who doesn't like a good thick handwritten font? The Edensick is a nice handwritten marker font, perfect for stationery and branding. This is a complete thick handwritten font. It comes with many OpenType features, PUA-encoded characters, glyphs, and multilingual support. The alternative characters are divided into several OpenType features such as stylistic sets, stylistic alternates, contextual alternates, swashes, and ligatures. Try this cool handwritten marker font! Discover More Handwritten Script Fonts and ResourcesNow you know how to draw fonts and how to create your very own handwritten script font. I shared some of the best handwritten signature fonts from Envato Elements. If you want to discover even more cool resources, check these out:
Editorial Note: This post has been updated with contributions from Maria Villanueva. Maria is a staff writer with Envato Tuts+.  |
| How to Prepare for a Phone Interview Posted: 08 Jun 2021 06:55 AM PDT If you've been looking for a job recently, you probably already know that phone interviews are becoming increasingly common. What you may not know is how to properly prepare for a phone interview.    In most phone interviews you can't see your interviewer and they can't see you. (Although FaceTime and Skype interviews are growing in popularity.) But even without a visual connection to your interviewer, you can still come across as a professional. Preparing for a phone interview is a lot like preparing for a face-to-face interview, but there are some important differences. In this tutorial, we'll teach you how to prepare for a phone interview. We'll also go over phone interview etiquette and provide some other phone interview tips that you can use before, during and after your interview. Why Do Companies Use Phone Interviews?You may wonder why companies use phone interviews. There are several reasons why a business might use a phone interview instead of a face-to-face interview. Here are three possible reasons:
No matter what the reason for the phone interview is, it's important that you take it seriously. A phone interview could determine whether you get hired. Now, let's take a closer look at what you can do to increase your chances of getting hired. Before: How to Prepare for a Phone InterviewYou should prepare for a phone interview just as carefully as you would prepare for a face-to-face interview. For a more successful phone interview, here are some phone interview tips you can follow: 1. Have a Professional ResumeIf you're looking for work, a professional resume can help you to make a positive impression so that you're invited to phone interviews and other interviews. Making an eye-catching resume isn't too hard if you use the right tools. Learn how to personalize a resume template in this tutorial: At Envato Elements and GraphicRiver you'll find a wide variety of customizable resume templates. Take a look at this article to get an idea of what's available: 2. Research the CompanyIf you can help it, you should never go into an interview without knowing anything about the interviewing company. Phone interviews are no exception. Learn everything you can about the company before the interview. Here are some research steps to take:
The more you learn about the company, its industry, and culture--the more prepared you'll be. 3. Practice Answering Possible QuestionsWhile you can't be certain about which interview questions you'll be asked, there are some questions that are commonly asked. Have a friend ask you these questions and practice answering them to prepare for your phone interview. For a list of commonly asked interview questions (and answers) review these tutorials:
4. Make Sure You're AvailableIf a recruiter sets a time and date for your interview, make sure that you're available. If you'll be using a cell phone, make sure the battery is charged and the ring tone is turned on so you don't miss the call. If you've got another job, you may need schedule the phone interview during your day off or during a break. You'll need a quiet, comfortable place to answer the phone. Ideally, you would take the phone interview call from your home. But I've known people who successfully completed a phone interview from their parked car during a work break. (Don't ever attempt to do a phone interview while you're driving.) 5. Tell Others You're Expecting an InterviewIf you'll be doing the interview from your home, make sure that family members and roommates know that you're expecting an interview call. Ask them not to play loud music or otherwise make noise during the scheduled time. They should also refrain from interrupting you while you're on the phone. Also, you should answer the phone yourself. Don't ask a friend to answer for you. 6. Make Sure Your Phone Message Is ProfessionalWhile you're job hunting, your phone message should be professional. It should state who you are clearly and the number that the caller has reached. Delete any humorous or offensive references. During: Telephone Interview TipsNow that you've done some preparation, it's time for the phone interview. Here are some tips you can use during your telephone interview: 1. Answer the Phone ProfessionallyHow you answer your telephone is important since it may be the first impression the interviewer gets of you. Make a habit of always answering your phone professionally if you're looking for work. While some phone interviews are scheduled, sometimes recruiters may call unexpectedly. A recruiter may also call during an unscheduled time to set up an interview or to confirm or change an interview time. 2. Be PoliteTelephone etiquette is especially important during phone interviews. Here's a list of some common phone etiquette practices:
Good manners always leave a positive impression and can help set you apart from other job candidates. 3. Listen CarefullyWhen the interviewer speaks, listen carefully to what they say. Also, don't interrupt them even if you think you know what they're going to say. It's okay to pause to think about a question, but don't wait too long. If you're struggling to come up with an answer, admit it. Say something like: "I'd never thought about that before, but it's a good question." 4. Speak ClearlySpeak in whole sentences and enunciate clearly. Don't mumble. Also, don't use slang expressions. Your interviewer may be from a different part of the world and be unfamiliar with local slang. Remember that the interviewer can't see you. Unlike in a face-to-face interview, they won't know if you nod your head in agreement. They can't read any of your body language signals. 5. Keep Your Resume NearbyYour telephone interviewer may have some questions about your resume. Keep it where you can see it during the interview. Keep a list handy with other information you might need to refer to. But don't have so many papers that you've got to shuffle through them to find what you're looking for. 6. Ask Your Own QuestionsThe interview process goes two ways. It's also a chance for you to find out whether the job is a good fit for you. So, don't be afraid to ask your own interview questions. Use this tutorial as inspiration to come up with your own questions for the phone interviewer: After: What to Do When the Phone Interview Is OverWhen your telephone interview is over you're not done. There are still a few tasks you can perform to help you get hired. Here are two things to do: 1. Send a Thank-You NoteA thank-you note is a simple courtesy that sets you apart from other candidates. Although it's easy to do, many job seekers don't bother to send out a thank-you after an interview. You can send your thank-you note by email, or if you've got the interviewer's address, mail out a formal thank-you. This tutorial provides some guidance on how to write and send an email thank-you: 2. Don't Forget to Follow UpIt's also a good idea to follow up after an interview to see if a decision has been made. How long should you wait before following up? Pay close attention during the interview. Often, the interviewer will give you a timeline for their hiring decision. For example, they may say something like: "We're going to make a decision by the end of the week." If you've got a timeline for the hiring decision, give them a few extra days after the deadline has passed before you contact them. These decisions rarely run on schedule and things often come up to delay the decision. If you don't have a timeline for when they intend to fill the job, many experts recommend waiting about two weeks from the date of your interview before you follow up. ConclusionPreparing for a phone interview is easy if you know what to do. If you're ready for the phone interview and use good etiquette during the interview, you're more likely to get hired. Even after the telephone interview is over, there are still a few steps you can take to make your phone interview more successful. Good luck in your job hunt! Editorial Note: This content was originally published in 2018. We're sharing it again because our editors have determined that this information is still accurate and relevant.  |
| 15+ Best WordPress Themes for Non Profits Posted: 08 Jun 2021 06:43 AM PDT Even during difficult times over the past year, online giving grew by 12.1%. And what's more, 45% of worldwide donors enrolled on a monthly giving program, meaning many are ready to make more of a long-term impact. Getting your digital presence spot on is key for your non profit if you want to grow your follower base, spread the word, and secure those all-important donations. Non Profit WebsitesIf you're looking to set up or update your non-profit website, the 2020 Global Trends in Giving Report uncovered some important topics to bear in mind. The following stats all relate to giving trends in Canada & the US.
Non profit website examplesWhat makes a great WordPress for nonprofits? Take a look at three stand-out examples to see some of the features that can set you apart. 1. San Diego Zoo Wildlife Alliance  
2. International Rescue Committee  
3. Direct Relief  
Best WordPress themes for nonprofits1. Alone – Charity Multipurpose Non-profit WordPress Theme   This WordPress for nonprofits has been proving itself for years. Launching way back in 2016, it's now collected an average 4.78 out of 5 stars, with users praising the team for their excellent customer service. It also comes with 30+ refreshingly different demos including animal charities, political campaigners, and volunteering sites. 2. Halpes - Non Profit Charity HTML Template   Unlike Alone, Halpes hasn't been going for long, but good things come to those who wait! Launching in March this year, Halpes is a charity WordPress theme that helps to simplify the storytelling process by including stats as well as percentage tallies to show how much money has been donated so far. The homepage is also anything but cluttered, with well-placed calls to action directing users to relevant information. 3. Perits – Non Profit Charity HTML Template   Here's another simple yet effective charity WordPress theme. The demo opts for a full-width banner and clear call to action to greet the user on the homepage. It also uses smaller content blocks with illustrations to clearly signpost services. Multiple causes are also called out, with the amount of money raised so far included in a clear tally. 4. Chirota – Non Profit Charity HTML Template   This non profit WordPress theme includes a call to donate within the header alongside a dropdown box enabling visitors to easily pick the frequency of their donation. You can easily incorporate the logos of the brands or customers involved in the business, just to add weight to your charity. There's also a good 'meet the team' section too, which helps to humanize your offering. 5. Total - Responsive Multi-Purpose WordPress Theme   Going since 2013, this is one of the most popular nonprofit website examples out there! With more than 48,000 sales so far, the Total theme comes with more than 40 pre-made demos and at least 500 styling options. Pick an option like the Sustainable demo for instance, and see how this super versatile theme can be adapted to your needs. Plenty of imagery, icons, and clear calls to action help to make this charity WordPress theme a hit. 6. Sterling Charity Donation   With more than 8,000 downloads, this WordPress for nonprofits is another popular option. It boasts 20 pre-made demos and 78 inner pages so you have plenty of opportunity to find the design that works best for you. The Non-Profit Art Gallery theme, for example, is different in style to many of the other nonprofit website examples, with a more illustrative style. There's also a useful events calendar to show visitors what's coming up. 7. Charity Hub - Nonprofit / Fundraising WordPress   This charity WordPress theme is packed with features, including a 'causes searching system' to help visitors find what they're looking for quickly and easily. It also comes with unlimited colors so you can add your personality to the template. Like many of the best WordPress themes for nonprofits, it also is fully responsive so will look A* no matter which device it's viewed from. 8. Eco Nature – Environment & Ecology WordPress Theme   Choose from three demos, each designed in a clean and simple style. The Ecology Theme opts for a slider in the header, which means you can update users about various campaigns in a couple of seconds. Subtle movement used throughout the site also helps to set this non profit WordPress theme apart, with images and statistics moving as they appear in view. It's also Gutenberg-optimized for very simple editing—great if you're a beginner. 9. Green Earth – Environmental WordPress Theme   This WordPress for nonprofits deserves a place on the list for its footer design alone! You can add popular posts, recent posts, recent comments, plus a contact widget all to the footer—it helps your user to quickly scan for the latest activity, always giving them a reason to return. It also comes with 350+ fonts, a price table, and the ability to share posts on social. 10. Charity WordPress Theme | HelpingHands   Another Gutenberg-optimized non profit WordPress theme, this is a great option if you have loads of content and you want to display it in a coherent, engaging way. From the full-width slider with call to action, plus pop-ups encouraging users to donate, to a visual events page, to a large testimonials section, this WordPress for nonprofits has everything you could need to encourage those donations to come rolling in. 11. Charity Foundation   A video header in Home 3 really helps to tell the story of your non profit, quickly immersing your visitors in the issues at hand. You can also include a WooCommerce shop where you could sell merchandise to raise money for your cause. The 'helped people' content block is also interesting, as you can include specific information about the people helped by donations. Donors can also create their own fundraising account which details info about the causes each person has supported to date. 12. Born To Give – Charity Crowdfunding Responsive WordPress Theme   You know where you are with this well-organized non profit WordPress theme. Multiple content blocks of different shapes and sizes break up information in a digestible format, including the different causes people can support as well as a breakdown of how much has been donated so far, a stats box, an events calendar, a photo gallery, and a success stories section. Again another great charity WordPress theme if you have plenty of content to share with the world. 13. Charitix | Nonprofit Charity WordPress Theme   If you have plenty of fundraising events lined up, then this WordPress for nonprofits could work well for you. The calendar displays an image of each event, all the key details, and then you can click through to a secondary page with further information plus a countryside. This one has also received plenty of great reviews for customer support. 14. Gracious – Charity and Donation WordPress Theme   Released in May this year, Gracious is a very new addition to our pick of best WordPress themes for nonprofits. However, to see why, just take a look at the well-designed donations content block, which clearly shows people how and where to donate. The big and bold image gallery also really helps to tell the story of your non profit, and there's even a section to add more info about your volunteers. Best Free Non Profit WordPress Themes15. Green Eco Planet (Free WordPress Theme)   If you're after simple and straightforward, then this free non profit WordPress theme is one to consider. Like many of the premium WordPress themes, it comes with a full-width banner and call to action to encourage people to find out more about your offering. It's fully responsive and cross-browser compatible too. 16. Charity Zone (Free WordPress Theme)   This well-organized free WordPress for nonprofits greets visitors with three calls to action—the demo splits this according to donations, volunteering, and scholarships. Separate calls to action further up and down the page also clearly signpost how visitors can help. Premium vs. Free Charity WordPress Themes
Build Your Charity WordPress Theme Today!Which is your favorite charity WordPress theme? Or do you know of a theme you think deserves a place on the list? Let us know in the comments below. To see the full collection, head to ThemeForest and search for non profit WordPress themes. You can also take a look at charity WordPress themes.  |
| 25 Best Infographic Google Slides Templates To Make Presentations in 2021 Posted: 08 Jun 2021 06:35 AM PDT The verdict is in. Infographics are effective according to Infographic World. Besides conveying data with few words, infographics have high viral potential. They're one of the most shareable types of content on the internet. Use a Google Slides infographic template to make the best impression.    In the past, creating an infographic was complex. It involved hiring a great graphic designer, working with them for weeks, and using expensive software to bring your vision to life. Today, anybody can create a compelling and stunning infographic using completely free tools like Google Slides. It's made possible by editable infographic templates for Google Slides. It all begins with a well-designed infographic template for Google Slides, like what you'll find in Envato Elements. Once you complete your infographic, it becomes a compelling part of your infographic presentation. Elements offers you unlimited downloads of templates for one low price. Or, if you want a single infographic template for Google Slides, download one for one-time usage from GraphicRiver. The Best Infographic Google Slides Themes on Envato Elements (With Unlimited Use)Envato Element is a bargain! Aside from Google infographic templates, you get unlimited downloads of fonts, icons, and graphics. It's everything else you need to make your infographics unique and outstanding. Of course, you can also find free Google Slides infographic templates. But to create infographics that'll represent your brand far and wide, go with premium Google Slides infographic templates.    Premium templates offer better designs made by professional designers. They also tend to be more user-friendly and easier to customize free infographic templates for Google Docs. For example, the design elements in premium templates are vector-based. That means you can resize, recolor, and edit them without losing quality. Many premium infographic templates for Google Docs also include hundreds of icons. These come in handy when embellishing your infographics. Some even come with after-sales support from the designer. This means you're not alone as you customize the template with your own data. 5 Best Infographic Templates for Google Slides on Envato Elements for 2021If you're looking for a premium infographic template for Google Slides with unlimited use, here's a curated list from Envato Elements: 1. Infographic Google Slides   The clean and colorful design of these infographics makes them easy to adapt to any industry. With over 150 slides to choose from, you're bound to find the right one for your needs. This template also includes hundreds of vector shapes and icons that'll come in handy to customize the graphics. The use of vector shapes means you can edit any shape or icon straight in Google Slides, without needing separate image editing software. The slides in this package are in 16:9 (HD) size. 2. Pyramid Pack - Google Infographic Templates   A pyramid-style infographic is the best way to visualize your data. Look no farther than the Pyramid Infographic Pack. You get 35 unique pyramid infographic templates for Google Docs that are easy to customize. Because it uses only standard fonts, this pack doesn't require you to install any new fonts. Furthermore, these infographic presentation slides are retina ready. 3. Boom: Charts Infographics Analytics Google Slides   Boom Charts Infographics gives you 50 unique and editable infographic designs with four color variations, for a grand total of 200 slides. Over 300 icons are included as well. All are editable in Google Slides. Feel free to mix-and-match and combine graphics into one unique and eye-catching infographic. 4. Digital Utopia Google Slides Template   Digital Utopia has dozens of colorful charts and graphs you can combine to create an eye-catching infographic within Google Slides. Plus, you get 16 Illustrator infographic landscapes, fully laid out, in AI & EPS formats. This template pack gives you plenty of color options. Five color schemes are built in, each with a light and dark version. You also have a choice of either 16:9 HD size (for presentations) or A4 size (for printing). And with over 4,000 vector icons included, you can create your own data visualizations. 5. Corporate Business Plan Google Slides Template   For an infographic with a monochromatic color scheme, consider the Corporate Business Plan template. It offers four slide templates based on one base color—besides a multi-color version. All that makes for a total of over 350 slides. You also get two sets of vector icons, line and simple style, for a total of over 4000 vector icons! Envato Elements (Design Without Limits)   Envato Elements has an attractive, all-inclusive offer for you: Sign up for Envato Elements. Get access to thousands of creative graphics and templates (with unlimited use). Download professional Google Slides infographic templates to video clips, website templates, audio, images, and more — all for a low monthly price.    That's right! Download as many Google Slides infographic templates as you want, then customize them to fit any of your project needs. While Envato Elements is a powerful option, if you prefer to buy new infographic templates for Google Slides one at a time (instead of getting unlimited access to hundreds of creative designs), check out the selection from our Envato Market below. 20 Best Google Slides Infographic Templates From GraphicRiver (Popular in 2021)Looking for even more infographic templates for Google Docs? Here's what's trending right now in the GraphicRiver marketplace: 1. Infographic Pack - Google Slides by Munkhuumgl   For creative visualization of data, this Infographic Pack by Munkhuumgl has you covered. Use visual metaphors like icebergs, fishing, spirals, and more to impart information without putting your audience to sleep. As with the other templates featured in this article, all the elements in this infographic pack are fully editable. Dark and bright versions are already built-in to get you started. Let's not forget the 6000+ vector icons that come in this pack! 2. PRO - Multipurpose Infographic Template Google Docs   This Google Slides template offers 390 creative, unique slides, 3500 vector icons, and 10 premade templates. PRO has various handmade infographic sections that'll be handy to anyone who wants to impress their audience with graphically clear and simplified data. How do you make an infographic in Google Slides? PRO - Multipurpose Infographic Template Google Docs effectively answers this question. 3. Infographics Pack Google Slides Diagrams by CiloArt   Creating any type infographic is possible with this massive infographics pack by CiloArt. A total of 525 unique slides gives you all the different types of infographics you could ever think of:
Ninety color themes are built in, and it takes only one click to automatically recolor all the slides. 4. Infographic & Isometric GGS Template   Your infographic will stand out when you use the unique three-dimensional (isometric) graphics in this template! It also offers dozens of people slides that you won't find anywhere else. The slides are in 16:9 or HD resolution (1920×1080 px) for the sharpest infographic presentations. What's more, the designer provides free updates and fast customer support, with a response time of 30 minutes. 5. Timeline Infographics Google Slides Presentation Template Diagrams   Looking to make a timeline infographic? The Timeline Infographics template pack gives you 75 unique timeline diagrams in a clean and simple style. Since all the objects on the slides are vector-based, each one is fully editable in Google Slides. This template comes with 12 premade colors, 90 built-in color themes, and over 5500 icons to customize the infographics. 6. Marketofy - Infographic Template Google Docs   Marketofy comes fully packed with 200 unique creative slides that are useful in real-world presentations. It's loaded with excellent handcrafted infographic illustrations like:
Once you've got this template, you'll never wonder how to make an infographic in Google Slides ever again. 7. Funnel Infographics Google Slides Template Diagrams   Funnel charts are useful for visualizing the progressive reduction of data as it passes through different stages, as well as parts of a whole. This template pack gives you 38 unique funnel charts and 5500+ icons to make the diagrams your own. Also included are 90 color themes you can easily install in Google Drive to enable one-click application on your slides. 8. Eargo - Google Infographic Templates   The Eargo Infographics Google Slides template is a good option for creating an infographic with different types of diagrams. It goes beyond the basic charts and offers maps, tree infographics, and visuals that show convergence and divergence. You get more than 250 unique charts, 30 premade color schemes, and light and dark versions of each slide. 9. Arrow Infographic Google Slides TemplateAdd creative arrow diagrams on your infographic with the Arrow Infographic Google Slides Template. You'll find more than 20 unique arrow infographics that are 100% vector based. This means each part of the infographics is fully editable. The infographic presentation slides in this template are in 16:9 or HD resolution. The template also includes free updates and fast customer support from the designer. 10. Mazano - Google Infographic Templates   Mazano not only comes with over 3000 icons, but also 234 unique, clean, and professional infographic slides that are custom made for various industries. Pick graphics from this extensive selection:
Once you've got the infographics you need, quickly and easily edit them to make them your own. Add custom animations or transitions and you're all set to impress your audience. 11. Circle Infographics Google Slides Template Diagrams   Circle charts are best for showing parts of a whole and how they compare in value to other parts as well as the whole itself. Circle charts also represent cycles and repetitive processes. The Circle Infographics Google Slides template gives you 38 unique and handmade circle charts to use in your infographic. All slide objects are vector-based. This means you can move, resize, and recolor them as much as you want to suit your needs. 12. Bundle Colorful Infographic Pack 3.0   Bundle Colorful Infographic Pack 3.0 boasts 100 unique infographic presentation slides with one-click recoloring. It's got all the file formats you need to edit the graphics in Google Slides, PowerPoint, and Keynote. More than 350 vector icons come with the template, and custom animations are built in as well. 13. Dizital Infographic Pack Google Slide Template   Create engaging infographics with the Dizital Infographic Pack Google Slide Template. The package contains 200 unique and well-designed infographics with a modern, clean, and colorful style. Everything from basic charts to puzzles, maps, and visual metaphors are at your fingertips. And all the slide objects can be moved, resized, and recolored without losing quality since they're vector shapes. 14. SWOT Analysis-Business Infographic Google Slides   Whoever said a SWOT analysis can't be exciting hasn't seen these infographic templates for Google Docs! You've got a selection of single-color or multicolor infographics, for a total of 250 slides in all. These infographics are versatile enough to use for more than Strengths, Weaknesses, Opportunities, and Strengths (SWOT). They can also be used to show timelines, cycles, and processes. 15. LeadData Infographic Pack Google Slide Template   Another hefty template, LeadData Infographic Pack delivers more than 265 infographics! These have a modern, clean style and include a variety of diagrams, such as puzzles and maps. As with other templates, each object on every slide is fully editable, thanks to the use of vector shapes. 16. Company Analytics Infographic Google Slide Template   In the Company Analytics Infographic template, not only are the objects fully editable, they come with built-in animation as well. Google Slides is all you need to change the shape, color, size, and position of the objects. This Google Slides infographic template also has 60 color schemes for you to choose from. Switching schemes takes only one click. Charts automatically update when you plug in your own data. You'll also love the included font icons kit with 500+ icons. 17. 3D Infographic & Timeline - Google Infographic Templates   This awesome Google infographic template is a must-have to create a presentation with data in 3D infographics or showcase events in a clean and creative timeline graphic. If you're new to infographics and learning how to make an infographic in Google Slides, there's a help guide that'll come in handy. 18. Skybiz Infographic Pack Google Slides Template   Skybiz Infographic Pack brings you more than 145 effective infographics with creative data visualization. Slides come in 16:9 aspect ratio, which is the ideal size for infographic presentations. These infographics are fully editable in Google Slides and have pre-built transition animations. You also get maps of Europe, the United States, Asia, and Australia. 19. Premax Infographic Pack Google Slides Template   Aside from charts and graphs, the Premax Infographic Pack also includes well-designed tables that won't put your audience to sleep. You also get elegant transition animations, maps, and 500+ font icons. Customize as much as you want. Changing the color, size, and position of each object doesn't require any special graphic design software. Everything is editable in Google Slides. 20. Montague - Infographic Template Google Docs   Are you still trying to figure out how to make an infographic in Google Slides? You don't have to start from scratch. Start with a premium template like Montague. This infographic template for Google Docs offers more than 4000 slides. Customize them customize quickly and easily for your next presentation. Easily drag and drop, change colors, add text, and information within minutes. How to Quickly Customize Infographic Google Slides Templates (For 2021 Presentations)Infographic themes for Google Slides let you present ideas in style. Plus, they're incredibly easy to customize. Let's learn how to build an infographic Google Slides deck in five easy steps: If you'd like to follow along, download the INFOGRAPHIC - Google Slide Template from Envato Elements.    Let's get started: 1. Customize TextInfographic themes like this have plenty of room for text. Adding text helps you fill in details to support the infographic itself.    Start by clicking to select any block of text on the slide. Then, begin typing. It's as simple as that. Repeat on other slides as necessary. 2. Remove Extra ObjectsNot every item on an infographic Google Slides template has to be used. That's the beauty of premium templates—they're flexible without limiting your options.    To delete an unwanted object, click to select it. Then, press Delete on your keyboard. 3. Change FontsIt's easy to overlook text as you style infographic themes. But it's actually a big component of great designs. Changing fonts is a way to add contrast and boost visual interest.    Highlight some text, then go to the Font section on the menu bar. There, you'll find drop-downs for font design, size, and more. You can also apply text effects like italics and underlines. 4. Edit Shape ColorsEditing an infographic Google Slides illustration involves adapting it to your own needs. Part of this comes from changing the colors. Most decks like this have beautiful pre-built schemes, but you're always free to change them.    Begin by clicking on a part of the infographic to select it. On the menu bar above, you'll find a Fill Color option. Click there, and you can apply custom colors, gradients, and more. 5. Rearrange ContentGoogle Slides makes it easy to quickly rearrange slide content. Each object you see on these infographic themes can be moved!    Click on an object's corner and drag to move it around your slide. The app will even automatically display guidelines, helping you maintain razor-sharp alignment. It's a great way to make each slide your own. Infographic Best Practices for Google SlidesAre you ready to start using an infographic template for Google Docs? These best practices give you some good guidelines: 1. Start With a Premium Infographic Template for Google Slides   Browse through our wide selection of premium infographic templates for Google Slides on Envato Elements or creative premium infographics templates on GraphicRiver. Pick the Google Slides infographic template that works best for you. Save loads of design time and get a head start by using a professionally pre-built infographics template. These well-designed premium templates also spark inspiration and ideas. 2. Have a Clear MessageJust because it's now super easy to make your own infographics—thanks to these infographic templates on Google Slides—it doesn't mean you should jump into it willy-nilly. For your infographic to be effective, it needs to have a clear storyline. Know exactly what message you want to convey and what you want to achieve with your infographic. Then, determine the best sequence for the data so that your message gets across clearly. It also helps to have a single call to action for those who'll be seeing your infographic. 3. Keep It Visual   An infographic is a visual medium, so keep it visual. Don't fill it with words in an effort to express the information. Instead, carefully choose the images that'll carry your points across without lengthy written explanations. The words in an infographic are there to support the visuals, not the other way around. If a graphic doesn't say something at a glance, then it's probably not the best visualization of your idea. 4. Keep Your Brand in MindWhen working on an infographic for your presentation, it's easy to get carried away and go astray from your branding guidelines. It's vital to have your visual branding well represented not only in your infographics, but also in your presentation. Your infographic and your entire presentation should look like it belongs to your business. Pay attention to these following elements and ensure they're in line with your brand:
5. Keep It Simple   You've seen them: massive infographics with a ton of tiny images and even tinier text. They may look impressive, but they're not the best at communicating. Focus each infographic to a few key points to avoid overwhelming your audience. Don't cram it with too many visuals and data. Use plenty of white space and apply visual styling to emphasize the most important parts of your infographic. Find More Presentation Infographic Templates for 2021The possibilities for designing an infographic on Google Slides are endless. The infographic templates I described above are only a few of your options. To get even more design inspiration for your Google Slides infographic templates, look at these selections for PowerPoint:
5 Google Slides Infographics Trends for 2021We've covered our selection of premium infographic themes and some of the best design practices. Now, let me share with you the best infographics trends for this year. Don't just go for a simple chart template when you can make it more interesting with these trends: 1. Monochrome Is Trending   Go for a monochrome tone in your infographics presentation this year. It'll give your presentation a very polished and professional look. Also, you won't saturate your slides and graphs with tons of colors. 2. Stand Out With Neon   On the other side of the spectrum, bright and neon colors are on trend this year for one good reason: they'll draw your audience's attention. And you want your viewers to look at your infographics. This is a great way to catch their eyes. 3. Be SpecificInfographics are great to visually display data. But don't stop on plain infographic themes. In Envato Elements we've got infographic themes for many specific topics, so you can tailor your presentation even more. From education infographics and healthcare infographics to oil and mining infographics and even oceanic infographics. Just browse our complete library! 4. Go for a Different Design   On a similar note, you don't need to settle with plain bar charts or pie charts. We've got infographic themes with unique designs. They'll make your data stand out, like this puzzle infographics Google Slides Template. 5. Include Maps   Map infographics are a great resource when you want to visually show the origin of your team, students, coworkers or even products. Instead of a long list of countries or regions, create a map infographic presentation with our templates. 5 Benefits of Using Professional Infographic Themes for Google SlidesStill deciding if you should use a professional infographic Google Slides theme for your next project? Perhaps you're wondering if they're really worth it. Here are five top reasons to always use premium infographic themes:
Benefits of Envato Elements (Unlimited Creative Control)   Envato Elements is the best value for creatives today. For a flat rate, you unlock unlimited downloads of Google Slides templates. Join Envato Elements now! You'll have instant access to Google Slides templates, along with photos, audio, and much more. It's a winning offer. Common Google Slides Questions Answered (FAQ)If you're new to Google Slides, it's normal to have some doubts about this presentation software. Let me help you answering some of the most frequently asked questions: 1. What Are the Advantages of Using Google Slides?Google Slides has some interesting advantages over its more popular competitor, PowerPoint. These are the two main benefits:
Learn more about the benefits of Google Slides here: 2. Is It Possible to Convert PowerPoint Presentations to Google Slides?Yes, it's possible. If you get a PowerPoint file but you want to edit it in Google Slides, convert it using Google Drive. In this tutorial, watch a video or follow our step-by-step guide: 3. What Do I Need to Customize an Infographic Template in Google Slides?Our infographic themes are very easy to edit and customize. You only need to have some elements ready after you've selected your infographic theme:
4. What Types of Charts and Graphs Are There?If you're wondering how to make an infographic in Google Slides, first, you need to know about the types of charts and their functions:
More on that here: 5. How Can I Add New Fonts to Google Slides?You can still add all the fonts you'd like to Google Slides even though it's a free web-based software. But, first you'll need to get the free fonts from Google Fonts. Then, the process to add them is really easy. Just check our tutorial here: Learn More About Google Slides InfographicsThere's a lot more to creating infographics than we can cover in this post. To learn more about creating an effective infographic on Google Slides, then check out these articles:
More Resources for Infographic Presentation DesignsYou've already seen the infographic Google Slides themes that pros love. They're the best way to save time while working in Google Slides. We've got more resources that can help you develop a Google Slides presentation, chock full of infographics. Many infographic resources work with all applications. Remember Envato Elements? It's the all-you-can-download source for creatives. You've already seen their deep library of infographic Google Slides themes. The same subscription gives you infographic files that work with any application.    In most cases, these infographics are still customizable. You download the file, change a few details, and they're ready to add to a presentation. Envato Market is the pay-as-you-go counterpart to Elements. Great news: it also has its own library of infographics. You can buy single infographic files from GraphicRiver for a low cost and use them in your presentation, too.    Make sure to also check out our guide that'll inspire you. it's sure to spark ideas for how you can use infographics effectively. The Best Infographics Are Within Your ReachIt's true. Gone are the days when you must hire a professional graphic designer to have your very own infographic. Today, you can create the best infographics yourself on Google Slides by using the templates featured here. If you're a power user, then select an infographic template from Envato Elements. You get unlimited downloads, not just of infographic templates, but also of fonts, icons, and other graphic elements—all for one small price. If you're making only one infographic, then GraphicRiver might be a better place for you to find an infographic template compatible with Google Slides. Here, you pay for every single use of a template and prices are very affordable as well. Starting with a premium infographic template is the easiest and fastest way for you to create your own infographic. You'll be proud to share it far and wide. Download your favorite Google Slides infographic template and get started today! Editorial Note: This post has been updated with contributions from Barni Rajah, Maria Villanueva, and Andrew Childress. Maria is a staff writer with Envato Tuts+. Barni and Andrew are freelance instructors for Envato Tuts+.  |
| Creative Arabic Calligraphy: Designing the Letters Posted: 08 Jun 2021 06:00 AM PDT   In previous Arabic calligraphy beginner lessons, we've picked up clues as to what makes up the consistency of a script. We learned the anatomy of the letterforms and how they relate to each other. We also learned how to proportion and space a script harmoniously and in a way that respects the hierarchy of letters. Now we're going to use all this to design a script. Are you a graphic designer and need modern Arabic fonts ready to use? We'll also review some Arabic fonts online from Envato Elements.    If you're looking for the best Arabic fonts online for your digital projects, scroll down after this Arabic calligraphy beginner tutorial. There's a hand-picked selection of premium Arabic calligraphy fonts from Envato Elements. What You Will Learn in This Arabic Calligraphy Art Tutorial
IntroductionThe Interrelationship of Letters as a Design BasisAs a warm-up exercise, here are two sets of letters, from Early and Eastern Kufic respectively, with some blanks. Your task is to draw the missing letters, inferring their shape from the other letters, as they are made up of parts that can be found in them. Refer to the chapter on Anatomy of the Letterforms for the specific parts making up each letter if you need a refresher. See solutions.jpg in the downloadable folder for the answers.   This is a practical reminder of how interrelated the letterforms are. The building blocks of the alphabet, the bodies and tails, are few in number, and in theory it's enough to design them to have the full alphabet. In practice, I don't recommend working on them as disembodied parts. What we can do instead is work on a core group of letters that together contain all of these building blocks. I chose seven letters for this core group, Group 1:   These letterforms feature all the basic shapes, including some minor ones I didn't mention earlier:
Group 2 then follows. It is mostly derived from the above, with only a few elements that still require designing:   The grey parts here were designed in Group 1, with the corresponding letters indicated. The black parts are not yet done.
The remaining letters, Group 3, are entirely derived from those we already designed:   This makes it all look so simple! The truth is, the basic process is simple, but "the devil is in the details". As we design a set from scratch below, you will see how many design decisions have to be made, and how tricky some letters can be. Calligraphy vs. TypographyAlthough it looks as if we are designing a typographic font, we are only overlapping with that process as far as our calligraphic needs go. Typography and calligraphy overlap, but neither contains the other, as their goals and media differ. Typography is concerned with large amounts of text, mechanically (or digitally) reproduced, that needs to be highly legible as well as attractive; it requires great visual and technical expertise. If we were creating a font, we would have to anticipate and design hundreds of character combinations, so as to create a system that would look good in shape and spacing when used at any size, by anybody. Really good fonts take years to create, but are still limited somewhere, as improvisation is not part of their nature (and is irrelevant to their purpose). In contrast, a calligrapher's set, such as we're creating, can be this simple because we can adjust and improvise on the spot, according to our specific uses, and not worry about planning for every possibility at its inception. The set can evolve with time, and we can break our own rules in places. It can be said, therefore, that the significant aspects of a set of letters created for calligraphic purposes are:
Step-by-Step Creation of a ScriptWith the above in mind, I will demonstrate a process of designing a script based on our three groups. I am working on gridded paper and will only transfer the letters to software when they are finalized. Working on paper is much more enjoyable than working digitally, but it is also the only way to really learn calligraphy (or typography for that matter). There is just no substitute for drawing the letters in the physical world until they become second nature. Serious practitioners will not limit their practice to sitting in front of a screen. For this process, you only need three tools: gridded paper (I use an A3 pad, but you can also print the attached A4 grid), a pencil and, optionally, a circular template. This tool is more convenient for small curves than a compass, and the one in the picture also doubles as a short ruler. However, I did most of the sketching freehand as I find it less distracting, and only used the ruler/template to draw finalized letters so I could see them better.   Step 1: Setting the ProportionsAs described in Proportions and Spacing, we must decide on proportions before we work on forms, but we can always come back and adjust them. I have in mind a set that has the tall elegance of Eastern Kufic but is rounder and softer. I actually start with loose preliminary sketches, looking for the essence of the set I want to make:   Preliminary sketches are helpful and even essential. Doodle freely, perhaps starting off with a historical letter you like and wandering from there, until you strike upon something you like. Your first idea is seldom the one with the most potential or that will give you the most enjoyment to work with, so taking the time to sketch freely can save you from giving up and starting over halfway through a set. Tentatively, I set my proportions as follows, with an extra tall Alif of 16, tall teeth and loops of 6, and a box of 3 units high.   I tried opening up the space inside the box to make it higher, but didn't like the result at all, and it also meant I'd have to open up the space inside the loops, but I want these tall and narrow. It's personal preference, therefore, that keeps the box so low. Because the Alif is so tall, the box looks particularly long, but that can be adjusted in context so it's not a worry. Step 2: Basic Design ElementProportions play a large part in the look of the script, but now we have to address forms. Whether simple or elaborate, the letters in a set will share a specific sense of form, a consistency of curves, angles, ornamental details if any. There is no one right way of determining the forms that define your set. You can start by designing one letter, and derive the rest from it; you can create a grid into which you constrain each letter (an example of a specifically created grid is the one used for LED numbers); you can start with a single design element, and let it reverberate through the entire script. The latter method is what I'm doing here. I have in mind this serif (Arabic: tarwîs) to head my Alif:   It is a simple shape formed of two quarter-circles, one with a diameter of 4 units (abbreviated ø4), and a smaller one with ø2. I tried it with smaller circles (the one in the middle) but the effect was weaker. I don't know yet what other shapes I may derive from it, but I can do a lot with quarter-circles of various sizes, so there is a lot of potential. Step 3: Letters of Group 1AlifWith the serif at the top of my 16-unit rectangle, the Alif takes shape:   I like the look of it, but I fancy giving it a foot when isolated, for a sophisticated touch. It has to be harmonious with my basic design element, but not, of course, be the same, so I'm already facing a small design challenge. What I do is go by the historical look of the foot (examples in medallion), but adapt it to my fledgling system by using two circles to create it. They are both ø2, as I tried with ø1 but the result didn't look right. Bâ' for Tooth and Flat TailI sketch these two elements separately before putting the letter together:  
In the end, the chosen tooth is 2, with 6 for a tail, and this is my Bâ'.   The design of the Bâ' messed up my system of proportions, so I have to revise it before I go on. The tooth is now 4 units high, and the box can't be changed from 3. The loops cannot stay at 6 in these conditions, as that would create too many levels in the text. Fortunately, I can sort this out by sacrificing their neck. If the loops sit directly on the baseline, they are 4 units high, like the tooth, without losing their tall silhouette. My new and final proportions are thus:   Dâl for the Box and HookBoxes can be open or closed, and their left end varies because it carries the identifying features of each individual letter. What they all have in common is an upper right corner that needs attention. In a set that is not of purely square construction, this angle needs to be at the very least angled or rounded in harmony with the overall design. This is one of the features of Dâl that need designing, the others being the hook and "tail" of this letter. It doesn't actually have a tail to speak of, but its lower stroke needs to terminate elegantly. The simplest way is to treat the lower stroke like a flat tail and terminate it the same way.  
My final choice for the hook is 3, which has a nice relationship with the lower curve while at the same time contrasting with it in size in a pleasing ratio of roughly 2:1. This first Dâl shows corner construction 1, with the smaller circles.   This one uses construction 2, which is much more dynamic, and I also made it half as long (8 rather than 16). I'm pleased with the result, which is well balanced with a forward thrust.   Nûn for the BowlThe bowl requires particular attention, as it recurs in so many letters and sets the level for other descenders. It's best to give this job to the bowl, rather than to the returning tail, because it is more complex, so that it is easier to adapt returning tails to its level than the other way around. The rule that descenders should be on the same level is not of course cast in stone, and half-bowls often evade it, but it should only be broken in a studied way, so I will endeavor to stick to it.  
  My final Nûn, drawn with the template to get more accurate circles, shows the descender level is 2 units below the baseline. Wâw for the Loop and Half-BowlI start looking into the half-bowl, as it derives from the bowl I just worked out.   Anything less pronounced than the bowl is suitable, so I could go as far as the full bowl without its finishing serif, but after trying different circles I hit upon a curve that's neither too big nor too small, and that comes to rest on the same descender level. Because I used the tooth in my sketch to see more clearly where the baseline was, I have inadvertently designed the Râ' by the same token. Moving on to the loop:  
In assembling the final Wâw, I try again the different half-bowls I explored, but am confirmed that the one I settled on works best.   Jîm for the Notch and Returning Tail  Jîm gave me a lot of trouble, mostly because I couldn't make up my mind whether I wanted to stick to the diagonal notch, or to let my shapes dictate a design. It took a while to settle on the solution at bottom right, which reuses the serif in yet another position and so as to create a semicircle. One of the reasons I settled on it is to give the letter the required height of 4. Some of the other shapes I liked are only 3 units high, and while that would align it with the boxes, it would make it look quite small in proportion to other letters—boxes have length to make up for their low height. Also, from the corner of my mind I'm thinking of the Ayn, and I'm aware that this semicircle will allow me to tie in those two related letters without making it too obvious. As for the tail, I started sketching quite an open one (towards the top), based on the bowl, and then realized it was too deep and I needed to bring it back up to 2 units below the baseline. Shifting the circles resulted in an angle where the tail returns, which has a much more edgy feel, more in tune with the overall theme—too many circular curves start looking too saccharine very quickly. I like the tail both with and without the little ornamental serif, but decide to keep it, at least provisionally. Mîm for the Alternative Loop and Short Tail 
I retain 4 and 5 for the time being. They both work, and their final test will be context. This completes group 1, which looks like this:   Step 4: Letters of Group 2Ayn 
KâfWe know how closely related Kâf and Dâl are. Yet I shrunk the length of the Dâl to make it more distinct, so I mean to do something similar here by modifying the hook into an elegant tapering curve.   Sketches 1 and 2 test different sizes of hooks, and also the two different treatments for the corner of the box (it's always good to double-check an earlier decision still works). The final shape I settle on in 3 is intermediate in size, and I also pushed it in slightly so the tail would jut out to signal the isolated form. The hook of the Kâf, always skinnier than the main lines of the letter, does not break the system of proportions because the substantial part of the letter is its body, which is the box. Yâ'The final Yâ' is a breeze to adapt, being mostly derived from shapes we already have. Its isolated form is another matter.  
Hâ'This is again a breeze, as the loop is already done, and reflecting it results in a perfect medial Hâ'.   Here's our finished Group 2:   Step 5: Letters of Group 3All the elements we need are now worked out, so this group will not take long. Fâ'Loop + flat tail.   SâdBox + bowl. However, there is the matter of Sâd's "tooth". It is optional, but I'd like to include it. As it's not a full-sized tooth, despite its name, simply sticking our serif there won't do.  
QâfLoop + bowl: Like Yâ', Qâf makes contact with the small serif. I try raising it higher to see if that's a solution, but it doesn't look right. In the end, after checking that the negative space thus created is sightly enough, I decide to give it the same treatment as Yâ'.   SînThree teeth + bowl. While they can be level, arranging them in decreasing height is too aesthetic a solution to pass up.  
LâmAlif + bowl.   Tâ'Alif + box. I give the lower left angle a little tail ending to add interest.   Râ'Tooth + half-bowl: I already designed this earlier as a by-product of the Wâw.   Here then is Group 3 completed:   Step 6: Testing the ScriptNow it's time to put the letters together in some sort of sentence, and see if the set looks good in context! We'll also see how we can intervene at this level to make it look even better. For this purpose I found a Lebanese proverb that contains all the body and tail shapes of the script: متل سراق الحمير كيف ما باع بخلصه (which means: "Like the donkey thief, whatever price he sells will be a profit"). Here's how it looks with the letters put together as they are, with regular spacing. This is the stage where you look for anything glaringly out of proportion, or a shape that clashes with the rest. In this case you'd have to revise the offending letter(s) and try again. To my eyes this passes muster; I'd thicken the extremely thin strokes on the bowls, but that's not a structural change so I can do it on the spot.   I then made some changes to the composition, the spacing and the letterforms themselves, looking for the most pleasing result for this specific context:   The distribution of the words is different, as I isolated كيف on one line but, as it is a low, strongly horizontal word without verticals, I spaced the lines above and below it as if it weren't there, and made it weave through the verticals instead. Furthermore I made several small adjustments that are not immediately noticeable, but contribute to the cohesion and beauty of the composition. They are highlighted here:  
Looking at it again now, there remains a bit I'm not so pleased about, the empty space below the word الحمير. More experimenting may be needed before I'm fully satisfied! ExerciseTime to create your own set of letters! This is a substantial assignment, but at the very least, aim to design the letters in Group 1. You can even pick a sentence and design what you need just for that. If you're up for the full job, you can follow the process outlined here, or diverge from it—there are no real rules for this, but I think this may be the easiest way to go about it for a first time. All you need is a pencil and gridded paper; A3 is comfortably large, but the downloadable folder includes an A4 pdf grid you can print out instead. 5 Best Modern Arabic Fonts From Envato ElementsYou now know more about how to write Arabic letters in calligraphy and how to make a script. We've done some Arabic calligraphy exercises. Now it's time to check out some ready-to-use Arabic calligraphy fonts. Finding professional Arabic fonts online isn't difficult with an Envato Elements subscription. You'll get unlimited Arabic font downloads. If you're a digital creator, you'll love our subscription-based marketplace. For a low monthly fee, enjoy unlimited Arabic font downloads. You can also get unlimited premium fonts, graphic templates, actions and presets, and more. Here are some of the best Arabic calligraphy fonts from Envato Elements. 1. Al-Andalus: Arabic Style Font (OTF, TTF)   Al-Andalus is a unique Arabic style font. Modern Arabic fonts like this are inspired by classic Middle East calligraphy. This Arabic calligraphy font is perfect for logos, branding, book covers, and more! 2. Maroque: Modern Arabic Font (OTF, TTF)   If you're looking for modern Arabic fonts, Moroque is the one for you. This cool Arabic style font is inspired by geometric patterns found in Moroccan carpets, textiles, and artwork. Arabic fonts online like this are a great option for your digital projects. You'll get the full character set, including punctuation and international characters. 3. Tcho: Multilingual Typeface (OTF, TTF)   What if you need a truly versatile, multilingual font? Tcho is a great option for you. This typeface is ideal if you do branding or design for international companies. The multilingual font covers these scripts: Latin, Cyrillic, Greek, Hebrew, Arabic, and Thai. 4. Sabana: Elegant Arabic Style Font (OTF, TTF, WOFF)   Sabana is one of our new Arabic calligraphy fonts. If you need modern Arabic fonts with ligatures and swashes, this is for you. Sabana is an elegant Arabic style font that will look great on your designs. You'll also get web fonts for even more options. 5. Assyam: Arab Brushstroke Font (OTF, TTF, WOFF)   Arab brushstroke fonts are trending. Assyam is an Arabic style font with a contemporary look and easy installation. Premium modern Arabic fonts like this are packed with great features. You'll get multilingual support and encoded characters. This means your Arab brushstroke font is accessible without additional software! Discover More Arabic Calligraphy Art and TutorialsYou've learned how to make a script in this Arabic calligraphy beginner tutorial. You've also seen top Arabic calligraphy fonts for your digital projects. Remember, this post is part of our learn Arabic calligraphy series. If you want to explore more Arabic calligraphy art and tutorials, check these out:
 |
| 33 Best Mailchimp Responsive Email Templates (2021 Newsletter Designs) Posted: 08 Jun 2021 05:55 AM PDT Building your email list is one of the most important tasks that can transform your business. That's where Mailchimp email templates and newsletter templates come in handy.    Once you've got subscribers, it's even more important to email them often. In time, you'll cultivate the relationship and establish trust. A professional Mailchimp email template such as those found on Envato Elements or ThemeForest will save you time. With a template you don't have to start from scratch to create a new campaign or email newsletter. The right Mailchimp email design ensures consistency on every send. On top of that, they're easy to customize and are built with responsive best email designs for 2021. Your emails will look great on both desktop and mobile email clients. You'll see Mailchimp responsive templates that adapt to every device. Beautiful Mailchimp Email Templates on Envato Elements (With Unlimited Use)You can find beautiful, responsive and best Mailchimp templates on Envato Elements. It offers hundreds of the best Mailchimp example designs for 2021 for a low monthly subscription. You'll unlock unlimited Mailchimp responsive templates for a flat rate. Don't fall for free Mailchimp templates. Each of these best Mailchimp templates can be customized to your liking. They've been carefully designed to look great on every device.    10 Best Premium Mailchimp Newsletters and Email Templates From Envato Elements (2021)Here are some premium Mailchimp example templates from Envato Elements. Each of these Mailchimp email templates has a unique and professional design. They include every element you might need to make your email campaigns stand out in the inbox: 1. Avalan - Elegant and Responsive Mailchimp Newsletter Template   Try the Avalan Mailchimp newsletter template if you're looking for the best Mailchimp designs. Free Mailchimp templates can't compare. The Mailchimp responsive template uses StampReady builder. That means you can tweak every part of this Mailchimp newsletter template designs. Then, test it, and save it for future use. Avalan Mailchimp newsletter template is also compatible with Campaign Monitor. The Avalan template has been tested and optimized to look and work great every device. That includes all major desktop, Android, and iOS email clients. 2. Shop - Mailchimp Responsive Templates for E-Commerce Businesses   Consider the Shop template if you need the best Mailchimp newsletter template geared for online stores. The template is easy to edit. Drag, drop, and clone different modules to speed up the design process. It shows the power of using Mailchimp newsletter templates for rapid design. Use the preview mode to see how your email will look on both desktop and mobile. Then export it to your computer so you can use it with your Mailchimp account. This premium template is far superior to the free Mailchimp templates you'll see. 3. Atellar - Multipurpose Responsive Mailchimp Newsletter Template   Atellar includes the best Mailchimp responsive templates that feature a clean look that's one of the best email designs for 2021. Use it no matter what type of campaign you need to send. Promote your recent posts with a featured image and a brief teaser of your article. Also, add calls to action that link to your sales pages. Use the StampReady builder to tweak the modules and the design. Then download the template to use it with Mailchimp or save it for future use in the builder. Go premium, and don't take the risk with Mailchimp newsletter templates free downloads. Premium Mailchimp email designs like Atellar really set the standard. 4. Emailo - Simple and Responsive Mailchimp Template Designs   The Emailo best Mailchimp newsletters template looks simple and clean. But it also packs a powerful set of options under the hood. Free responsive email templates 2021 can't match up to a premium Mailchimp email design like this. Key features include:
5. Kepler - Powerful Mailchimp Template Designs   The best email templates feature responsive and beautiful Mailchimp templates designs. Features of this Mailchimp responsive template include:
Before you export the template, you can send a test campaign and preview the finished design using the builder's interface. It's the fastest way to customize a Mailchimp responsive template. 6. Sentinel - Responsive Mailchimp Template Designs   Choose the Sentinel template if you like clean Mailchimp newsletter designs. These best email templates can be customized thanks to the StampReady drag-and-drop builder. Use it as a Mailchimp email design or an HTML template. You can preview and export the Mailchimp email design. It's a Mailchimp responsive template that will re-shape itself based on the device. Rest assured, it'll work great with all major email clients. 7. Idea Responsive Email and Newsletter Template   Idea, one of the best Mailchimp designs templates, includes features for extra visual appeal. Free Mailchimp templates simply don't have all the design extras that this one does. It works on every major email client. Notable features include:
8. Blade - Easy to Use Responsive HTML Email Template   The Blade Mailchimp responsive template is easy to use. Compared to many Mailchimp newsletter templates free downloads, you won't lack the features you need with The Blade. These best email templates stand out thanks to custom modules. Its features makes it a great choice if you want to encourage subscribers to take action. 9. Accel - Professional Mailchimp Responsive Templates   The Accel Mailchimp inspiration template is perfect for a professional and polished feel. Aside from being responsive, it's 100% customizable. The drag-and-drop interface allows you not only to add or remove various modules, but also to tweak colors, fonts, and more. These premium best Mailchimp templates work with all major email clients. That includes responsive designs that adapt to desktop, iOS, and Android devices. It even includes a PSD file for those who have more experience with design. 10. Space - Corporate Mailchimp Themes   If you're looking for Mailchimp themes with a corporate feel, look no further than Space. These customizable best Mailchimp templates let you rearrange the elements to your liking. Customize the style and export the finished design to your desktop. You can also save your progress at any time and continue working on it later, straight from the desktop. Envato Elements (Design Without Limits)   Envato Elements has a single compelling (all inclusive) offer: Sign up for Envato Elements and you get access to thousands of unlimited use graphics and templates (with unlimited use). Get great web themes, Mailchimp responsive email templates 2021, and more—all for one low price.    That's right! Download as many professional Mailchimp inspiration templates and graphics as you want. Then customize them to fit any of your project needs. Every item has an easy to understand license and guaranteed professional quality. Don't be tempted by free Mailchimp templates you find online. The best Mailchimp email designs are often found in premium packages like those found on Envato Elements or ThemeForest. Envato Elements is a powerful option, but let's say you prefer to buy unique responsive email template for Mailchimp one at a time. Instead of getting unlimited access to hundreds of the best email designs for 2021, check out the selection from our ThemeForest marketplace below. Beautiful Mailchimp Templates from ThemeForest in 2021 (Buy One at a Time)You can also find your responsive email template for Mailchimp on ThemeForest. These Mailchimp layouts templates are perfect if you want to buy a single template for a one-off campaign. You'll find thousands of Mailchimp newsletter templates for your email campaigns. Here are the best Mailchimp responsive email templates 2021 from ThemeForest. They'll help you take your Mailchimp email design to the next level in 2021.    25 Best Responsive Mailchimp Templates (Email Design Mailchimp Inspiration for 2021)Free Mailchimp templates are tempting. But the best premium email templates featured in this roundup are a better choice. Whether you're emailing your list to share the latest products, promotions, or simply a collection of your most popular blog posts: 1. Switch - Best Mailchimp Newsletters Template   The Switch template has responsive Mailchimp newsletter designs that are easy to customize. Add and replace different elements, tweak the style settings, and save the template for future use. What's more, this Mailchimp layouts uses advanced lossy compression that reduces image file size by 70%. The Switch template is also compatible with Mailster, a popular WordPress plugin for email newsletters. This template has many awesome features that free responsive email templates 2021 may lack. 2. Repo Mail - Modern Mailchimp Responsive Email Template   The Repo Mail template includes many Mailchimp layouts. They're perfect for newsletters, product promotions, and marketing campaigns. Thanks to Gifky Layout Builder, you can even create custom Mailchimp layouts and color schemes. Notable features of this Mailchimp email design include:
3. Carol - Feature Rich Mailchimp Template With Responsive Design   The Carol Mailchimp template comes with a responsive design and over 100 modules ready to be used in your campaigns. Incorporate your brand thanks to the ability to use unlimited colors. Rearrange the modules to your liking. Preview the finished design on both desktop and mobile devices when you're done. Customers praise the design features as well as outstanding support: Beautiful Mailchimp templates design and the support service was always very fast and great for any debug requests. Thank you! 4. Kara - Creative Responsive HTML Email Template   Try the Kara template if you need Mailchimp newsletter templates to upgrade from free Mailchimp templates. The template is responsive. It allows you to add background images that are supported in Outlook. The template comes with a drag-and-drop editor, unlimited colors, and is compatible with all major clients. Customers rave about the design and features of this template: Very well designed, commented, and documented. Beautiful Mailchimp templates. 5. Notification App - Conversion-Focused Mailchimp Template   The Notification App is a perfect choice for online store owners or app developers who want to improve their conversion rates. The template includes pre-made designs for welcome emails, order confirmations, invoices, and more. It's also responsive and has plenty of customization options to choose from. Features that lack in many free responsive email templates 2021 out there. 6. Kinetic - Interactive Mailchimp Email Template   Definitely check out the Kinetic template if you want your emails to stand out or an upgrade after using free Mailchimp templates. On top of being responsive, you can add modules such as carousels, progress bars, videos, and more. The template is easy to customize with a drag-and-drop interface. 7. Notify3 - Notification Mailchimp Email Template   Consider the Notify3 template if you want the ability to choose from pre-designed templates. This saves you from adding modules yourself, so all you've got to do is replace the dummy content with your own. But you can still take advantage of the drag-and-drop builder to add, clone, or remove various modules. 8. Kappa - Responsive Mailchimp Template Designs With Builder Included   The Kappa template offers gorgeous premium design as well as 12 pre-built templates and a drag-and-drop builder that's easy to use. These premium designs will set you apart from competitors who use free Mailchimp templates. Features include:
9. Halox - Bold Responsive Email Template for Mailchimp   The Halox template makes it easy to export your finished template straight into Mailchimp. It supports Google Fonts. So, you can style your typography and change any of the element's colors, and more. The email passed the Litmus test. That means it's proven to work with all major email clients. 10. Salut - Professional Agency Email Newsletter Template   Reach more customers on any device. Salut is tested and compatible with not only Mailchimp, but also Campaign Monitor, StampReady and Mailster Plugin. Customize the template to fit your company identity and your own vision. Fast support is something that many Mailchimp newsletter templates for free download don't have. So, using a premium template like Salut gives you this huge benefit. 11. Notifier - Responsive Email Set   This premium best Mailchimp designs set comes with +10 templates and +110 unique modules. Use this online template builder with unlimited variations and modules. Create Mailchimp themes for your brand or company. Save your created template to the dashboard and edit later. 12. Paxos - Responsive Email Template Mailchimp   A travel and agency themed responsive email template for Mailchimp. It comes with nine simple and clean layouts to pick from. It's compatible with other email services like Mailster, Campaign Monitor, StampReady and more. Create a clear, modern and professional email template for your brand and reach your customers across a wide range of devices. 13. Sartre - Responsive Email Toolkit   Sartre comes with 15 ready-to-use-layouts and 120+ modules that can be used for your next email newsletter. Get loads of Mailchimp ideas with all these layouts. Ever wanted to create a Mailchimp newsletter email that mirrors your website and brand? Well, now you can. This template based on the original WordPress theme. Sartre is built with Acorn Email Framework and is stacked with loads of features. You can also contact the Author for any pre-sales questions. 14. Hixel - Responsive Email Template for Agency   Hixel has friendliness in mind. This responsive Mailchimp template gives you control over your designs. Easy to use drag and drop modules allowing you to get creative with the look and feel of the emails. Featuring over 12+ complete email newsletter packs along with notification emails. Hixel is perfect if you need to connect with your subscribers and make more sales. 15. Blacksales - Best Email Templates for Promotions   Blacksales is one of the best promotional responsive Mailchimp templates out there. It comes with over 40 different modules that vary in design. It's a must have if your company sends out promotional emails often. Even though it's a Black Friday themed, it'll work for any type of sale or promotion. 16. Enhance - Mailchimp Inspiration for SEO and Digital Agency   Enhance comes with over nine of the best email templates. It's also compatible with StampReady Builder and many major email marketing platforms. This Mailchimp responsive template helps you create best Mailchimp newsletters. It's a great investment for those who want to connect with the subscribers and make more sales. 17. Glacier - Mailchimp Responsive Email Templates   Looking for top Mailchimp newsletter templates? Glacier is one of the best responsive Mailchimp email templates out there. It comes stacked with features like:
18. Stella - Mailchimp Responsive Email Templates   Stella has 30 unique modules used to build responsive Mailchimp email templates. This Drag and Drop email builder gives you full control over your email creation. It also allows you to save your edits and continue later. Once you're done, export to HTML, Mailchimp or Campaign Monitor. The features and quality of Stella are incredible, and tough to find in free Mailchimp templates. 19. Real Estate - Mailchimp Themes   Do you need to create a monthly newsletter promoting your listings so your clients are well informed? This Real Estate is the best premium Mailchimp email design themed template for you. Create professional newsletters in no time with Mailchimp email templates like this. 20. Sky Mail - Multipurpose Mailchimp Newsletter Template   If you're new to using Mailchimp email templates, this is an example of a good template to start with. It includes full documentation with video instructions. Sky Mail also comes with over 50 modules, giving you enough creative options. Don't fall for free Mailchimp templates and try this one instead. 21. Travel - Mailchimp Themes   Travel is a perfect email template if you need of travel-themed Mailchimp email templates. It comes with 25 unique modules, giving you enough options to create your best promotional or newsletter email. 22. WOHOO - Best Email Design Notifications Template   WOHOO is a multipurpose email template. It features 15 unique notification modules with creative and responsive designs. This looks great on any screen size and give you endless customization possibilities. Loads of email notification Mailchimp ideas in this template. 23. Hotel Booking - Mailchimp Themes   Hotel Booking is a responsive email template designed for the hospitality industry. It comes with over 20 modules, help document and good post-sales support. A great Mailchimp responsive option to get your hands on. How to Quickly Customize Mailchimp Email Templates (In 2021)Once you've found your favorite Mailchimp templates, it's time to customize them. By using a Mailchimp email design you'll impress readers with a stylish message every time. Let's customize a set of Mailchimp newsletter templates in just five steps. For this quick tutorial, we'll use the premium Emailo - Responsive Email and Newsletter Template from Envato Elements.    Emailo is versatile, flexible, and a top 2021 choice for Mailchimp email templates. Let's walk through using a Mailchimp email design to compose a slick and effective email for your audience: 1. Upload Your TemplateYou've downloaded your Mailchimp email templates. Now, it's time to upload them into Mailchimp itself. Begin by going to the Campaigns menu and find the Email Templates section.    Select Create Template, and then Code Your Own > Import HTML. You're looking for an HTML file that's inside your downloaded Mailchimp templates file. Name it, then click Upload to bring the Mailchimp responsive template into the app. 2. Edit TextA Mailchimp responsive template like this makes it easy to add custom text. Once you've finished uploading your Mailchimp newsletter templates, click on Edit Design. You'll see text boxes appear on-screen. Each of these is customizable.    To do that, hover over a text box and choose Edit. On the right side, in the Editable Region sidebar, replace the existing text with words of your own. Repeat throughout the template to fill in your Mailchimp email design. 3. Change ColorsFree Mailchimp templates tend to have basic layouts. But premium templates like Emailo give you far more options. For example, you can change the colors of text inside the Mailchimp templates!    Start by clicking on a text box to select it. On the Editable Region sidebar, select your text and choose Text Color. You'll see a color chooser appear. From it, you can select your favorite color, or even insert your own with a hex code. 4. Add ImagesImage placeholders are a useful feature not usually found with free Mailchimp templates. They let you import and scale photos in a flash. Before you begin, upload images to the My Files section of Mailchimp. This is an image library that you can use again and again.    Then, click into any of the placeholders you see on the Mailchimp responsive template. Choose Edit, then Replace. Browse to your image and insert it. You'll see it appear on your Mailchimp email design, sized and scaled perfectly. Need images to use in your Mailchimp email templates? Turn to Envato Elements once again. As a subscriber, you've got unlimited access to millions of stock photos. Use the Envato Elements stock library at no extra cost to make your Mailchimp newsletter templates shine. 5. Preview the Mailchimp Email DesignIt's always a good idea to preview your finished template before sending it out. This ensures everything is arranged correctly. In the upper right corner of the screen, click Preview and Test. Here, you'll see options to Enter Preview Mode or Send a Test Email. The first shows a browser-based preview of your finished Mailchimp responsive template. The second actually sends the Mailchimp templates design to your inbox.    With Mailchimp newsletter templates from Envato Elements you save precious time. Plus, readers love amazing Mailchimp templates that connect with them. 5 Quick Tips (Helpful Mailchimp Ideas) to Boost Your Email Engagement Rate in 2021When it comes to your email list, the most important metric is the engagement rate. It's measured by taking into the account your open and click-through rate.    Naturally, the more subscribers you've got, the lower your engagement rate will be. But there are a few ways to help you get better open and click-through rates. Let's jump into these helpful email Mailchimp ideas that you can put in place fast: 1. Be Personal in Your EmailsAlmost every email provider allows you to insert personalization tags in your email campaigns. This means that every contact who provided their first name will get an email that greets them personally. An extra touch like this goes to show you're trying to form a relationship and makes your subscribers feel like you're writing the email just for them. Take it a step further and make sure your campaigns come from a real person rather a generic email address like marketing@yourcompany.com. 2. Write an Interesting Subject LineEmail campaigns with subject lines such as "Company News/Updates/Latest Post" aren't going to get you far. Instead, make sure your subject line needs to trigger their curiosity and get them to open the email. Use a clear language, keep it simple, but don't forget to include action-oriented language and show them the value of the opening the email.    3. Include a Call to ActionIf you want your subscribers to click through to your site, then you need to include a call to action (CTA). In order for it to be effective, use one CTA per email and make sure it's visible. Remember that most people skim emails. So, make sure your CTA doesn't get lost in the rest of the email content. 4. Add Alt Tags for Images and ButtonsConsidering that some email clients block images, you'll want to add alt tags to any image or button that you add to your email. Without the alt tags, your subscribers can miss them and that could cost you a sale.    5. Abide by the CAN-SPAM RulesFinally, the most important piece of advice is to abide by the CAN-SPAM rules. This ensures your email campaigns aren't automatically sent to the spam or junk folder. Some of the various rules mean you need to include easy way to opt out and use clear language in the fields. 5 Top Mailchimp Email Newsletter Trends for 2021What works and what doesn't change all the time in the email marketing world. Make sure you know the latest trends so your email newsletters can stand out. Don't worry, we've done some of that work for you. Here are five trends you should know for Mailchimp email templates in 2021: 1. Use VideosWhether people on your email list do it for information or entertainment, it's almost guaranteed they stream videos online. That's why adding videos to your newsletters is a huge trend this year. Find a Mailchimp template that lets you embed videos for an easy marketing win in 2021.    2. Eye-Catching TypographyFont choice sets the tone for the content in your email newsletter. Be careful with this trend! Not every font is compatible with every email client. Envato Elements offers a variety of font choices. But if you're having trouble finding a fond that's compatible, try Google Fonts. They're web-based and increase compatibility. 3. Added InteractivityNews is usually one-way communication. Someone talks, someone else listens. That's why the trend that's upsetting the status quo in 2021 is making Mailchimp email templates interactive. Make clickable call to actions and images make your readers feel engaged.    4. Design For Dark ModeDark mode has been riding a wave of popularity in recent years. A lot of mobile apps are making dark mode an option. Some email clients are following suit. Keep up with this design trend by making a Mailchimp email design that works for light and dark mode. 5. Keep it NeatMinimal design has been trending for a few years, but it's worth repeating. An organized layout goes a long way. Keep your Mailchimp email templates looking their best with clear subheadings, white space, and media to break up blocks of text.    More Stunning Mailchimp Email Templates for YouIs 33 not enough Mailchimp theme options for you? Envato Tuts+ has your back. We've rounded up another few dozen Mailchimp email templates that you can use for your 2021 campaign:
Where to Find the Best Mailchimp Example Templates in 2021 (Envato Elements vs ThemeForest)Both Envato Elements and ThemeForest have popular Mailchimp campaign examples with high-quality designs. They lead the pack in 2021. But should you use ThemeForest or Envato Elements for Mailchimp email templates? And what are the key benefits of each? 1. Key Benefits of Envato ElementsEnvato Elements is a premium subscription service. It gives you unlimited creative template downloads for a single monthly fee. That's a powerful offer. Download as many Mailchimp campaign example templates as you need. You'll get: web templates, fonts, add-ons, and graphic assets. There are loads of quality Mailchimp campaign example templates available on Envato Elements: 2. Key Benefits of ThemeForest (& Envato Market)ThemeForest is the leading digital marketplace for purchasing single-use graphics and visual assets. It's part of the Envato Market suite of online marketplaces for many creative digital asset needs. Download and pay for each template as you need it without any continuing commitment. When you need a Mailchimp campaign example template head over to ThemeForest to buy and download your files. Here are the best Mailchimp newsletter example templates that are trending on ThemeForest:    Your Choice (What's Right for You?)If you're a digital marketer with many projects, or a graphic or web designer with many clients, then Envato Elements offers a great bang for your money. Sign up for Envato Elements now. Or if you need a Mailchimp newsletter example template to download right now, then head over to ThemeForest to find what you need. Common Email Marketing Questions Answered (FAQ)If you're starting to work with email marketing tools, it's normal to have some doubts. Let's talk about some of the frequently asked questions about this topic. 1. What Is Marketing Automation?Let's begin with the basics. Email marketing is one form of marketing automation. This means the use of apps, software and tools to replace manual marketing tasks with automated processes. Marketing automation has made some tasks easier. But it doesn't mean you forget personalization. Read more about this key part here: 2. What Are the Benefits of Marketing Automation?Marketing automation has plenty of benefits. Here are some of them:
3. Why Should I Use Mailchimp?Mailchimp is a great tool because it's easy to use. It provides clear steps and a simple interface. But the best thing about it? Its free plan allows you to manage 2,000 contact and send up to 10,000 emails per month. That's a great plan for starting businesses. Read more about it here: 4. How Do I Choose an Email Newsletter Template?Mailchimp newsletter templates are a great way to save even more time. Wondering how to choose the best? Here's what you should look out for:
5. What Do I Need to Customize a Newsletter With Mailchimp?You'll need four things to quickly customize your newsletter:
A call to action is what you want your subscribers to do. For example, you want them to visit your website, click for coupons, take a survey, etc. Learn More About Email Marketing and MailchimpI hope you've liked the premium Mailchimp responsive templates and the Mailchimp email design tips and trends. Now, if you'd like to learn more about email marketing, check these helpful resources:
Spice Up Your Email Campaigns in 2021 With Pro Mailchimp TemplatesPremade Mailchimp email templates are the best way to save time and maintain a consistent look and feel for all your email campaigns. Thanks to the drag-and-drop builders that many of these Mailchimp templates use, they're easy to customize. You can even preview them and save them for later use. Browse through our professional Mailchimp template collection on Envato Elements. Or head over to ThemeForest to see even more great email templates with stylish designs. Use them to spice up your 2021 email campaigns. Editorial Note: This post has been updated with contributions from Barni Rajah, Nathan Umoh, Maria Villanueva, and Andrew Childress. Nathan and Maria are staff writers with Envato Tuts+. Barni and Andrew are freelance instructors for Envato Tuts+.  |
| A to Z of Adobe XD: Tips & Tricks! Posted: 08 Jun 2021 03:05 AM PDT Let me show you some rapid tips and tricks for Adobe XD. We'll look at 26 Adobe XD features, tips and tricks from A to Z.    Once you get familiarized with Adobe XD, check out Envato Elements! With one subscription, you'll have unlimited access to millions of creative digital assets such as graphics, Adobe XD fonts, UI kits, and more. One simple commercial licensing that you can cancel at any time! Follow along with us over on our Envato Tuts+ YouTube channel: What You Will Learn:
A is for ArtboardsAn Artboard represents the area where a screen design will be created in Adobe XD. By default, your starting artboard will be white, and you can have multiple artboards in one document. Selecting the Artboard tool from the toolbar or pressing the A hotkey will open a list with the most common mobile, tablet, desktop, and wearables screen sizes in the right sidebar. You can select one of the preset artboards and add the artboard to your design, or you can define your own custom size artboard. Click the name of an Arboard to select it, use the bounding box to scale it or double click the name to rename it.    B is for BordersA Border (stroke) can be applied to any type of object inside an Adobe XD document. Once applied, you can change its color, adjust the style, set the alignment and its thickness, or you can select one of the cap and join border settings. Using the eyedropper tool you can quickly grab a color from your design and use it for the Border.    C is for ComponentsComponents are design elements that can be easily reused across artboards inside Adobe XD documents. The design element that you save as a component becomes the Main Component and is indicated by a green filled diamond in the upper left corner. You can add multiple instances of a component and when you edit the Main Component the rest of the instances modify simultaneously. All your Components are stored inside the Libraries panel which can be easily opened or closed using the icon from the lower left hand corner, or by pressing the Shift + Command + Y keyboard shortcut. Along with colors and characters styles, Adobe XD components are an essential part of any Adobe XD design system.    D is for Desktop PreviewClick the Play button in the upper right corner to open the Desktop Preview window for previewing and interacting with your design. Note: you can only interact with your design after you prototype it. When you get to letter P you'll learn more about prototyping in Adobe XD.    E is for Ellipse ToolGrab the Ellipse tool from your toolbar or use the E hotkey, and then click and drag to create a new ellipse in Adobe XD. To create a perfect circle, hold down the Shift key as you click and drag.    F is for FillA Fill sets the color of a design element in Adobe XD. Clicking the Fill color wheel from the Property inspector will open the color picker window. Using the drop down menu from the top side you can select one of the three Fill types: Solid Color, Linear Gradient or Radial Gradient. The direction of an Adobe XD gradient can be adjusted directly on the artboard using the two end points while the colors of an Adobe XD gradient can be adjusted from the color picker window. Using the eyedropper tool you can quickly grab a color from your design and use it for the Fill.    G is for GridWhenever you select an artboard you get the option to enable the Grid in the Property inspector. Grids can be used to define the main structure of a design and to measure, align or easily create pixel perfect objects. Using the dropdown menu, you can select a Layout Grid or a Square Grid. Depending on the type of grid that you select you will get a list of settings that can be used to adjust the grid. Click the Make Default button to set the current grid settings to be default or click the Use Default button to replace your current grid settings with the default values. A well put together grid can be the perfect start for an Adobe XD wireframe.    H is for Horizontal ScrollingWith Horizontal Scrolling you can set areas from your design to scroll independently from the rest of content. To create this sort of animation in Adobe XD, select the elements that you want to be part of your scrolling area, go to the Property inspector and you will find three scrolling options: Horizontal Scroll, Vertical Scroll or Horizontal & Vertical Scroll. Once you select the desired scrolling option, you can adjust the size of that scroll area directly on the artboard using the blue handles.    I is for InteractionsInteractions are an essential component when you prototype a design and are used to define triggers and actions to make your design interactive. You can find all the settings in the Property inspector and keep in mind that you can only access them when you are in Prototype mode.    J is for JoinsJoins affect the corner points of a border. Depending on the type of Join that you select from the Property inspector, you can make the corners appear sharp (Miter Join), rounded (Round Join), or squared (Bevel Join).    K is for Command + KUsing this Adobe XD shortcut you can save your selected element as an Adobe XD component. This first instance will be your Main Component which means that the rest of the instances will adjust their appearance depending on this Main Component.    L is for LayersLayers are a fundamental component because any object that you create in Adobe XD is a layer. Your layers are stacked on top of each other, and the visibility on your artboard is determined by their location in the Layers panel. The Layers panel can be opened or closed using the Layers panel icon from the lower left hand corner, or by pressing the Command + Y keyboard shortcut.    M is for MaskingMasking gives you the possibility to hide parts of your design elements in Adobe XD. To mask in Adobe XD, select your layer along with the one that you wish to act as the mask, right-click your selection and go to Mask with Shape. Alternatively you can use the Shift + Command + M keyboard shortcut. This will mask your layer and create a mask group inside the Layers panel. To edit a masked group, double-click it and this will allow you adjust the masked layer or the mask. To disable a mask in Adobe XD, right-click on it and go to Ungroup Mask or press Shift + Command + G.    N is for Command + NUse this Adobe XD shortcut to open the Adobe XD Welcome Screen where you can create a new document, open one of your recent designs, learn new things about Adobe XD, or explore your shared documents. 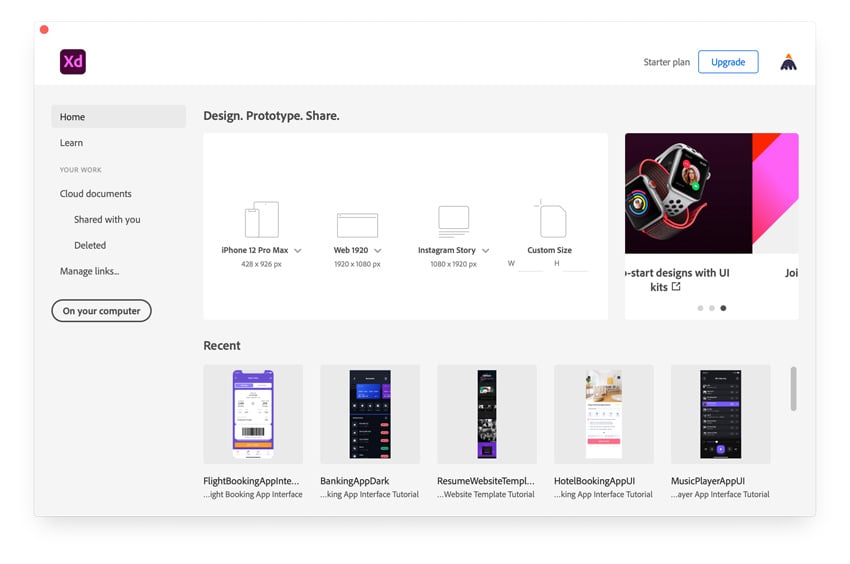   O is for OpacityOpacity give you the possibility to adjust the transparency of any layer in Adobe XD. 100% is the default value which makes your layer fully visible, while at 0% your layer is completely invisible.    P is for PrototypeAdobe XD Prototype allows you to visualize how users will experience your app or website. To built your own prototype, first you need to switch to Prototype mode. Click the Prototype button from the top-left corner and then you will be able to connect the artboards from your project, choosing the trigger, the action or the Adobe XD animations that works with your design. When your prototype is done you preview your Adobe XD animation using the Desktop Preview button.    Q is for Command + QUse this classic Adobe XD shortcut whenever you wish to quickly quit Adobe XD.    R is for Repeat GridWith Repeat Grid, you can easily repeat an element from your Adobe XD design. This can be a real time saver when you need to create a list or a row of elements that have the same size. To create a repeat grid, select the element that you want to repeat and click the Repeat Grid button from the Property inspector. Using the green handles on your artboard you can easily adjust the size of the grid and as you hover over the area between the elements you can adjust the horizontal or the vertical spacing.       S is for StacksStacks enable elements within a group to have defined spacing between them. In order to create a stack, first you need to group the elements that you want to be stacked. Select your group and focus on the Property inspector. Make sure Responsive Resize is enabled and then check the Stack box. Adobe XD will check your design and decide which type of stack fits your need: Horizontal or Vertical. Once created, you can change the type of your stack or you can adjust the spacing or the padding for the elements inside your stack. Resize or reorder an element within a stack and the rest of the elements will move to preserve the predefined spacing settings.    T is for TextGrab the Text tool or use the T hotkey whenever you wish to add text in Adobe XD. Once you click on your artboard you can type in new text. You can select your Adobe XD font and set the rest of settings in the Property inspector.    U is for Command + Option + UUse this Adobe XD shortcut to perform the Add boolean operation which will unite selected objects. Besides Add you have another three boolean operations that can be used to combine selected shapes in Adobe XD:
      V is for Move ToolThe V hotkey gives you the Move tool which can be used mainly to select and move objects on the artboard. Using this same tool, you can double-click a piece of text if you wish to edit it or you can double click a group of shapes if you wish to select a specific object inside that group.    W is for Command + WUse this classic Adobe XD shortcut whenever you wish to close your current Adobe XD document.    X is for Command + XUse this classic Adobe XD shortcut whenever you wish to Cut an object from your design.    Y is for Polygon ToolThe Y hotkey gives you the Polygon tool which can be used to create stars, triangles, rhombuses, pentagons, hexagons, and so on. Hold down the Shift key as you click and drag to create an equilateral shape. Press the up and down arrow keys while you click and drag to increase or decrease the number of sides, or press the left and right arrow keys while you click and drag to turn the polygon into a star shape. A shape created using the Polygon tool can also be edited from the Property inspector.    Z is for Zoom ToolThe Z hotkey gives you the Zoom tool which can be used to zoom in or out. Click anywhere on your artboard to zoom in, or click and drag to define the area on which you wish to zoom. To zoom out, hold down the Option key and click anywhere on the artboard.    Ready to Try More Adobe XD Tutorials?Awesome! So now that we have gone through the A to Z of Adobe XD, why not move to the next level and try one of the more in depth tutorials on Envato Tuts+. You can learn how to create a wireframe in Adobe XD, and how to use all the presented features to build your own design. Whether you're working on an Adobe XD design system or you just want to learn more, Envato Tuts+ has you covered!
 |
| 25+ Best Free Calligraphy Fonts (Free Downloads) Posted: 08 Jun 2021 01:31 AM PDT Whether you're creating wedding stationery or any other type of high-end design, free calligraphy fonts are a great asset for your creative toolbox.    Check out this list of the 25+ best free calligraphy fonts, as well as a selection of premium fonts you can find at Envato Elements. Unlimited Calligraphy Font Downloads at Envato ElementsFree calligraphy script fonts are great, but they often come with complicated licensing restrictions that can limit what you're able to use them for. Fortunately, there's a way for you to access top-quality calligraphy fonts, without blowing your budget. Envato Elements gives you unlimited font downloads for a single low monthly fee.    And as well as fonts, you can also choose from millions of photos, logos, mockups, and much more. One fee for unlimited downloads, and no catches. Here are some examples of what you can find on Envato Elements. 12+ Best Calligraphy Fonts From Envato Elements1. Lucinda Script (OTF)   Look at the elegant swirls and flourishes on Lucinda Script, a beautiful, modern calligraphy font that you can use for wedding invitations, letterhead, posters, and more. Download it today, and give your next project a touch of class. 2. La Provence Calligraphy Font Download (TTF)   Ah, spring in Provence! Channel the vibes of beautiful blue skies and fields of lavender with this ornate calligraphy font. You get uppercase and lowercase characters, as well as multilingual glyphs. 3. Inspiration Hand Drawn Calligraphy Font (TTF, OTF, WOFF)How's this for inspiration? This modern display font offers plenty of whirls and flourishes to make your text stand out from the crowd. It's perfect for wedding invitations, table cards, quotes, social media banners, and more. 4. Jasmitha Script (OTF)   Even some of the best free calligraphy fonts can be hard to read, but Jasmitha is a clear, legible option. You get the dynamic, flowing script of a calligraphy font, but with a simplicity that makes it ideal for larger amounts of text. 5. Quintessa Calligraphy Typeface (OTF, TTF)   Or try Quintessa, a hand-lettered calligraphic font with the look of an ink brush. It comes with uppercase and lowercase characters, numerals, and basic punctuation, and would be ideal for logos, invitations, greeting cards, and more. 6. Amelina Script (OTF)   Now we move from thick ink brushstrokes to fine, elegantly drawn lines. Amelina Script is a beautiful calligraphic typeface that you can use for wedding invitations, signage, or other situations in which you need something special. 7. Emellie Script Font (OTF, WOFF)   Try Emellie if you're looking for a stylish calligraphic typeface with fun swashes. It's perfect for logos, wedding stationery, and more, and it comes with standard Latin characters, uppercase alternates, initial and terminal forms, numbers and symbols, extended Latin characters, and select ligatures. That's a lot of versatility for your next project! 8. Fabulous Script (OTF)   Check out the stylish calligraphic flourishes in this typeface. Fabulous Script would make a wonderful signature, invitation, logo, etc. Use the wide selection of alternates in any program that supports OpenType features. 9. Natalia Script Calligraphy Font (OTF)   The best calligraphy fonts incorporate the mix of thick and thin strokes that's a common characteristic of calligraphy. Natalia Script is a great showcase for this style, so why not download it and try it out? 10. Murchison Script (OTF)   Or try Murchison Script to see another characteristic of calligraphy: those extravagant flourishes around the text. You could spend years learning hand lettering to create a style like this—or you could just download Murchison Script! 11. Neermias Modern Calligraphy Font (OTF, TTF)   Here's a simple and elegant calligraphic font to try. Neermias Modern is perfect for fashion brands, interior design, and other similar businesses. It comes with uppercase and lowercase characters, numerals, punctuation, and symbols. 12. Revallyna Script (OTF, TTF)   Try this fresh, modern calligraphy script, with its decorative characters and bouncing baseline! With 320 glyphs and a wide selection of stylistic sets, contextual alternates, and ligatures, you'll have all the options you need to create one-of-a-kind titles and text! 13. Kexman Script Font (OTF)   I'm not sure which looks better: the font or the chocolate muffin. Either way, Kexman is a great option if you're looking for calligraphy font downloads with plenty of ligatures, alternates, and swashes to help you sculpt the perfect text. 14. Toscana Font (TTF)   We visited Provence earlier, so let's drop in on Tuscany now. Toscana Font is a handmade calligraphic typeface that includes uppercase and lowercase characters, with the decorative alternates you've come to expect by now from these premium calligraphy fonts. 25+ Best Free Calligraphy Fonts to DownloadAs you can see, premium fonts have a lot to offer. But if you're on a very tight budget and need to find calligraphy fonts for free download, you can find some high-quality free calligraphy script fonts on Envato Elements. And below you'll find a selection of some more free fonts available online. 1. Stylish Calligraphy Font   This is certainly a stylish calligraphy font to use in your next project. One thing to watch out for with free calligraphy fonts, however, is the usage rights. This one is free for personal use, but you'll need to pay for a commercial license. 2. Lemon Splash Script FontLemon Splash is a stylish offering from Envato. It boasts uppercase and lowercase characters, ligatures, stylistic set, and multilingual support. This free calligraphy fonts download comes in TTF format and would be a great addition to your font library! 3. HardtrackIf you want to send loving messages that leave an impression, try Hardtrack. This calligraphy script font has a handwritten style. It's a nice visual touch that adds a personal feel to your text. 4. Lovely Home Font   Want to know how to get those lovely ending swashes? It's as simple as typing ">" after the word. Download this modern calligraphy font free, and see how it works! An excellent choice if you're looking for a free wedding calligraphy font. 5. Australia Font   Envato is based in Melbourne, so this free brush calligraphy font is dear to our hearts. Beyond the name, though, it also has lots to offer, so why not take those stylish characters and dancing baseline for a spin? 6. Diettersen Free Calligraphy FontDiettersen is another free brush calligraphy font that's definitely worth checking out. It's fun, creative, and stylish. Use this modern calligraphy font free download for stationery, social media messages, and a lot more. 7. Ester-Clark Free Calligraphy Font DownloadEster-Clark is a free brush calligraphy font that's made with a handmade lettering style. It's easy to install and can be used in a wide range of programs. 8. Generating Script   "Generating Script" sounds like a message that would come up on your computer as it's processing. But in fact, it's a fun handwritten typeface that will give your text a wonderfully creative appeal. 9. Amalfi Coast   If you're on the hunt for the best free wedding calligraphy fonts, Amalfi Coast would be a great option. It has that elegance and style you need—but, again, just make sure you comply with the licensing terms. 10. La Pimienta Free Calligraphy FontLa Pimienta is one of the best free calligraphy fonts out there. With its creative hand-lettering style, it would be great for stationery, logos, invitations, and more. 11. FREE | Lovely Yollandy Script Font   Lovely Yollandy is a stylish, modern calligraphy font, free to download for personal use. It's a beautiful typeface that offers lots of possibilities, so why not give it a try? 12. FREE | Asmirandah Modern Script   When it comes to free calligraphy fonts with glyphs, Asmirandah is right up there among the best. This free calligraphy script includes a full set of uppercase and lowercase letters, multilingual symbols, numerals, punctuation, and ending lowercase swashes. 13. SOUTHAMPTON SIGNATURE - FREE SCRIPT FONT   One thing that all the best free calligraphy fonts have in common is an effortless style. Southampton is a beautifully designed typeface that will give a touch of class to your logos, stationery, labels, and more. Unfortunately, it also shares another common characteristic of free calligraphy fonts: it's only free for personal use. 14. Free Style // Arabic Calligraphy   We've been focusing mostly on English-language calligraphy styles in this article, but Arabic calligraphy has a long and distinguished tradition, which you can learn more about in Joumana Medlej's excellent series of tutorials. But you can also find Arabic calligraphy fonts for free download, like this one, which will give you a great taste of what's possible. 15. Sophan Free Calligraphy Font DownloadHow is this modern calligraphy font free for personal and commercial use? It's so beautifully designed, and it includes plenty of style. Try this free calligraphy script typeface if you want an option that's both elegant and fun. 16. Free Font: Austral   On the other hand, if you want a modern calligraphy font free to download, then Austral is a great option. It's a stylish display font for a whole range of uses. 17. MINDFULLY - FREE FONT   Mindfully stands out among the best free calligraphy fonts because it's free both for personal and commercial use. It also comes with four different versions, as well as ligatures, numbers, punctuation, and multi-language support. Try it if you've been hunting for calligraphy fonts for free download. 18. Brilganttyne Script (Free)   Your search for free wedding calligraphy fonts just ended! Brilganttyne is a romantic typeface that would look great on invitations, place cards, or anywhere else where you need some elegance and style. It includes punctuation, accents, ligatures, and more. 19. SALTED MOCHA - FREE BRUSH FONT   Try Salted Mocha, a free brush calligraphy font designed by Stephanie Arsenault. It's fun and playful, and best of all, it's free for personal and desktop commercial use. 20. Mollysh Free Script FontHere's a free brush calligraphy font that's good for personal and desktop commercial use. Mollysh has a unique name with an even more unique look. Few free calligraphy fonts can match its style. 21. Nicoline Free Script FontNicoline is a great example of free calligraphy fonts with glyphs. It's sophisticated and graceful, and it comes with upper and lowercase letters, as well as numbers. 22. FREE | Summer Miracle Modern Handwritten Font   "Summer" and "miracle" are two words that definitely belong together. This is a great, contemporary calligraphy font that will give any project a creative vibe! 23. Sally Morrison Free Script FontLooking for a modern calligraphy font free to download? Try Sally Morrison, a lovely brush calligraphy typeface that looks as if it was handwritten. 24. Outeris Free Handwritten Script FontOuteris is a stylish modern calligraphy font free to download and use. It includes a full set of upper and lowercase letters that you can add to just about any creative project. 25. TAHU! - FREE SCRIPT FONT   Here's another of the calligraphy fonts for free download. Tahu is an energetic, stylish typeface that you can use for advertising, logos, branding, and more—yes, it's free for commercial use too! Even More Fantastic Calligraphy Fonts From Envato ElementsAs you've seen above, you're not going to run out of options for awesome calligraphy fonts anytime soon. So if you're looking for more professionally designed typefaces, check out these ten from Envato Elements: 1. Badegan Calligraphy (OTF, TTF, EOT, SVG, WOFF, WOFF2)   Badegan is a modern calligraphy script font with lots of character. Actually, it also has lots of characters, with more than 370 included glyphs. Use this elegant typeface for invitations, posters, and more. There are also web font files in this download, making Badegan highly versatile. 2. Designest Calligraphy (OTF, TTF, WOFF, WOFF2)   Here's a simple, elegant typeface that leaves an impression. Designest features beautiful swashes and ligatures that make every letter look special. This calligraphy font download also has multilingual support and alternate characters that work for many different uses. 3. Alyssa Calligraphy (OTF, TTF)   Are you looking for a calligraphy font that looks more handmade? Then you'll love the style of Alyssa. Each character has a unique style that flows thanks to the nice ligatures. Craft a trendy flyer, magazine cover, and more with this typeface. 4. Refillia Calligraphy (OTF, TTF)   Here's a cool calligraphy typeface that radiates warmth. Refillia features both upper and lowercase letters, along with numbers, punctuation, and multilingual glyphs. Try it out for book covers, social media posts, or other projects. 5. Madelican Calligraphy (OTF, TTF, WOFF)   Madelican has a truly unique and modern approach to calligraphy. It draws inspiration from Italy and ancient manuscripts. The results are elegant and can be used to show your creativity. With up to 16 stylish alternates and multilingual support, Madelican can be enjoyed by almost any audience. 6. Bridgesty: Modern Calligraphy (OTF, TTF)   The bouncy, fun nature of Bridgesty's glyphs makes this font an instant eye-catcher. Thanks to the thin lines of the calligraphy lettering, there's also an elegance to this font download. It also includes:
7. Monogram Calligraphy (OTF)   Here's a useful calligraphy font pack that's perfect for your projects. Monogram features special characters in each of its files that you can mix and match for stunning results. Design art for the home, wedding invitations, and a whole lot more with Monogram. 8. Endestry Modern Calligraphy (OTF, TTF, WOFF)   Endestry's claim to be a sweet modern calligraphy typeface rings true from just a single look. It has wonderful script lettering and ligatures. You can use it in popular programs like Photoshop and InDesign, as well as online. 9. Hastagram: Calligraphy Font (OTF, TTF, WOFF)   Try out the inspired Hastagram if you want to lend a unique look to your creative projects. The versatile font files install easily and work in a variety of programs. Whether you're working on making postcards or product packaging, you'll want to try Hastagram. 10. Schatell: Modern Calligraphy (OTF, TTF)   We round out our list of calligraphy script font downloads with Schatell. It has a nice style that's perfect for logos, posters, and a lot more. Along with smart ligatures, Schatell includes:
Choose Your Favourite Calligraphy Font TodayAs you've seen in this article, there are plenty of wonderful calligraphy fonts for free download. But if you're looking for the best of the best, we recommend the premium calligraphy fonts on Envato Elements. You get to download and use as many fonts as you want, with a simple, broad commercial license—and you also get unlimited downloads of photos, logos, and millions of other creative assets. Check out these really helpful articles below for more excellent font resources:
 |


.jpg)
.jpg)


.jpg)
.jpg)


| You are subscribed to email updates from Envato Tuts+ Tutorials. To stop receiving these emails, you may unsubscribe now. | Email delivery powered by Google |
| Google, 1600 Amphitheatre Parkway, Mountain View, CA 94043, United States | |


0 Comments